![]()
![]()
![]()
![]() ®
®
066600350 1 Copyright© 2004 CAT EYE Co., Ltd.
A
D
C
B
E
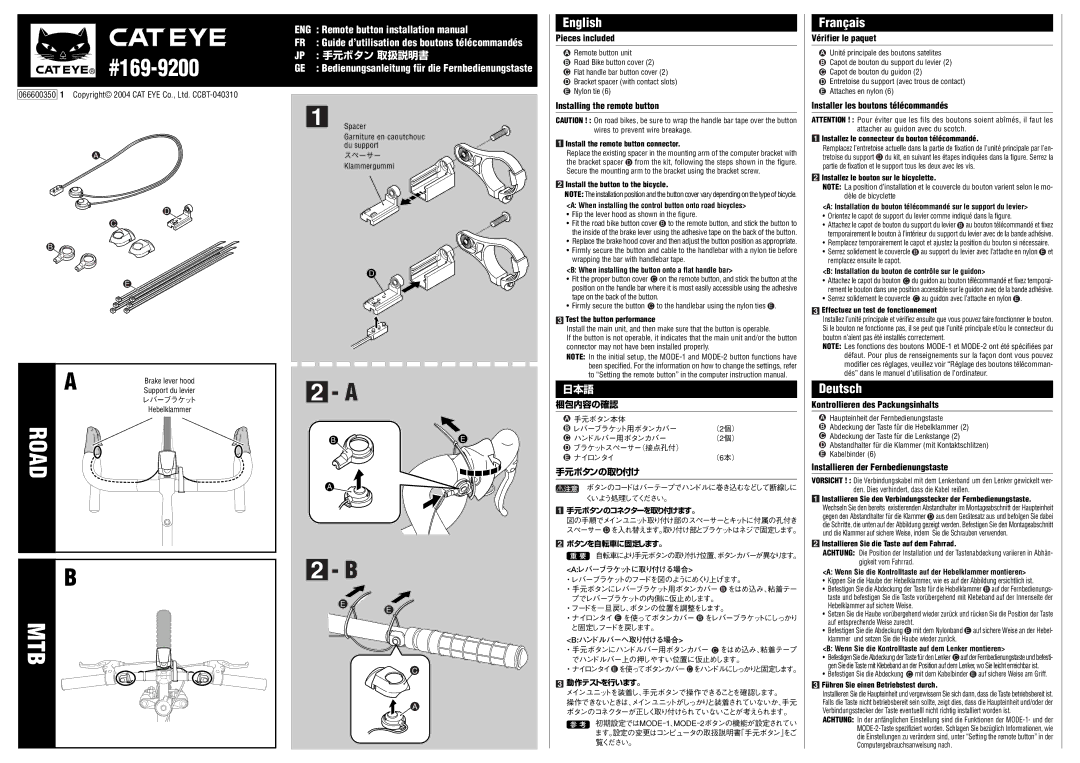
A | Brake lever hood |
Support du levier | |
| レバーブラケット |
| Hebelklammer |
ROAD
B |
MTB |
ENG | : Remote button installation manual |
FR | : Guide d’utilisation des boutons télécommandés |
JP | : 手元ボタン 取扱説明書 |
GE | : Bedienungsanleitung für die Fernbedienungstaste |
1 Spacer
Garniture en caoutchouc du support
スペーサー
Klammergummi
D
2- A
BE
A
2- B
E
E
C
![]() A
A
English
Pieces included
ARemote button unit
BRoad Bike button cover (2)
CFlat handle bar button cover (2)
DBracket spacer (with contact slots)
ENylon tie (6)
Installing the remote button
CAUTION ! : On road bikes, be sure to wrap the handle bar tape over the button wires to prevent wire breakage.
 Install the remote button connector.
Replace the existing spacer in the mounting arm of the computer bracket with the bracket spacer D from the kit, following the steps shown in the figure. Secure the mounting arm to the bracket using the bracket screw.
![]() Install the button to the bicycle.
Install the button to the bicycle.
NOTE: The installation position and the button cover vary depending on the type of bicycle.
<A: When installing the control button onto road bicycles>
•Flip the lever hood as shown in the figure.
•Fit the road bike button cover B to the remote button, and stick the button to the inside of the brake lever using the adhesive tape on the back of the button.
•Replace the brake hood cover and then adjust the button position as appropriate.
•Firmly secure the button and cable to the handlebar with a nylon tie before wrapping the bar with handlebar tape.
<B: When installing the button onto a flat handle bar>
•Fit the proper button cover C on the remote button, and stick the button at the position on the handle bar where it is most easily accessible using the adhesive tape on the back of the button.
•Firmly secure the button C to the handlebar using the nylon ties E .
 Test the button performance
Install the main unit, and then make sure that the button is operable.
If the button is not operable, it indicates that the main unit and/or the button connector may not have been installed properly.
NOTE: In the initial setup, the
日本語
梱包内容の確認
A手元ボタン本体
B レバーブラケット用ボタンカバー | (2個) |
C ハンドルバー用ボタンカバー | (2個) |
Dブラケットスペーサー(接点孔付)
E ナイロンタイ | (6本) |
手元ボタンの取り付け
![]() 注意 ボタンのコードはバーテープでハンドルに巻き込むなどして断線しに くいよう処理してください。
注意 ボタンのコードはバーテープでハンドルに巻き込むなどして断線しに くいよう処理してください。
手元ボタンのコネクターを取り付けます。
図の手順でメインユニット取り付け部のスペーサーとキットに付属の孔付き スペーサー D を入れ替えます。取り付け部とブラケットはネジで固定します。
ボタンを自転車に固定します。
重 要 自転車により手元ボタンの取り付け位置、ボタンカバーが異なります。
<A:レバーブラケットに取り付ける場合>
・レバーブラケットのフードを図のようにめくり上げます。
・手元ボタンにレバーブラケット用ボタンカバー B をはめ込み、粘着テー
プでレバーブラケットの内側に仮止めします。 ・フードを一旦戻し、ボタンの位置を調整をします。
・ナイロンタイ E を使ってボタンカバー B をレバーブラケットにしっかり と固定しフードを戻します。
<B:ハンドルバーへ取り付ける場合>
・手元ボタンにハンドルバー用ボタンカバー C をはめ込み、粘着テープ
でハンドルバー上の押しやすい位置に仮止めします。
・ナイロンタイ E を使ってボタンカバー C をハンドルにしっかりと固定します。
動作テストを行います。
メインユニットを装着し、手元ボタンで操作できることを確認します。
操作できないときは、メインユニットがしっかりと装着されていないか、手元 ボタンのコネクターが正しく取り付けられていないことが考えられます。 参 考 初期設定ではMODE‐1、MODE‐2ボタンの機能が設定されてい
ます。設定の変更はコンピュータの取扱説明書「手元ボタン」をご 覧ください。
Français
Vérifier le paquet
AUnité principale des boutons satelites
BCapot de bouton du support du levier (2)
CCapot de bouton du guidon (2)
DEntretoise du support (avec trous de contact)
EAttaches en nylon (6)
Installer les boutons télécommandés
ATTENTION ! : Pour éviter que les fils des boutons soient abîmés, il faut les attacher au guidon avec du scotch.
1Installez le connecteur du bouton télécommandé.
Remplacez l’entretoise actuelle dans la partie de fixation de l’unité principale par l’en- tretoise du support D du kit, en suivant les étapes indiquées dans la figure. Serrez la partie de fixation et le support tous les deux avec les vis.
2Installez le bouton sur le bicyclette.
NOTE: La position d’installation et le couvercle du bouton varient selon le mo- dèle de bicyclette
<A: Installation du bouton télécommandé sur le support du levier>
•Orientez le capot de support du levier comme indiqué dans la figure.
•Attachez le capot de bouton du support du levier B au bouton télécommandé et fixez temporairement le bouton à l’intérieur du support du levier avec de la bande adhésive.
•Remplacez temporairement le capot et ajustez la position du bouton si nécessaire.
•Serrez solidement le couvercle B au support du levier avec l’attache en nylon E et remplacez ensuite le capot.
<B: Installation du bouton de contrôle sur le guidon>
•Attachez le capot du bouton C du guidon au bouton télécommandé et fixez temporai- rement le bouton dans une position accessible sur le guidon avec de la bande adhésive.
•Serrez solidement le couvercle C au guidon avec l’attache en nylon E .
3Effectuez un test de fonctionnement
Installez l’unité principale et vérifiez ensuite que vous pouvez faire fonctionner le bouton. Si le bouton ne fonctionne pas, il se peut que l’unité principale et/ou le connecteur du bouton n’aient pas été installés correctement.
NOTE: Les fonctions des boutons
Deutsch
Kontrollieren des Packungsinhalts
AHaupteinheit der Fernbedienungstaste
BAbdeckung der Taste für die Hebelklammer (2)
CAbdeckung der Taste für die Lenkstange (2)
DAbstandhalter für die Klammer (mit Kontaktschlitzen)
EKabelbinder (6)
Installieren der Fernbedienungstaste
VORSICHT ! : Die Verbindungskabel mit dem Lenkerband um den Lenker gewickelt wer- den. Dies verhindert, dass die Kabel reißen.
1Installieren Sie den Verbindungsstecker der Fernbedienungstaste. Wechseln Sie den bereits existierenden Abstandhalter im Montageabschnitt der Haupteinheit gegen den Abstandhalter für die Klammer D aus dem Gerätesatz aus und befolgen Sie dabei die Schritte, die unten auf der Abbildung gezeigt werden. Befestigen Sie den Montageabschnitt und die Klammer auf sichere Weise, indem Sie die Schrauben verwenden.
2Installieren Sie die Taste auf dem Fahrrad.
ACHTUNG: Die Position der Installation und der Tastenabdeckung variieren in Abhän- gigkeit vom Fahrrad.
<A: Wenn Sie die Kontrolltaste auf der Hebelklammer montieren>
•Kippen Sie die Haube der Hebelklammer, wie es auf der Abbildung ersichtlich ist.
•Befestigen Sie die Abdeckung der Taste für die Hebelklammer B auf der Fernbedienungs- taste und befestigen Sie die Taste vorübergehend mit Klebeband auf der Innenseite der Hebelklammer auf sichere Weise.
•Setzen Sie die Haube vorübergehend wieder zurück und rücken Sie die Position der Taste auf entsprechende Weise zurecht.
•Befestigen Sie die Abdeckung B mit dem Nylonband E auf sichere Weise an der Hebel- klammer und setzen Sie die Haube wieder zurück.
<B: Wenn Sie die Kontrolltaste auf dem Lenker montieren>
•Befestigen Sie die Abdeckung der Taste für den Lenker C auf der Fernbedienungstaste und befesti- gen Sie die Taste mit Klebeband an der Position auf dem Lenker, wo Sie leicht erreichbar ist.
•Befestigen Sie die Abdeckung C mit dem Kabelbinder E auf sichere Weise am Griff.
3Führen Sie einen Betriebstest durch.
Installieren Sie die Haupteinheit und vergewissern Sie sich dann, dass die Taste betriebsbereit ist. Falls die Taste nicht betriebsbereit sein sollte, zeigt dies, dass die Haupteinheit und/oder der Verbindungsstecker der Taste eventuelll nicht richtig installiert worden ist.
ACHTUNG: In der anfänglichen Einstellung sind die Funktionen der