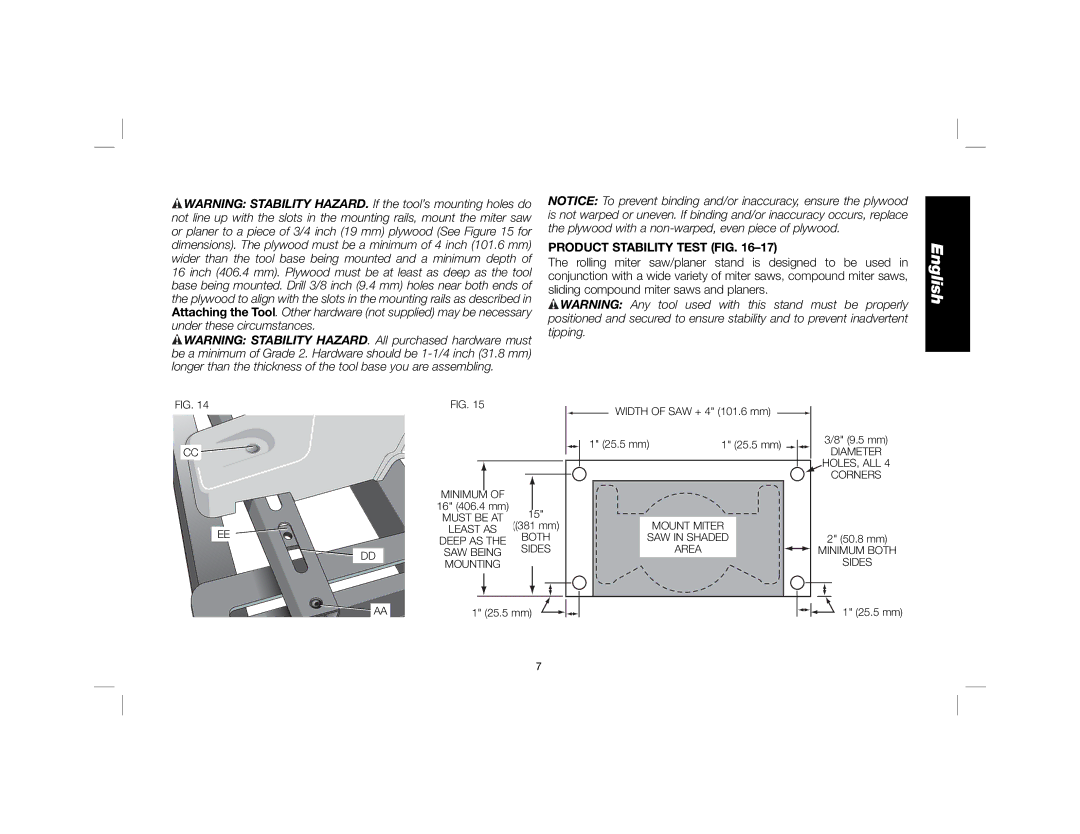
![]() WARNING: STABILITY HAZARD. If the tool’s mounting holes do not line up with the slots in the mounting rails, mount the miter saw or planer to a piece of 3/4 inch (19 mm) plywood (See Figure 15 for dimensions). The plywood must be a minimum of 4 inch (101.6 mm) wider than the tool base being mounted and a minimum depth of 16 inch (406.4 mm). Plywood must be at least as deep as the tool base being mounted. Drill 3/8 inch (9.4 mm) holes near both ends of the plywood to align with the slots in the mounting rails as described in Attaching the Tool. Other hardware (not supplied) may be necessary under these circumstances.
WARNING: STABILITY HAZARD. If the tool’s mounting holes do not line up with the slots in the mounting rails, mount the miter saw or planer to a piece of 3/4 inch (19 mm) plywood (See Figure 15 for dimensions). The plywood must be a minimum of 4 inch (101.6 mm) wider than the tool base being mounted and a minimum depth of 16 inch (406.4 mm). Plywood must be at least as deep as the tool base being mounted. Drill 3/8 inch (9.4 mm) holes near both ends of the plywood to align with the slots in the mounting rails as described in Attaching the Tool. Other hardware (not supplied) may be necessary under these circumstances.
![]() WARNING: STABILITY HAZARD. All purchased hardware must be a minimum of Grade 2. Hardware should be
WARNING: STABILITY HAZARD. All purchased hardware must be a minimum of Grade 2. Hardware should be
NOTICE: To prevent binding and/or inaccuracy, ensure the plywood is not warped or uneven. If binding and/or inaccuracy occurs, replace the plywood with a
PRODUCT STABILITY TEST (FIG. 16–17)
The rolling miter saw/planer stand is designed to be used in conjunction with a wide variety of miter saws, compound miter saws, sliding compound miter saws and planers.
![]() WARNING: Any tool used with this stand must be properly positioned and secured to ensure stability and to prevent inadvertent tipping.
WARNING: Any tool used with this stand must be properly positioned and secured to ensure stability and to prevent inadvertent tipping.
English
FIG. 14 | FIG. 15 |
| |
CC |
|
| |
| MINIMUM OF |
| |
| 16" (406.4 mm) | 15" | |
| MUST BE AT | ||
| ((381 mm) | ||
EE | LEAST AS | BOTH | |
DEEP AS THE | |||
| SIDES | ||
DD | SAW BEING | ||
| |||
MOUNTING |
| ||
|
| ||
AA | 1" (25.5 mm) | ||
WIDTH OF SAW + 4" (101.6 mm)
1" (25.5 mm) | 1" (25.5 mm) |
| MOUNT MITER |
SAW IN SHADED | |
| AREA |
3/8" (9.5 mm)
DIAMETER
HOLES, ALL 4
CORNERS
2" (50.8 mm)
MINIMUM BOTH
SIDES
1" (25.5 mm)
7