Sherwood SD-860 manual When selecting the Speaker Distance, When selecting the preferred unit

Page 40

Continued

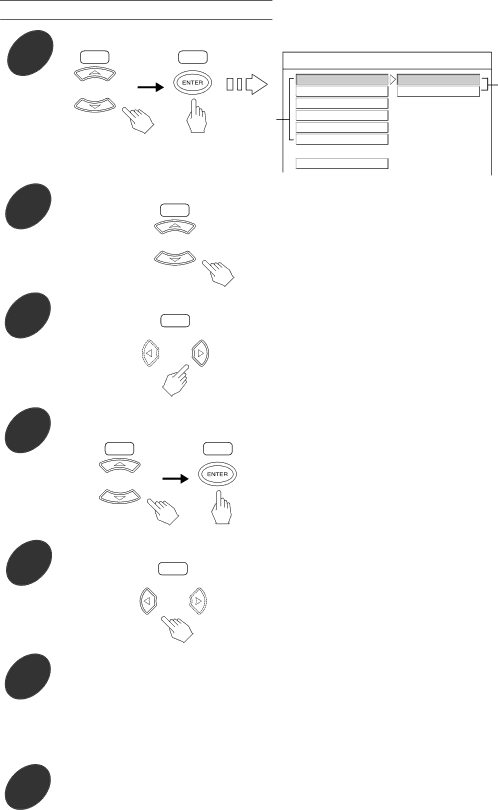
When selecting the SPEAKER DISTANCE

1

Press the CURSOR /

buttons to select the SPEAKER DISTANCE, then press the ENTER button.

RC

RC

SPEAKER DISTANCE


UNIT

METERS


FRONT L

Setting menu


FEET


CENTER


Item

FRONT R


SURROUND R


menu


SURROUND L


SPEAKER SETUP


2

3

Press the CURSOR / buttons to select the preferred item.

RC

• Then the setting menu of the selected item is displayed.

Press the CURSOR button to select the setting menu.

RC

• Each time the CURSOR or button is pressed, the setting menu or the item menu is selected.

4

5

Press the CURSOR / buttons to select the

preferred setting, then press the ENTER button.

RC

RC

Press the CURSOR button to select the item menu.

When selecting the preferred unit,

You can select either METERS or FEET.

Once a unit is selected, the distances are automatically changed in the selected unit.

When setting the distance

You can set the distance within the range of 1.5~9.0 meters

in 0.3 meter intervals(or 5~30 feet in 1 feet intervals)

Note : You cannot select the subwoofer and speakers set to NONE.

RC

• Each time the CURSOR or button is pressed, the item menu or the setting menu is selected.

6

7

Set other speakers to preferred distances.

To return to the speaker setup menu screen

• Press the CURSOR button to select the item menu, press the CURSOR / buttons to select “SPEAKER SETUP” and press the ENTER button.

Then the speaker setup menu screen will be displayed.

When the RETURN button is pressed, the speaker setup menu screen will be displayed, too. Set other setups to your preference.

40

Image 40
Contents SD-860 Introduction Read this Before Operating Your UnitSafety Instructions For Your Safety Contents Connecting to A/V Amplifier or Receiver System ConnectionsConnecting 5.1CH Audio OUTPUTs Connecting 2CH Audio OUTPUTsConnecting Digital OUTPUTs Audio output from the unit’s Digital OUTPUTsConnecting Composite Video OUTPUTs 1 Connecting S-VIDEO OUTPUTs 1Connecting Component Video OUTPUTs Connecting DIGI-LINK jackConnecting to TV with Audio and Video INS Connecting to TV with Scart CONNECTORRegional OptionRemote Controls Front Panel & Remote ControlsFront Panel Controls Remote Control Operation Range Loading Batteries Fluorescent DisplaySymbol about Invalid Operation Preliminary Knowledge About DiscsPlayable Disc Types Region CodeCare and Handling of Discs Audio and Video FilesDivX Before starting playback OperationsPreparations To start playback from the menu of DVD To stop playback and return to the menu displayTo select a playback area / layer To stop playback To pause playbackFrame advance playback To select a title/group during playbackTo skip ahead or back during playback Rapid playback during playbackSlow playback To select a page during playbackBonus group playback Adjusting the brightness of the fluorescent displayAchieving higher purity of sound quality Displaying Disc Information During Playback To display additional information on a fileWhen clearing the numbers entered before playback When entering title, chapter, group, track numberWhen entering the elapsed time When using a DVD menu When using a title menuPlaying a Specific Item Repeating a chapter/track, title/group Repeat PlaybackRepeating a file, folder Playing TRACKS/FILES in Random Order Repeating the desired partClearing the programmed tracks To clear one by one Playing Tracks in Desired OrderTo clear all programmed tracks Storing a bookmark in the memory Bookmark PlaybackRecalling a bookmarked scene/point Changing the Audio Language Changing the Subtitle LanguageZooming IN/OUT a Scene Changing the Camera AngleTo select a zoom scale Changing the Video Signal Format Changing the Component Video Output SignalInitial Settings Setting the Language Setup To return to the main setup menu screen When selecting OthersWhen selecting the TV Display Setting the Video SetupWhen selecting the TV Type When selecting the Scart VIDEORegional Option When selecting the Video OutputWhen selecting the Picture Mode When selecting the Black Level When selecting the Digital Output Setting the Audio SetupWhen selecting the Downmix When selecting the Dolby PRO Logic When selecting the Audio DRCSetting the Speaker Setup When selecting the Speaker ConfigurationAbout speaker size To return to the speaker setup menu screenAbout crossover frequency When selecting the Speaker Distance When selecting the preferred unitWhen setting the distance To return to the speaker setup menu screenWhen selecting the Channel Level Channel LevelEach speaker is heard to be equally loud When selecting the Captions When selecting the Screen SaverWhen selecting the Background When selecting the Angle MarkWhen selecting the Sacd Area When selecting the DVD Audio AreaWhen selecting the OSD When selecting the Parental Control Press the Cursor Buttons to select the Parental ControlWhen selecting the Password When selecting the Divx VOD When selecting the Defaults Press the Cursor / buttons to select the DefaultsDefinition Of Terms Interlaced scan Progressive scanComposite video VideoTroubleshooting Guide Problem Possible Cause RemedySpecifications Sacd 2 Hz~100 kHzWow and flutter Unmeasurable less than ±0.002 % DVD / DivX Mpeg 2 / MpegDVD Language Code List Code LanguageDVD-VIDEO / Audio & Sacd Player

SD-860 specifications

The Sherwood SD-860 is an innovative stereo receiver that offers a versatile audio solution for both casual listeners and dedicated audiophiles. Known for its blend of functionality and modern design, the SD-860 provides a wealth of features aimed at enhancing the listening experience.

One of the standout characteristics of the Sherwood SD-860 is its robust power output. With a high wattage rating, it delivers clear and powerful sound across multiple channels, making it suitable for various speaker setups. Whether you’re connecting bookshelf speakers or a full home theater system, the SD-860 ensures that audio signals maintain clarity even at high volume levels.

Connectivity is another key strength of the SD-860. The receiver includes multiple inputs such as analog, digital, and USB ports, allowing users to connect a variety of devices such as CD players, turntables, and streaming devices seamlessly. This multi-device compatibility makes it an ideal choice for those looking to create an integrated audio system.

The Sherwood SD-860 also features advanced digital signal processing (DSP) capabilities, which help optimize sound performance. With built-in equalization settings, users can tailor the audio output to their personal preferences or adjust the sound according to their room acoustics. This ensures that regardless of your music source, you can enjoy a refined listening experience.

Furthermore, the SD-860 is equipped with Bluetooth technology, enabling wireless streaming from smartphones, tablets, or computers. This easy connectivity allows users to enjoy their favorite music without the hassle of cables, thereby catering to the modern listener who values convenience and versatility.

In terms of design, the Sherwood SD-860 maintains an elegant aesthetic, featuring a sleek front panel and intuitive control layout. Its user-friendly interface simplifies operation, making it accessible for users of all skill levels. The receiver is built with durability in mind, ensuring longevity while maintaining high performance.

Overall, the Sherwood SD-860 is a commendable stereo receiver that combines quality sound, extensive connectivity options, and user-friendly features. It stands out as an excellent choice for anyone looking to enhance their audio setup with a powerful and versatile component that meets the demands of today’s diverse listening environments.