2 | Items |
![]() User Manual, LCD Monitor, Power cord,
User Manual, LCD Monitor, Power cord,
3Setting up the LCD monitor
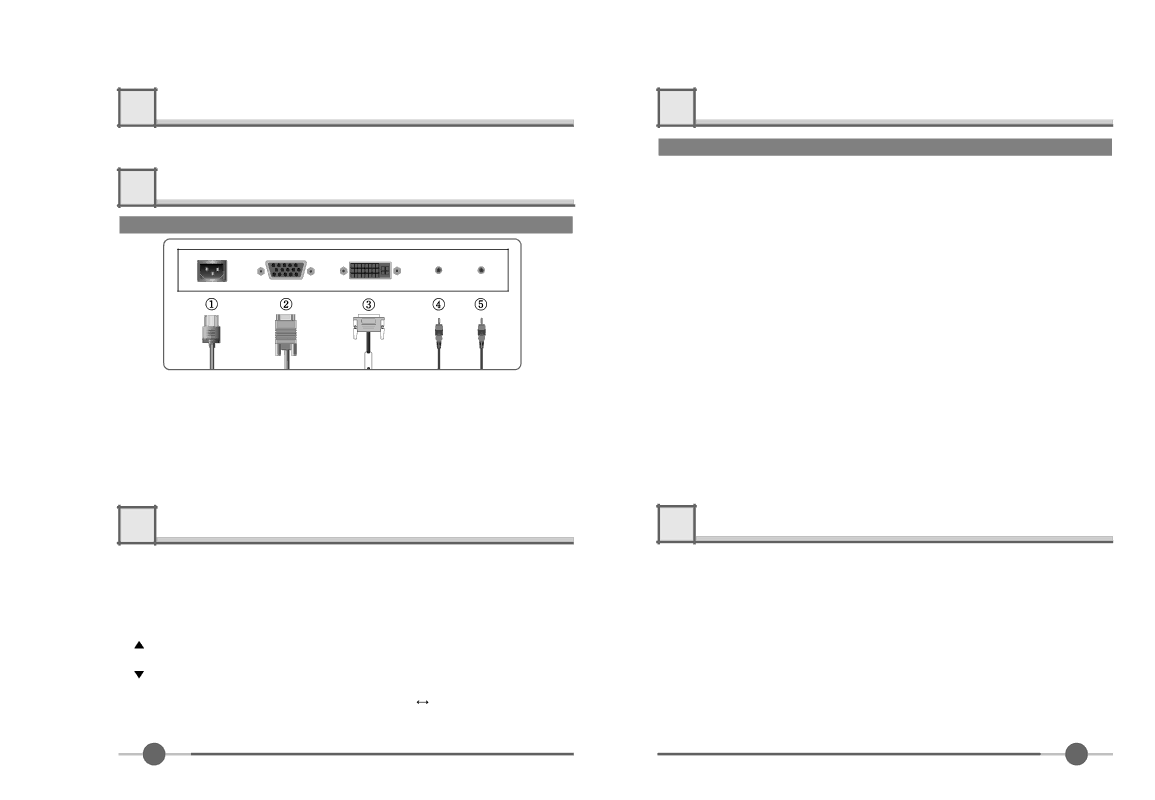
How to connect the power cord and the several cables to the LCD monitor.
No. | Name | Cable connections |
1 | Power | Power Cord |
2 | ||
3 | DVI | |
4 | SPK IN | Audio Cable*1 |
5 | SPK OUT | External Speaker Cable*1 |
*1 : For Audio Model Only.
4 | Adjusting The Monitor |
MENU | : 1. First click : The OSD main menu appears. | |
| 2. | Second click : The OSD menu disappears. |
AUTO | : When you push Auto button, this will optimize image quality automatically. | |
MUTE | : Sound Mute On/Off button. | |
POWER : Power On/Off toggle button. | ||
SEL | : Select a command function. | |
| : 1. | Move the |
| 2. | Decrease the current option value. |
| : 1. | Move the |
| 2. | Increase the current option value. |
MODE | : You can change the display mode.(ANALOG DIGITAL) | |
VOL | : Volume. | |
MWE | : You can manually adjust the screen to your environment on the computer. | |
3 |
|
|
5 | Appendix |
Display Modes | |
Mode | Resolution | Horizontal | Vertical | Pixel Clock | Sync | |
Frequency(KHz) | Frequency(Hz) | Frequency(MHz) | Polarity(H/V) | |||
|
| |||||
| 720 X 400 | 31.468 | 70.087 | 28.322 | ||
|
|
|
|
|
| |
|
| 31.468 | 59.940 | 25.175 | ||
|
|
|
|
|
| |
VGA | 640 X 480 | 35.000 | 66.670 | 30.240 | ||
|
|
|
|
|
| |
|
| 37.500 | 75.000 | 31.500 | ||
|
|
|
|
|
| |
|
| 37.879 | 60.300 | 40.000 | +/+ | |
|
|
|
|
|
| |
SVGA | 800 X 600 | 48.077 | 72.188 | 50.000 | +/+ | |
|
|
|
|
|
| |
|
| 46.875 | 75.000 | 49.500 | +/+ | |
|
|
|
|
|
| |
|
| 48.363 | 60.004 | 65.000 | ||
|
|
|
|
|
| |
XGA | 1024 X 768 | 56.476 | 70.000 | 75.000 | ||
|
|
|
|
|
| |
|
| 60.023 | 75.029 | 78.750 | +/+ | |
|
|
|
|
|
| |
XGA+ | 1152 X 864 | 67.500 | 75.000 | 108.000 | +/+ | |
|
|
|
|
|
| |
SXGA | 1280 X 1024 | 63.981 | 60.020 | 108.000 | ||
|
|
|
| |||
79.976 *1 | 75.025 *1 | 135.000 *1 | +/+ *1 | |||
|
|
*1 : For Analog Mode Only.
6 | PowerSaver |
This monitor has a
This system saves energy by switching your monitor into a
State | Power | Recovery | LED Color | |
consumption | Time | |||
|
| |||
ON | Under 40W | - | Green | |
OFF | Less than 2W | Within2 sec | Amber | |
|
|
|
|
4