Omnimount ULPT-M, OM10049 manual Step

Page 22

STEP 4

4.1


4.4


4.2


4.3


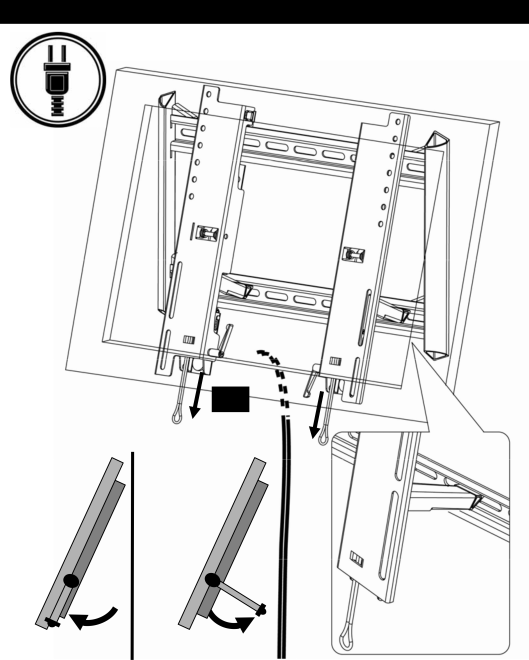
While extended out with Kick Stand, route cables behind TV and connect your TV input wiring.

P22

Image 22
Contents ULPT-M Images may differ from actual product¡ADVERTENCIA! Español WARNUNG! Deutsch FIGYELEM! Magyar AVERTISMENT! Română ﺞﺘﻨﻤﻟﺎﺑ صﺎﺨﻟا نزﻮﻠﻟ ﻰﺼﻗﻷا ﺪﺤﻟا زوﺎﺠﺘﺗ ﻻ ΠΡΟΕΙΔΟΠΟΙΗΣΗ! ΕλληνικaWeight Capacity Maximum Screen SizeSymbol KEY 水平 调整 水平器 ハンマー オプションRemove Tighten Fastener Loosen Fastener Hand tighten Contents Tools NeededContents Wood Stud Installation Find studs and mark edge and center locationsWood Stud Wall Installation Drill pilot holeConcrete Installation Use wall plate or wall template to mark mounting locationsコンクリート壁への取り付け Solid ConcreteMount wall plate Concrete Wall Installation Mounting Option a for Vesa Patterns Greater than SmallerAttach monitor using monitor hardware, M-A, M-B, etc… StepBack of TV SpacersHang with monitor attached Step P23 P24 Left Blank Intentionally Left Blank IntentionallyOmnimount Product Warranty EnglishP27 OmniMount Systems, Inc