Philips CRT Television manual Adjusting the Picture

Page 7


ADJUSTING THE PICTURE


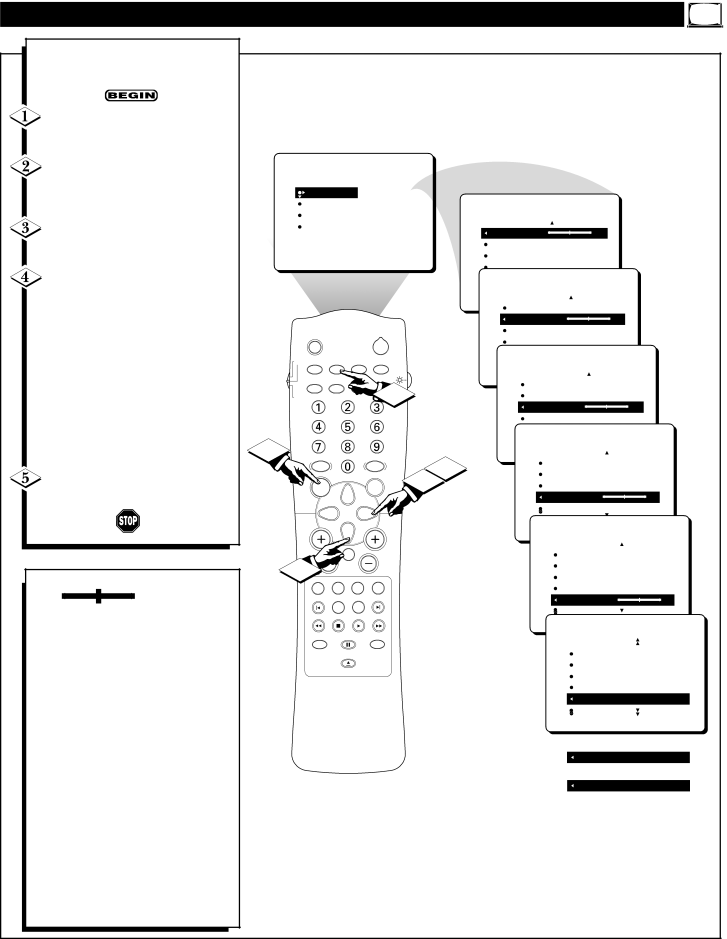
o adjust your TV picture controls,


Tselect a channel and follow these


steps.


Press the MENU button on the


remote control to show the on-screen


menu. PICTURE will be highlighted.


Press the CURSOR RIGHT button


and the menu will shift to the left.


BRIGHTNESS will be highlighted and an


PICTURE


BRIGHTNESS


adjustment bar will be shown to the right.


SOUND


COLOR


FEATURES


PICTURE


PICTURE


Use the CURSOR LEFT or CUR-


INSTALL


SHARPNESS


BRIGHTNESS

30


TINT


SOR RIGHT button to adjust the


COLOR


BRIGHTNESS level of the picture.


PICTURE


After adjusting the BRIGHTNESS


SHARPNESS


STORE


control, press the CURSOR DOWN


PICTURE


button to select another picture adjust-


BRIGHTNESS


ment: COLOR, PICTURE, SHARP-


COLOR

30


NESS, TINT, OR COLOR TEMP.


SLEEP


POWER


PICTURE


SHARPNESS


Press the CURSOR LEFT or CUR-


STORE


SOR RIGHT button to adjust the

TV

SOURCE

STATUS

CC

CLOCK


PICTURE


selected control.


REPEAT

REPEAT

SHUFFLE SCAN


BRIGHTNESS


A-B


5


COLOR


NOTE: The menu will show only five

DVD


PICTURE

30

items at a time, so you will need to con-


SHARPNESS


tinue scrolling with the CURSOR


STORE


DOWN button to adjust the TINT and

1


PICTURE


COLOR TEMP.


SOUND


PICTURE


3

BRIGHTNESS


Press the STATUS button to


2

COLOR


MENU


OK


PICTURE


remove the menu from the screen.


SHARPNESS

30


TINT


PICTURE


4

VOL


CH


BRIGHTNESS


MUTE


COLOR


Remember, when the bar scale is cen-

T/C

AUDIO

FTS

ANGLE


PICTURE


SHARPNESS


tered

, the control set-


PREVIOUS

ZOOM

SUBTITLE

NEXT


TINT

0

tings are at normal, mid-range levels.


REVERSE

STOP

PLAY

FORWARD


Picture adjustments are described here.


BRIGHTNESS Ð adds or subtracts


INCR.SURR. PAUSE

SURF


PICTURE


OPEN/CLOSE


COLOR


light from the darkest part of the pic-


PICTURE


ture.


SHARPNESS


COLOR Ð adds or eliminates color.


TINT


COLOR TEMP

NORMAL

PICTURE Ð improves the detail of the


lightest parts of the picture.


OR


SHARPNESS Ð improves the detail in


COLOR TEMP

WARM

the picture.


OR


TINT Ð adjusts the picture to obtain


COLOR TEMP

COOL


natural skin tones.


COLOR TEMP offers NORMAL,


COOL, or WARM picture preferences.


NORMAL Ð keeps whites, white.


COOL Ð makes whites, bluish.


WARM Ð makes whites, reddish.


7


Image 7
Contents For fast help, call us first Warranty Verification Important Safety Instructions Region code for ALL 1 this set is ALL or Safety Instructions Read before operating equipmentTable of Contents Standard Broadcast VHF/UHF or Cable TV Catv FeaturesCleaning Discs END-OF-LIFE DisposalAdjusting the Picture Press the Cursor Right but Turning on the Dynamic Noise Reduction ControlPress the Cursor Down but Turning on the Contrast + Control Press the Cursor UP or CUR- SOR Down button to select Timer Setting the ClockPress the Cursor UP or Down button to set AM or PM Timer Setting the Start Time Press the Cursor Right Or Cursor Left button to Timer Setting the Stop TimePress the Numbered but Timer Selecting the Start UP ChannelChannel. Or, press the Cursor Once press the Cursor Timer Setting Activate to on or OFFThen press the Cursor Down Timer Turning on the Timer DisplayOr Cursor Left button to turn Press the Cursor Right button and the menu will shift to Using the Closed Captioning ControlPress the Status button to remove the menu from the screen Selecting the Screen Format Size Blue Mute OFF Activating the Blue Mute ControlSleep Using the Sleep TimerYou also can block individual channels or block programming Understanding AutolockMovie Ratings TV Parental GuidelinesCode Autolock Setting UP the Access CodeAutolock Blocking Channels TimerCursor Down button to high Enter your four-digit Access CODE. Correct willAuto Lock Blocking by Movie Rating Button again to highlightPress the Cursor Right Autolock Blocking by TV RatingAutolock Turning Block on or OFF Autolock Blocking Unrated Broadcasts Enter your four-digit Access Code and the menuOr Cursor Left button to Autolock Blocking Broadcasts That have no Rating Enter your four-digit AccessOr Cursor Left button to tog Block Unrated No Rating Autolock Reviewing Your SettingsAuto Lock Viewing Blocked Programming Control, press the Cursor Sound Adjusting the Treble , Bass , and BalanceCursor Left button to adjust Use the Cursor Right orVolume Sound Adjusting the VolumeSOR Right or Cursor Left Sound Using the AVL Audio Volume LevelerPress the INCR. SURR. but Sound Using Incredible SurroundSecond Audio Program SAP Sound Setting the TV for Stereo and SAPPress the Cursor Left or Sound Setting the Audio OUT ControlCursor Right button to set Turn the TV and audio sys Sound Using the TV Speaker Control and Audio Output JacksConnect the Right Left Audio OUT jacks onPress the Picture button Remote Control Using Auto PicturePress the Sound button on Remote Control Using AutosoundPress the Sound button repeat Screen, press the Cursor Remote Control Using Channel SurfPress the CHANNEL+ or Ð Press the Surf button onOperating the DVD Player PowerMenu BAR Operation General ExplanationOperating the DVD Player Personal Preferences Press the Cursor UP or Down buttons to scroll Analog output, Night mode, orKaraoke vocal Digital output Select Off IfEnglish Menu LanguageStandby Status window or Low powerAccess Control Will require a Status Window Select On or Off Low Power Standby Select OnPress the Status button on the remote control to display Access CodePress the Cursor Left or Right button until the Personal Operating the DVD Player Playing a Disc Playing a DVD Or Video CD MovieMoving to Another Title or Track Operating the DVD Player General FeaturesMoving to Another Chapter or Index Search Forward or Reverse Still Picture /PICTURE By Picture PlaybackShuffle Repeat Repeat A-BPress the Shuffle button to Press the OK button to confirm Press the Numbered buttonsStoring Titles/Tracks Favorite Track Selection VideoOry Storing a FTS-Video ProgramErasing All Selections from a FTS-Video Program Erasing a Favorite Track SelectionTV/DVD Player Erasing a FTS-Video ProgramPress the Menu button again Operating the DVD Player Special FeaturesTITLE/CHAPTER/DISC Menus Camera AngleSubtitles Audio LanguagePress the Subtitle button Operating the DVD Player Playing Audio CDS Operating the DVD Player Special Video CD FeaturePlayback Control PBC Press the OK button to store Switching FTS on or OFFPress the Cursor Right or Or, press the Numbered butTroubleshooting No Power No Picture No SoundGlossary of Television Terms Index Canada Factory Service LocationsHouston Limited Warranty