Philips 32PFL3506 user manual Connect devices, Connection overview, Video input jack

Page 28

9 Connect devices

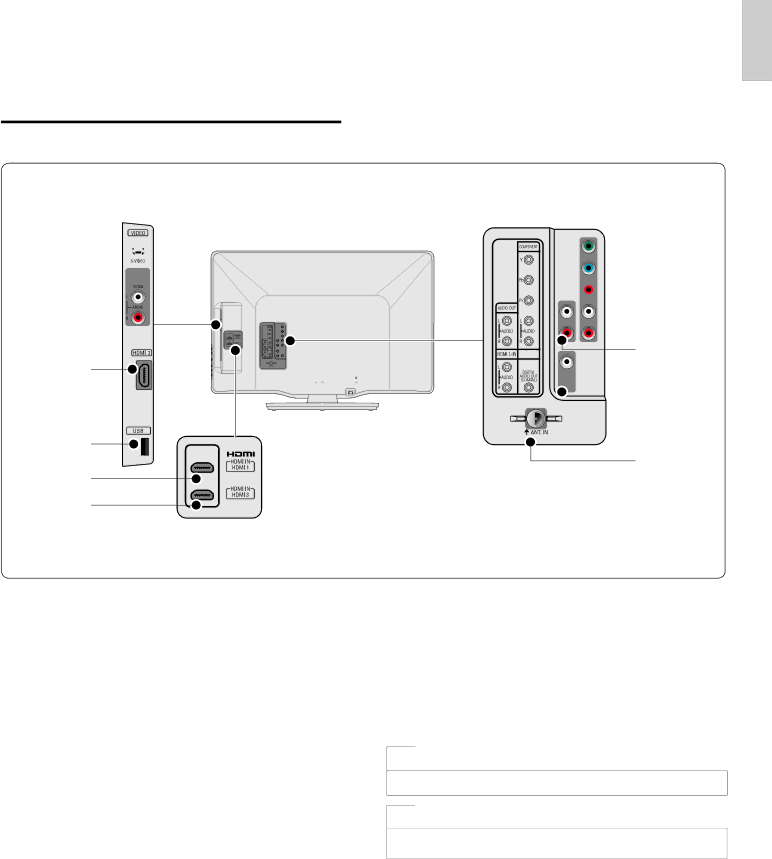
This section describes how to connect various devices with different connectors and supplements examples provided in the Quick Start Guide.

Connection overview

English

a b

c

d*

e

f

gf

hg

ih ji

kj

aS-Video input jack

S-Video input connector to be used with Audio L/R connectors for camcorder, game console, etc. When you use the S-Video for video signals, do not use Composite video for video signals.

bComposite video and audio input jack

Video input for analog devices such as DVD, camcorder, game console, etc.To be used with audio input.

cHDMI 2 input jack

Second HDMI in connector.

Digital audio and video input from high definition digital devices such as Blu-ray players.

dUSB terminal

Data input from USB storage devices only. Do not connect any device to this terminal such as; digital camera, keyboard, mouse, etc.

eHDMI 1 input jack

First HDMI in connector.

fHDMI 3 input jack

Third HDMI in connector.

gComponent video and audio input jack

Video input from analog devices such as DVD, receiver, game console, etc.This connector is used with audio input.

hAnalog audio output jack

Audio cable connection for an external device.

iDigital audio output jack

Digital audio output to home theaters and other digital audio systems.

jAudio input jack for HDMI 1 and PC

kAntenna input jack

Signal input from an antenna, cable or satellite.

Caution

Disconnect the AC power cord before connecting devices.

Note

Different types of connectors may be used to connect a device to your TV, depending on availability and your needs.

EN 27

Image 28
Contents FR Manuel d’Utilisation ES Manual del Usuario 32PFL3506 Lea esta manual antes de usar el productoContents Product Safety Notification Important Safety Instructions Model 32PFL3506 Address USA, IncTelephone Number Modifications Product information Screen careEnvironmental care Regulatory noticesSide controls and indicators Remote controlStandby indicator / remote control sensor Power Your TVStandby-On InfoSupplied accessories Installing the remote control batteriesGet started Mounting stand onto TVSpecified by the service provider Connecting the antenna or cableComposite Video and Audio YPbPr Component Video Input Managing cables Plugging in the AC power cordAttach the cable management tie as illustrated below Press OK to finish Settings assistant Switching on and initial setupFinish the Setup Switching on your TV and putting it in standby mode Switching channelsUse your TV This section helps you perform basic TV operationsAdjusting volume Still modeWatching channels from a set-top box Watching connected devicesSwitching audio mode Watching a Blu-ray discChanging picture and sound settings Changing picture settingsSummary of picture settings Changing auto picture modeSummary of picture formats Changing picture formatNormal Display a 169 picture at its original size Using your TV as a PC monitor Supported screen resolutionsChanging sound settings Summary of sound settingsSleeptimer Child and rating locksUsing the movie ratings lock Summary of TV ratingsSummary of US movie ratings Summary of Canadian English ratingClosed caption Set your location to home EasyLinkPress Î or ï to select the desired mode, then press OK Supported formats Not-supported formats View your pictures on a USB storage deviceProgressive Jpeg files You can configure the following features of your slideshow Watch your Video on a USB storage deviceConfigure how the slideshow is played Listen to music on a USB storage deviceInstall channels Press Menu on the remote control and select LanguagePress OK to start the installation Selecting your menu languageChannel list Add channelsPreparing for the software upgrade Switch on the TVUpgrading software Downloading the softwareConnect devices Connection overviewVideo input jack Composite video and audio input jackSelecting your connection quality Hdmi Highest qualityComponent Y Pb Pr High quality Video Good qualityConnecting your devices OUT OUTIf you connect a PC with a HDMI-DVI connector Digital Audio OUTDownloading an electronic copy TroubleshootingContact us Specifications Warranty Limited Warranty ONE 1 YearVolume Adjust Auto volume leveling Mute Warranty YPbPr Index120V ~ 60Hz 130W Comercializado por México, D.F