JVC GR-AX680 manual Date/Time, Display Select Dial, Feature Purpose Operation

Page 17

EN17

DATE/TIME

Display

Select Dial

Date display

Time display

Date/Time display

Auto Date


Date-off mode

Record mode


(No display)

The characters you have set using

Character Generator (pg. 23)

Date display


Auto Date Record mode

25.12.98AUTO DATE

Auto date record mode

FEATURE:

PURPOSE:

OPERATION:

NOTES:

Date/Time/Character Insert

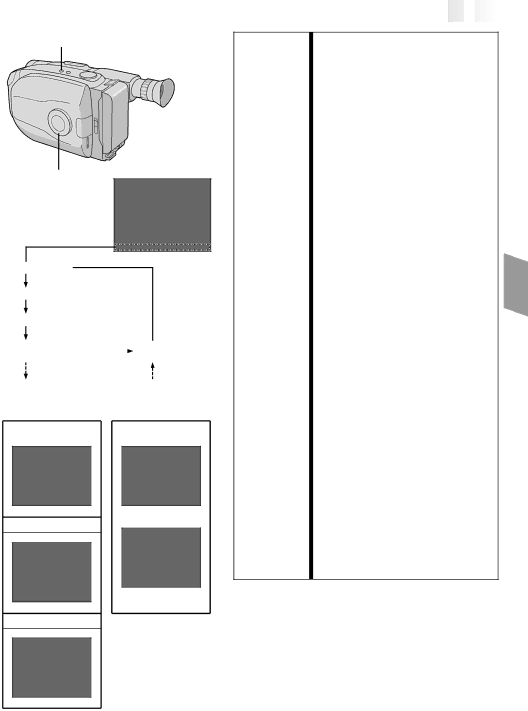
To display the date and time in the viewfinder or on a connected colour monitor, as well as to record them manually or automatically.

1)Turn the Select Dial to any position except AUTO LOCK.

2)Choose a display mode by pressing DATE/TIME repeatedly while in Record-Standby to cycle through the modes as shown in the illustration to the left.

You should have already

performed the Date/Time Setting procedure (pg. 7). If you haven’t, do so first.

DISPLAY

The selected display can be recorded.

If you don’t want to record the display, select the Date-off mode before shooting.

If you want to delete the display during shooting, press DATE/TIME.

To recall the display, engage the Record-Standby mode and press DATE/TIME repeatedly until the desired display appears.

AUTO DATE RECORD

Your camcorder automatically records the date for about 5 seconds after recording is initiated in the following situations:

After changing the date.

After loading a cassette.

After Auto Date Record mode is selected by pressing DATE/TIME.

In this mode, the date is replaced after 5 seconds with “AUTO DATE” but this is not recorded.

Time display

22:50:00

Date/Time display

25.12.98

Auto date record executed

Setting the Select Dial to AUTO LOCK always engages the Auto Date Record mode, and disables all other modes.

25.12.9822:50:00

Image 17
Contents GR-AX680 Safety Precautions Contents Supply Power PowerAttach Battery Pack Detach Battery PackCar Battery Charger/Adapter BH-V3E optional To DC in jack Terminal AC PowerCharge marker DC OUTClose Cover Switch OFF PowerInsert Battery Menu Select DialJog Dial Viewfinder Menu ScreenMenu Jog Dial Menu Screen Tape Length Setting MenuSelect Dial Viewfinder Open Cassette Holder Loading/Unloading a CassetteINSERT/REMOVE Cassette Close Cassette HolderViewfinder Adjustment Grip AdjustmentShoulder Strap Attachment Adjust LengthTripod Mounting Attach StrapBasic Recording Enter RECORD-STANDBY ModeLoad a Cassette Start ShootingStop Recording Tape remaining time indicator60MIN 59MIN 3MIN 2MIN 1MINZoom-in Zoom-out Zoom indicator bar EN Recording Basic FeaturesPower Zoom button Menu Jog Dial Menu ScreenQuick Review FeaturePurpose OperationPicture Stabiliser Basic FeaturesStabilizer Feature Purpose Operation DATE/TIME Feature Purpose OperationDisplay Select Dial Date/Time/Character InsertMark Recording Advanced FeaturesProgramme AE With Special Effects 2000 sec Nega Posi modeIndication Engage FADE- or Wipe Standby Mode Advanced FeaturesTo Cancel FADE- or WIPE- Standby Mode Fade/WipeSelect Super Lolux Mode Engage Wide ModeWide Super LoLuxGain UpInstant Titles Select Preset TitleTitle Title displayTop left corner, and then press it Setting Menu Ex. REC Time Using Menu For Detailed AdjustmentMenu Screen Explanations REC Time Demo Mode OFFINT. Time Tally LampTo darken the image To brighten the image Menu Jog Dial Menu ScreenExposure Menu Screen Auto Focus FocusingFocus Menu Screen END Adjustment of FocusClose Menu Access Menu Screen Manual White Balance Adjustment M.W.BAccess White Balance Menu Screen Select White BalanceJog Dial REC Time Indicator INT. Time Menu INT. Time IndicatorRecording Start/Stop Button Select Dial Menu Jog Dial REC Time Menu INT. TimeTime-Lapse Release Animation ModeSET Interval Between Recordings SET Recording TimeBasic Playback Power SwitchPLAY/PAUSE REW Stop Playback Fast-ForwardActivate Manual Tracking TrackingCounter R/M PLAY/PAUSE FeaturesStop Feature Cassette Adapter Using The Cassette Adapter ENInsert Cassette in Adapter Play Back on Connected VCRConnect Camcorder to VCR Basic ConnectionsConnect Camcorder to TV RF-V5ETape Dubbing Replace Battery Holder Pull OUT Battery HolderRM-V700U optional FunctionsSTART/STOP Viss INT. Time REC Time Interval Timer IndicatorRec Time Indicator Viewfinder Random Assemble Editing R.A.Edit VCR Code ListSET Remote to Operate VCR Operate VCRPrepare VCR Connect toPrepare Camcorder Register Beginning of Scene Access R.A. Edit Counter DisplayRegister END of Scene Register Additional ScenesBegin Automatic Editing Engage VCR’S RECORD-PAUSE ModeEND Automatic Editing ON/OFF VCR REC StbySTART/STOP REW Pause Insert Play REW Power SwitchIndicator Play Pause DUB REWTape is running, but there’s no playback picture Recording cannot be performedRecording does not start Lens Cover Warning indicator On again. If the error number still appears in the viewShooting a very bright object Camcorder50EN Indicators 52EN Avoid using the unit For safety, do notTo avoid hazard During useClean Lens Clean ExteriorClean Viewfinder Remove EyepieceSpecifications EN GR-AX680