3 Get started
![]() Caution
Caution
•Use the controls only as stated in this user manual.
Always follow the instructions in this chapter in sequence.
If you contact Philips, you will be asked for the model and serial number of your apparatus.The model number and serial number are on the bottom of your apparatus.Write the numbers here:
Model No. __________________________
Serial No. ___________________________
Install the car audio
These instructions are for a typical installation. However, if your car has different requirements, make the corresponding adjustment. If you have any questions regarding installation kits, consult your Philips car audio dealer.
![]() Caution
Caution
•This unit is designed for negative ground (earth) 12 V DC operation only.
•Always install this unit in the car dashboard. Other locations can be dangerous as the rear of the unit heats up during use.
•To avoid
•Ensure that you connect the yellow and red power supply leads after all other leads are connected.
•Ensure that all loose leads are insulated with electrical tape.
•Ensure that the leads do not get caught under screws orin parts that will move (e.g. seat rail).
•Ensure that all ground (earth) leads are run to a common ground (earth) point.
•Use only the supplied mounting hardware for a safe and secure installation.
•Improper fuses can cause damage or fire. When you need to change the fuse, consult a professional.
Note on the power supply lead (yellow) |
|
• When you connect other devices to this | English |
circuit is higher than the total fuse value | |
system, ensure that the rating of the car |
|
of all the connected devices. |
|
|
|
Notes on speaker connection
•Never connect speaker wires to the metal body or chassis of the car.
•Never connect speaker wires with stripes to one another.
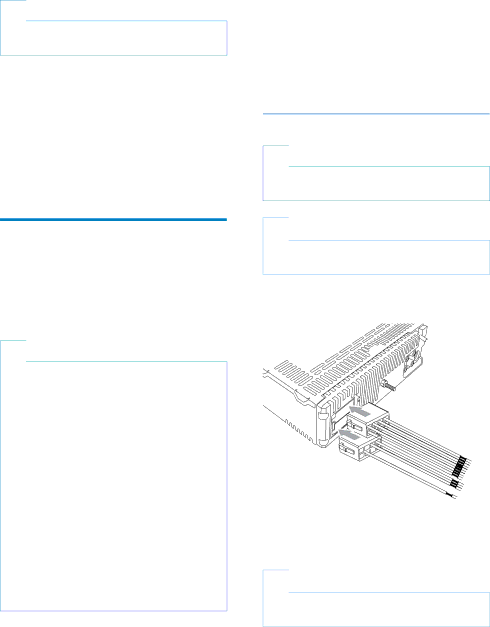
Connect wires: ISO male connectors
![]() Caution
Caution
•Ensure that all loose leads are insulated with electrical tape.
![]() Note
Note
•Consult a professional to connect CE130 as instructed below.
1 Connect the supplied male connector to the unit.
2Check the car’s wiring carefully and connect them to the supplied male connector.
![]() Note
Note
•Risk of danger! Please consult a professional to perform the below steps!
EN 9