Speaker Selection Switches (Continued)
Auxiliary Speakers:
Slide the Speaker Control Switch to turn:
•Main speaker off and auxiliary speakers on
(MAIN OFF),
•Main speakers on and auxiliary speakers off
(AUX OFF) or
•Main speakers on and auxiliary speakers on
(ALL ON).
|
| POWER |
|
|
|
| DIM |
|
|
|
| MODE |
|
|
|
| DISP |
|
|
|
| 1 | 2 | 3 |
|
| BAND | EQ | AS/PS |
|
|
|
| VOLUME |
|
| MAIN SPEAKERS |
| |
|
|
|
| SEEK |
|
|
|
| SCAN |
REPEAT | INTRO |
| RA |
|
MAIN OFF | AUX OFF | ALL ON | SPEA |
|
|
|
|
| |
SLEEP |
|
|
|
|
EJECT
MUTE
STEREO
ALARM
4 | 5 | 6 |
REPEAT | INTRO | RANDOM |
SELECT |
|
|
PUSH |
|
|
SLEEP |
|
|
ALARM |
|
|
Speaker Control
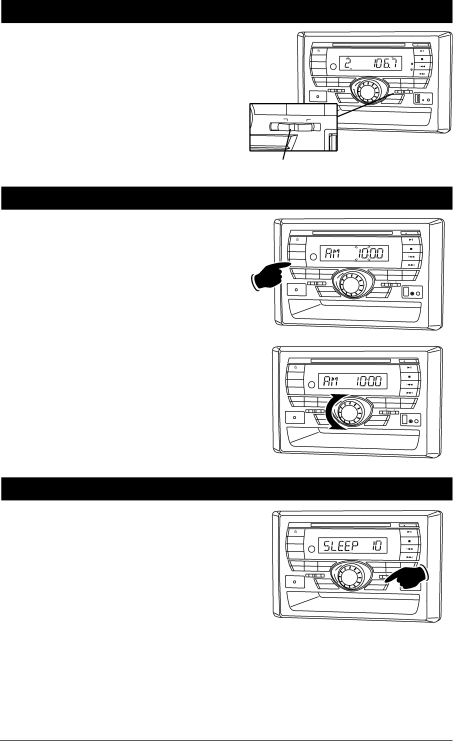
Setting the Clock
1.Press the DISP button until the clock appears in the display.
2.Press and hold the DISP button until the hour indicator start flashing.
3.Rotate the VOLUME knob until the correct Hour
appears in the display. | Hold |
Note: When setting the clock make sure to |
|
select the correct AM or PM indicator. |
|
POWER
DIM
MODE
DISP
1 BAND
MAIN SPEAKERS
| 2 | 3 |
|
| EQ/LOUD | AS/PS |
|
A | B | C | VOLUME |
|
| SEEK |
|
|
| SCAN |
|
EJECT
MUTE
STEREO![]()
ALARM ![]()
| 4 | 5 | 6 |
| REPEAT | INTRO | RANDOM |
SELECT | MAIN OFF | AUX OFF | ALL ON |
PUSH | |||
|
|
| SPEAKER CONTROL |
| SLEEP |
|
|
| ALARM |
|
|
4.Press the VOLUME knob and the Minute indica- tors will start flashing.
5.Rotate the VOLUME knob until the correct Minutes appears in the display.
6.Press the DISP button and the colon between the hours and the minutes will start flashing indicating the clock is set.
POWER
DIM
MODE
DISP
1 BAND
MAIN SPEAKERS
| 2 | 3 |
|
| EQ/LOUD | AS/PS |
|
A | B | C | VOLUME |
|
| SEEK |
|
|
| SCAN |
|
EJECT
MUTE
STEREO![]()
ALARM ![]()
| 4 | 5 | 6 | |
SELECT | REPEAT | INTRO | RANDOM | |
MAIN OFF | AUX OFF | ALL ON | ||
PUSH | ||||
|
|
| SPEAKER CONTROL | |
| SLEEP |
|
| |
| ALARM |
|
|
Sleep Timer Operation
Setting the Sleep Timer:
1.Press the SLEEP button until the “SLEEP” appears in the display.
2.Keep pressing the SLEEP button again until the desired sleep time appears in the display (0, 10, 20, 30, 40, 50, 60, 70, 80 minutes).
3.Wait 5 seconds and the display will return to normal operation.
4.After the designated sleep timer has expired the unit will turn off automatically.
Cancelling the Sleep Timer:
1.Press the SLEEP button until “SLEEP 0” is displayed.
2.Wait 5 seconds and the display will return to normal operation.
POWER
DIM
MODE
DISP
1 BAND
MAIN SPEAKERS
| 2 | 3 |
|
| EQ/LOUD | AS/PS |
|
A | B | C | VOLUME |
|
| SEEK |
|
|
| SCAN |
|
EJECT
MUTE
STEREO![]()
ALARM ![]()
| 4 | 5 | 6 | |
SELECT | REPEAT | INTRO | RANDOM | |
MAIN OFF | AUX OFF | ALLOFFON | ||
PUSH | ||||
|
|
| SPEAKER CONTROL | |
| SLEEP |
| HEADPHONSAESTELLITE | |
|
| RADIO INPUT | ||
| ALARM |
| RESET RESET |
9