Nikon 6MWA0711-01 user manual

Page 46

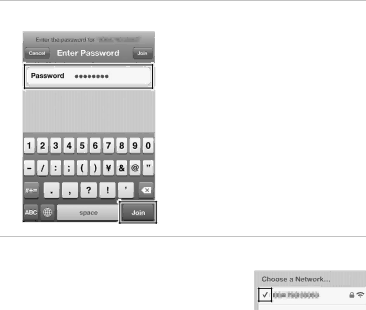
4Enter the encryption key and tap Join.

5Confirm that the connection is successful.

A check appears next to the network name when a connection is established.

32

Image 46
Contents Wireless Transmitter What the WT-5 Can Do for You Synchronized release Trademark Information For Your Safety Do not disassembleDo not expose to high temperatures Vii FCC Radio Frequency Interference Statement Use of 5.15-5.25GHz bandCo-location Compliance with FCC requirement 15.407cFCC/IC RF Exposure Statement IC RSS-Gen Statement TTE Directive Symbol for Separate Collection in European CountriesDeclaration of Conformity Available Channels For use ChannelsXiii Table of Contents Symbols and Conventions Background KnowledgeLife-Long Learning IllustrationsConnection Types Http Sever ModeFirewall Settings FTP uploadConnection Status Connecting the WT-5Power Source StatusWireless Connections Wireless LANs Choosing a Power SourceWireless Transmitter Utility Network GuideAttach the WT-5 Turn the camera on Insert a memory cardRemoving the WT-5 Display network profiles Display the hardware listSelect WT-5 Select Create profileChoose a connection type Start the connection wizardName the new network profile Text Entry Choose a connection methodKeyboard area Use Enter the encryption key Search for Wireless NetworkChoose a network Hidden SSIDsChoose your next step Push-Button WPSPress Jbutton on the camera Choose your next step Enter the PIN for the wireless LAN access point PIN-Entry WPSDirect Connection Ad Hoc Enter the SsidConfirm the IP address FTP UploadObtain or select an IP address Choose the server typeLog Enter the IP addressMAC Address Filtering Choose a destination folder Exit the wizardChoose whether to copy the profile to the computer RoutersConnect the camera to the computer Start the Wireless Transmitter Utility Disconnect the cameraEnable copying Copying ProfilesAd Hoc Mode Choose an adapterPage Appendices WindowsPage Windows Vista Page Windows XP Mac OS IPhone Page Connect the camera Click Next Select WT-5 and click Next Setup Picture Folder Select Add/edit profiles and click NextPage Select Manual setup and click Next Automatic Setup Communication mode Select Infrastructure or Ad hoc Page Enter IP address information and click Next Enter ftp settings and click Next Server type Choose FTP or SftpPage Select the new network profile Select EnableConnect the WT-5 Select Network connectionProblem Solution TroubleshootingFor Choose hardware Specifications Weight In. × 1.7 in. × 1.2Index Page 6MWA0711-01