1 |
FIGURE |
FIGURE 1
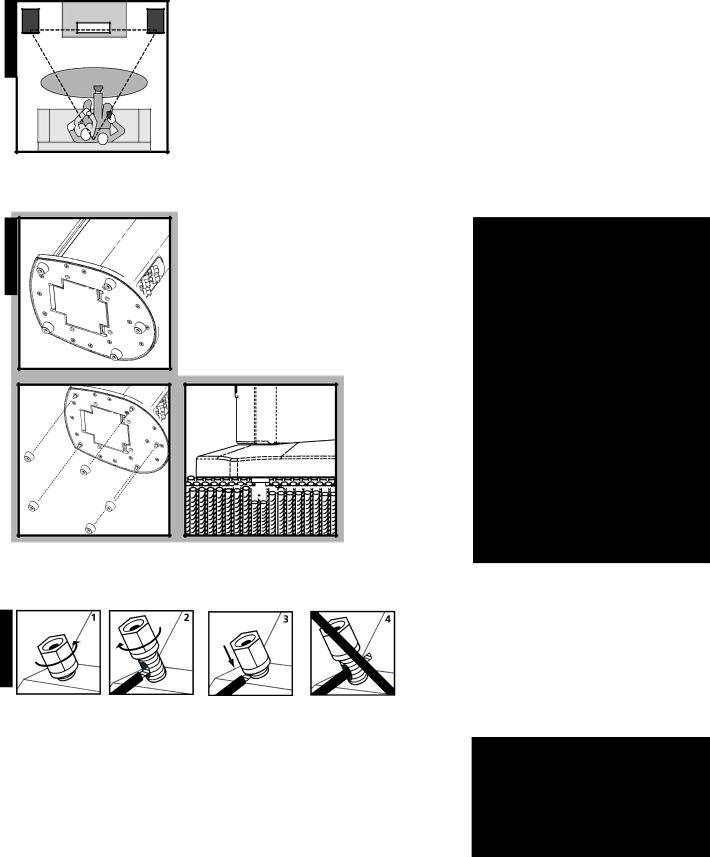
Create an equilateral triangle between the speakers and the listening position.
RM Series Loudspeakers are magnetically shielded for safe placement near TV or video monitors. If you notice video distortion or discoloration, immediately move the speakers away from the video source and call Polk Audio Customer Service
Haga un triángulo equilátero con los altavoces y la posición de audición. Polk Audio:
Créez un triangle équilatéral entre les enceintes et la position d’écoute. Polk Audio:
Bilden Sie ein Dreieck zwischen den Lautsprechern und Ihrer Hörposition. Polk Audio:
Disponete ai vertici di un triangolo equilatero i due diffusori acustici, sinistro e destro, e il punto d'ascolto ottimale. I diffusori RM hanno altoparlanti con magneti schermati e si possono avvicinare tranquillamente a televisori e monitor. Se notate immagini distorte o alterazioni dei colori, allontanateli subito dallo schermo video e contattate il nostro Client Care Center:
2 |
FIGURE |
FIGURE 2
Spike feet for stability on carpet or hard floors.
Use púas para estabilizar en una alfombra.
Pour plus de stabilité sur tapis, utilisez les pieds.
Für Stabilität auf Teppich Gebrauch Füße.
Per la stabilità sulla moquette, usate i piedi.
Spike Kit Option:
If your listening position is less than 6 feet from the
front speakers, tilting the speakers back slightly will yield
better high frequency response and imaging. To achieve
optimal backward tilt, replace the two front spikes with
the optional long spikes found in the plastic accessory bag
in the Styrofoam packaging, and adjust properly for desired
tilt. Be sure to loosen the two middle spikes so that they
make firm contact with the floor.
Jeu Accessoire De Picots:
Si votre position d’écoute se situe à moins de 6 pieds (1,8m)
des enceintes avant, vous obtiendrez des aigus plus naturels et
une meilleure imagerie en inclinant les enceintes légèrement vers
l’arrière. Pour réaliser l’inclinaison optimale, remplacez les deux
picots avant avec les deux grands picots contenus dans le sac
d’accessoires trouvé dans l’emballage de styromousse et
desserrer les deux picots centraux pour assurer leur
contact ferme avec le sol.
FIGURE 3
FIGURE 3
Using binding post connections.
Uso de conexiones con tornillos de presión.
Utilisation des bornes de branchement.
Verwendung von Anschlussklemmen.
Loosen hex nut.
Desenrosque parcialmente a tuerca hexagonal.
Desserrer l’écrou.
Sechskantmutter lösen.
Allentate il dado esagonale.
Insert speaker wire through hole.
Inserte el alambre para la bocina en el orificio.
Insérer le fil du haut- parleur dans le trou.
Inserite nel foro
i conduttori del cavo per altoparlanti.
Tighten hex nut.
Enrosque la tuerca de nuevo.
Serrer l’écrou.
Sechskantmutter festschrauben.
Stringete il dado esagonale.
Do not insert insulated section of speaker wire.
No inserte alambre con material aislante.
Ne pas insérer la partie isolée du fil du
Isolation des Lautsprecher- Drahtes nicht in das Loch schieben.
Non inserite nel foro una porzione di cavo isolato.
Uso dei morsetti a vite.
To use Banana Plugs
(US only):
Carefully pry out the binding post plugs
to expose banana plug holes.
(This is for US owners only.)
F o r m o r e i n f o r m a t i o n v i s i t o u r w e b s i t e a t w w w. p o l k a u d i o . c o m