Yamaha Yamaha PortaTone, EZ-20 Setting Up, Power Requirements, Using an AC Power Adaptor

Page 8

Setting Up

Power Requirements

Although the EZ-20 will run either from an optional AC adaptor or batteries, Yamaha recommends use of an AC adaptor whenever possible. An AC adaptor is more environmen- tally friendly than batteries and does not deplete resources.

Using an AC Power Adaptor

Use of an AC power adaptor is recom- mended, especially when you use the EZ-20 for a long period of time.

1Make sure that the [STANDBY/ON] switch of the EZ-20 is set to

STANDBY.

2Connect one end of the adaptor to the DC IN 12V jack on the rear panel of your EZ-20.

3Connect the other end to a suitable electrical outlet.

3outlet

2PA-3B

WARNING

Use ONLY a Yamaha PA-3B AC Power Adap- tor (or other adaptor specifically recommended by Yamaha) to power your instrument from the AC mains.

The use of other adaptors may result in irrepa- rable damage to both the adaptor and the EZ- 20.

CAUTION

Unplug the AC Power Adaptor when not using the
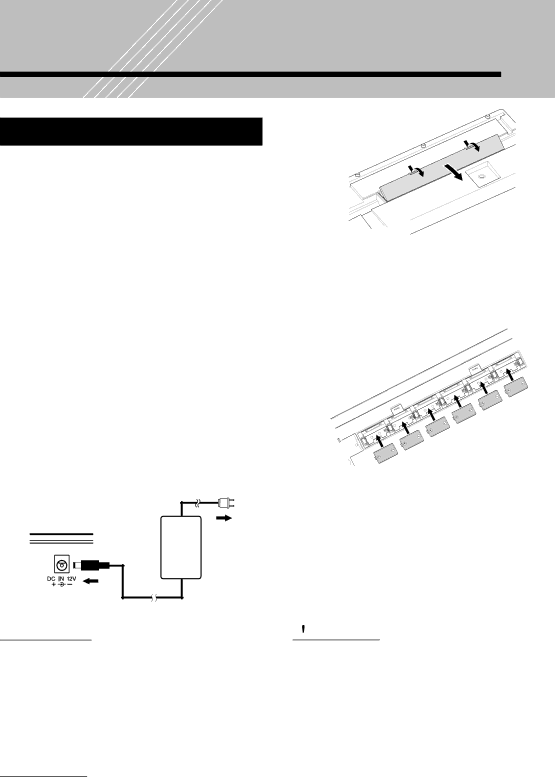
 EZ-20, or during electrical storms.

Using Batteries

1Turn the instrument upside-down and remove the battery compartment lid.

2Insert six 1.5-volt “D” size, R20P (LR20) or equivalent batteries as shown in the illustration, making sure that the positive and negative termi- nals are properly aligned.

3Replace the lid.

When the batteries run low and the battery voltage drops below a cer- tain level, the EZ-20 may not sound or function properly. As soon as this happens, replace them with a com- plete set of six new batteries, heeding the cautions described below.

CAUTION

Insert the batteries in the correct direction, making sure that the positive and negative ter- minals of the batteries match the label. If the orientation does not match the label, the bat- teries may generate heat, cause a fire, or leak.

Never mix old and new batteries or different types of batteries (e.g., alkaline and manganese).

To prevent possible damage from battery leakage, remove the batteries from the instru- ment if it is not to be used for a long time.

Even when the switch is in the “STANDBY” position, electricity is still flowing to the instrument at the minimum level.

When you plan not to use the EZ-20 for a long period of time, make sure you unplug the AC power adaptor from the wall AC outlet, and/ or remove the batteries from the instrument.

8

Image 8
Contents Page Special Message Section Precautions Main Features Other powerful features include Portable GrandContents Midi Functions About Midi Midi TerminalsSetting Up Power RequirementsUsing an AC Power Adaptor Using BatteriesUsing Headphones Connecting a Keyboard Ampli fier or Stereo SystemUsing a Footswitch Using the Midi TerminalsRear Panel Panel Controls and TerminalsFront Panel MN O Stop the Demo song Playing the Demo SongsPress the Demo button Playing a Single Song Start the SongStop the song Song ListLesson 1 Timing Using the Lesson FeatureSelect Timing, Waiting, or Minus One, and start the lesson When you’re finished, stop the Lesson Lesson 2 WaitingLesson 3 Minus One GradePlaying the Piano Playing along with the MetronomePress the Portable Grand button Play the keyboardPlaying the ABC/DoReMi Voices Selecting and Playing Other VoicesPress the ABC/DoReMi button Press the Voice button Select a voice Play the keyboardUsing the Auto Accompaniment Press the Style buttonSelect a section Stop the auto accompanimentLooking up Chords in the Dictionary Press the Dict. buttonWant to find out more? See Adjusting the volume level Power onPanel Display Indications Changing the tempoOverall settings Symbol for pressing and holding down the buttonPressing and holding down Changing the valuePanel Display Indications Selecting a functionName & number indication Song/Style/Voice Selecting a numberAccompaniment On indicator ABC/DoReMi indicatorsMeasure indicator Chord indicatorNotation display Fingering guideSelecting and Playing Songs Listening To a Demo SongSelecting and Playing a Song Press the Song buttonSelect the desired song number Start and stop the song playbackAdjusting the Tempo Tap FunctionSong Volume Level Switching the Light Guide On and Off Start the song Play the Multi Pads Multi PadsSelect a song that supports the Multi Pads function Set point B the end point RepeatWhile playing a song, set point a the start point Song Lesson Select one of the Lesson songsSelect the part you wish to work on left, right or both Start the LessonPress the START/STOP button to stop the Lesson Types of LessonABC/DoReMi Guide Grade Talking Talking function includes the following announcementsPortable Grand Using the MetronomeSetting a Tempo Setting the Time Signature of the Metronome Adjusting the Metronome VolumePlaying Voices Selecting a VoicePlaying a Voice Press the Voice buttonPlay the selected voice Selecting the ABC or DoReMi voiceTranspose Press the Overall button repeatedly to select TransposeTuning Press the Overall button repeatedly to select TuningSelect the desired style number Auto AccompanimentSelecting a Style Start Starting AccompanimentSync start Intro Sync start Stopping the AccompanimentTap start Changing the Tempo Press the TEMPO/TAP buttonCm7 Using Auto Accompaniment-Multi FingeringSingle Finger Chords Fingered Chords Fingered Chords in the Key of CPress the Dict. button Specify the root of the chord Specify the type of the chord major, minor, seventh, etcWhat is a Chord? Play a chord, following the Light GuideCaug Cdim Adjusting the Accompaniment Volume Playing a Melody along with the AccompanimentChanging the Accompaniment Section IntroMain EndingAbout the Fill-in Patterns Ritardando ritMidi Terminals Midi FunctionsAbout Midi How Can Midi be Used? Troubleshooting Problem Possible Cause and SolutionVoice List Maximum PolyphonySitar Sound Effects&Drum Kit List Bank MSB# 127 Bank LSB# 112 ProgramStyle List & Multipads Style ListMulti pads Midi Implementation Chart YamahaReset All Cntrls Page Specifications Panel ControlsIndex MiscLimited Warranty North America