Philips PET707 user manual Attaching and charging the battery pack, Detaching the battery pack

Page 12

PREPARATIONS

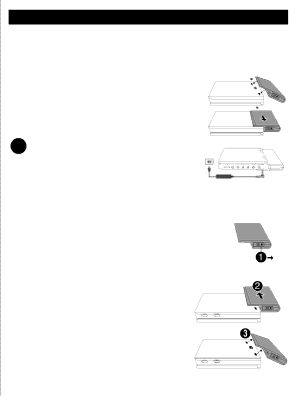
Attaching and charging the battery pack*

1Switch off the set. Attach the battery pack as shown.

2Connect the supplied adapter to the set and the main power supply (as shown). Charge until the red indicator turns off (approximately 4.5 - 6.5 hours when unit is charged from power off).

TIP

It is normal for the battery pack to become warm during charging.

is shown on the screen when battery power is running low.

Detaching the battery pack

1Switch off the set.

2Unplug the AC adapter.

3Turn the player upside down.

4Press down the battery pack lock switch .

5Slide off the battery pack as shown ➋ ➌.

*Rechargeable batteries have a limited number of charge cycles and may eventually need to be replaced. Battery life and number of charge cycles vary by use and settings.

Image 12
Contents PET706 Page Front View Functional Overview Main unit controls see figureFront of player see figure On . Power . OFF .....Switch the player on / off Volume controlHeadphones jack Remote Control Remote controls see figurePlacement IntroductionYour portable DVD player UnpackingPlayable disc formats DVD-VideoVideo CD Audio CD / MP3 CDPower Sources Safety and maintenanceGeneral Information Do not touch the lensHandling discs On handling the LCD screenEnvironmental information Copyright informationPower supply Using the AC / DC adaptor Powering your remote controlPreparations Attaching and charging the battery pack Detaching the battery packSwitch off the set. Attach the battery pack as shown Connections Connecting headphones Connecting additional equipmentColor Yellow White Red Digital Audio Out TIPRemote control operation General ExplanationAbout this manual Menu navigationSwitching on for OSD language setup Loading discs and switching onBasic Functions Select your preferred language and press OKPlaying a DVD disc Playing an audio or video CD discPlaying a MP3-CD Playing a Jpeg discsGeneral Features Moving to another title / track / chapterStill picture and step frame SearchSlow motion Changing the audio outputVolume Control Program Use 0-9and OK to key in specific settingsRepeat a B Play modesSpecial DVD Features Disc menuCamera angle Changing the languageOSD Operations Setup Operations General SetupAudio Setup Password SetupPreferences Troubleshooting Clean the disc Ensure the disc label is upwardsAnother disc Check the digital connectionsTechnical Data Operating temperature rangeHow to connect a plug Mains plugCopyright in the U.K Copyright Information Disposal of Your OLD ProductInformation SUR LE Droit Dauteur Mise AU Rebut DE Votre Ancien ProduitClass Laser Product Second LCD screen Content Control elementsFunctional com Connection Ponents Connect to headphonePower Sources Front of the player see figureRight side of the player see figure Safety and maintenance Hearing Safety Listen at a moderate volumeListen for reasonable periods of time On handling the LCD screen Environmental informationCopyright information Connect the power source to the primary DVD player using Use in a carUse at home Power on Connect to headphoneConnect to camcorder Volume control Screen brightness and contrastMake sure all the connected devices are Already started on the primary deviceMake sure that the video out function on Primary device has been activatedDisposal of your old product