HP dc7700 manual Upgrading the Hard Drive

Page 29

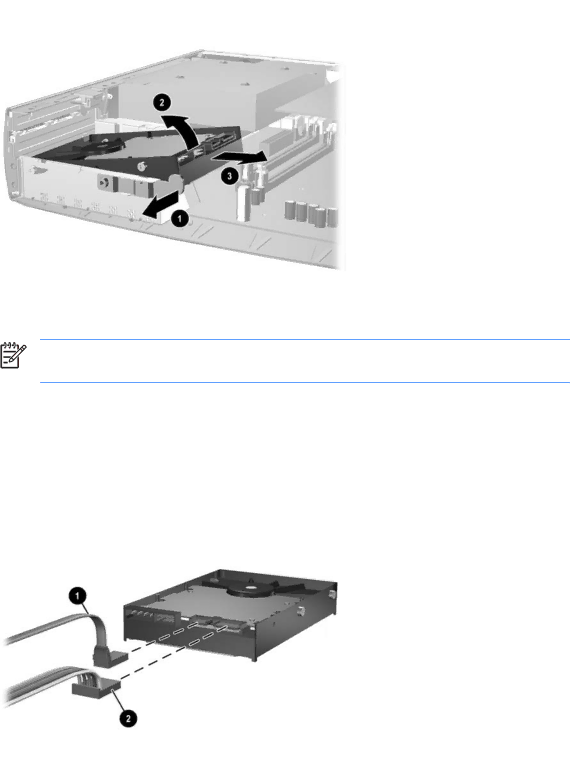
9.Rotate the right side of the hard drive up (2), then pull the drive out to the right (3).

Figure 2-13Removing the Internal Hard Drive

NOTE When removing cables, pull on the connector instead of the cable itself. This will help prevent cable damage.

10.Disconnect the data cable (1) from the hard drive by pulling the connector out of the socket in the hard drive.

11.Disconnect the power cable (2) from the hard drive by pulling the connector out of the socket in the hard drive.

Figure 2-14Disconnecting the Data Cable and Power Cable from the Hard Drive

ENWW

Upgrading the Hard Drive 23

Image 29
Contents Hardware Reference Guide-dc7700 Series Ultra-Slim Desktop Page About This Book About This Book Table of contents Grounding Methods Standard Configuration Features Product FeaturesFront Panel Components Drive configuration may vary by model2Rear Panel Components Rear Panel Components3Keyboard Components KeyboardUsing the Windows Logo Key Serial Number Location Changing from Desktop to Tower ConfigurationChanging from Desktop to Tower Configuration Enww Serviceability Features Hardware UpgradesRemoving the Computer Access Panel 2Releasing the Front Bezel Removing the Front Bezel AssemblyEnww 6Aligning the Front Bezel Assembly Connect the fan and speaker cables to the system board Rotating the Power Supply DDR2-SDRAM DIMMs Installing Additional MemoryDIMMs Description Socket Color Populating Dimm SocketsInstalling DIMMs Enww Replacing an Expansion Card Bracket Replacing an Expansion Card Bracket Upgrading the Hard Drive Upgrading the Hard Drive Enww Removing the Existing Optical Drive Replacing the Optical Drive17Removing the Optical Drive Hardware Upgrades Preparing the New Optical Drive Installing the New Optical Drive Approximate Weight SpecificationsAppendix a Specifications Battery Replacement Type Figure B-2Removing and Replacing a Coin Cell Battery Type Enww Cable Lock Installing a Security LockSecurity Lock Provisions Padlock Grounding Methods Electrostatic DischargePreventing Electrostatic Damage Appendix D Electrostatic Discharge Computer Operating Guidelines and RoutineCare Cleaning Optical Drive PrecautionsSafety Shipping PreparationKeyboard IndexEnww