Philips MCD709 Getting Started, Inserting batteries into the Remote Control, Setting up the TV

Page 19
Setting up Progressive Scan feature (for
Progressive Scan TV only)
The progressive scan display twice the number of frames per seconds than interlaced scanning (ordinary normal TV system).With nearly double the number of lines, progressive scan offers higher picture resolution and quality.
IMPORTANT!
Before enabling the progressive scan feature, you must ensure:
1) Your TV can accept progressive signals, a progressive scan TV is required.
2) You have connected the DVD player to your TV using Y Pb Pr (see ÒConnections-Step 5: Connecting TV- Using Component Video jacksÓ.)
1 Turn on your TV.
2 Turn off your TV progressive scan mode or turn on interlaced mode (refer to your TV user manual).
3 Press ECO POWER/STANDBY-ONB (B on the remote) to turn on the DVD player.
4 Select the correct Video Input channel.
The DVD background screen appears on the TV.
5 Press SYSTEM.

Getting Started

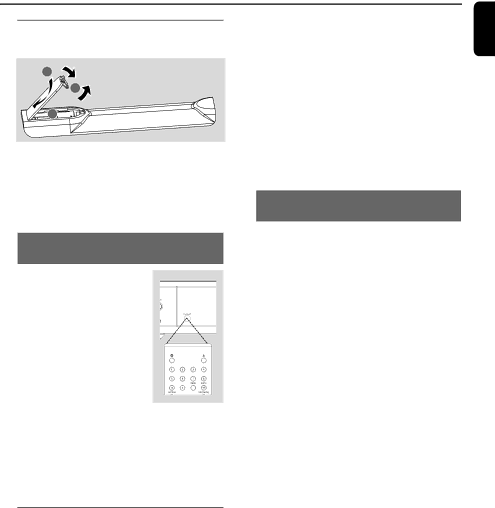
Step 1: Inserting batteries into the Remote Control

3

1

2

1Open the battery compartment.

2Insert two AAA batteries following the indications (+/-) inside the compartment.

3Close the cover.

Usually these channels are between the lowest and highest channels and may be called FRONT, A/V IN, or VIDEO. See your TV manual for more details.

Or, you may go to channel 1 on your TV, then press the Channel down button repeatedly until you see the Video In channel.

Or, the TV Remote Control may have a button or switch that chooses different video modes.

Or, set the TV to channel 3 or 4 if you are using an RF modulator.

English

Using the Remote Control to operate

the Player

1Aim the Remote Control directly at the remote sensor (IR) on the front panel.

2 Do not put any objects between the Remote Control and the DVD Player while operating the DVD Player.

CAUTION!

Remove batteries if

they are exhausted or if the Remote Control is not being used for a long time.

Do not use old and new or different types of batteries in combination.

Batteries contain chemical substances, so they should be disposed of properly.

Step 2: Setting up the TV

IMPORTANT!

Make sure you have completed all the necessary connections. (See “Connecting TV”).

1Switch the DVD system on and then select DISC source. (See ÒSwitching the system on/offÓ).

2Turn on the TV and set to the correct video-in channel.You should see the blue Philips DVD background screen on the TV.

19

Image 19
Contents DVD Micro Theatre Copyright in the U.K How to connect a plugImportant notes for users in the U.K Mains plugProhibited Manufactured under license from Dolby LaboratoriesWindows Media is a trademark of Microsoft Corporation Language Code Italiano Nederlands Deutsch Dansk Svenska Contents Other Functions System Menu OptionsGeneral Information FeaturesSupplied accessories InstallationDisposal of your old product MaintenanceSpeaker Placing the speakers and subwooferType plate is located at the bottom of the system Connections Connecting speakersConnecting the control cable Connecting TV Using Scart jackUsing Component Video jacks Y Pb Pr English Using Composite Video jackUse the composite video cable yellow to Using S-Video jackRF modulator to the Antenna in jack on the TV Connecting the power cord Connecting FM/MW antennasAdditional Connecting additional equipment Recording digital C Using the VCR for recording DVDs BConnecting an active subwoofer D Viewing and listening to the playback of other equipment aFunctional Overview DVD player and power amplifierZoom Remote controlProg GOTO/STCLOCK/RDS SLEEP/TIMER§ Mode DISC/TUNER/AUXGetting Started Inserting batteries into the Remote ControlSetting up the TV English Using the Remote Control to operate PlayerTo deactivate Progressive manually To exit from the menu Setting language preferenceSetting the OSD Language Setting the Audio, Subtitle and Disc Menu languageBasic Operations To deactivate the demonstration Demonstration modeDimming the display screen To activate the demonstrationPlaying discs Disc OperationsRegion Codes Playable DiscsBasic playback controls Using the Disc MenuForward/Reverse Searching DVD/VCD DivX/CD/MP3/WMA English Repeat A-B DVD/VCD/CD/MP3/DivXSlow Motion DVD/VCD Program not for Picture CDPlaying MP3/WMA/JPEG Picture Special disc featuresPlaying MP3/WMA disc Zoom picture Jpeg Special Jpeg featuresPlaying Jpeg Picture CD Preview function JpegPlayback with multi-angles Jpeg Playing a DivX discTV Display General SetupSystem Menu Options Basic operationsThis function is used to turn the screen saver on or off Audio SetupOff Screen saver is disabled Screen SaverÒReverb ModeÓ Digital Audio Setup 3D ProcessingDolby Digital Setup Option included in 3D Processing isColor Setting Video SetupNight Mode TV ModeRating explanations DefaultPreference ParentalSystem Menu Options Other Functions Setting the RDS clockRadio Reception Wake-up timer setting Setting the clockSetting sleep/wake-up timer Sleep timer settingSpecifications Check if the AC power cord is properly connected TroubleshootingEnglish Problem SolutionTroubleshooting Troubleshooting Glossary