Desktop Unit:

AastraLink Pro 160 Administrator’s Quick Start Guide

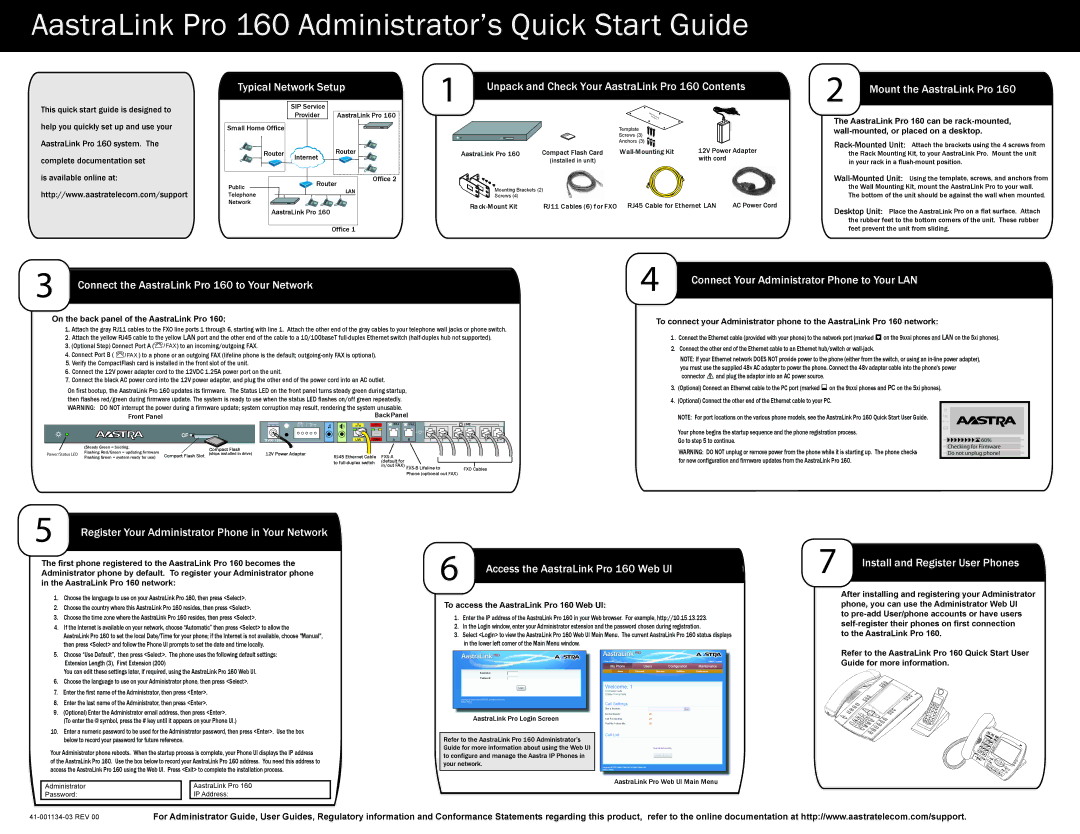
This quick start guide is designed to help you quickly set up and use your AastraLink Pro 160 system. The complete documentation set

is available online at: http://www.aastratelecom.com/support

Typical Network Setup


SIP Service


Provider

AastraLink Pro 160

Small Home Office


Router

Internet

Router


Public


Router

Office 2


LAN


Telephone


Network


AastraLink Pro 160


Office 1


1

Unpack and Check Your AastraLink Pro 160 Contents


Wall


M


ou


Te nti


mpl ng


ate


Template


CF


Screws (3)


Anchors (3)


AastraLink Pro 160

Compact Flash Card

Wall-Mounting Kit

12V Power Adapter


(installed in unit)


with cord


Mounting Brackets (2)


Screws (4)


Rack-Mount Kit

RJ11 Cables (6) for FXO

RJ45 Cable for Ethernet LAN

AC Power Cord


2

Mount the AastraLink Pro 160

The AastraLink Pro 160 can be rack-mounted, wall-mounted, or placed on a desktop.

Rack-Mounted Unit: Attach the brackets using the 4 screws from the Rack Mounting Kit, to your AastraLink Pro. Mount the unit in your rack in a flush-mount position.

Wall-Mounted Unit: Using the template, screws, and anchors from

the Wall Mounting Kit, mount the AastraLink Pro to your wall. The bottom of the unit should be against the wall when mounted.

Place the AastraLink Pro on a flat surface. Attach the rubber feet to the bottom corners of the unit. These rubber feet prevent the unit from sliding.


3

Connect the AastraLink Pro 160 to Your Network

On the back panel of the AastraLink Pro 160:

1.Attach the gray RJ11 cables to the FXO line ports 1 through 6, starting with line 1. Attach the other end of the gray cables to your telephone wall jacks or phone switch.

2.Attach the yellow RJ45 cable to the yellow LAN port and the other end of the cable to a 10/100baseT full-duplex Ethernet switch (half-duplex hub not supported).

3.(Optional Step) Connect Port A (/FAX) to an incoming/outgoing FAX.

4.Connect Port B ( /FAX ) to a phone or an outgoing FAX (lifeline phone is the default; outgoing-only FAX is optional).

5.Verify the CompactFlash card is installed in the front slot of the unit.

6.Connect the 12V power adapter cord to the 12VDC 1.25A power port on the unit.

7.Connect the black AC power cord into the 12V power adapter, and plug the other end of the power cord into an AC outlet.

On first bootup, the AastraLink Pro 160 updates its firmware. The Status LED on the front panel turns steady green during startup, then flashes red/green during firmware update. The system is ready to use when the status LED flashes on/off green repeatedly. WARNING: DO NOT interrupt the power during a firmware update; system corruption may result, rendering the system unusable.

Front Panel

Back Panel


/FAX

/ FAX


LINE


CF


TM8DC


12 VDC 1.25A

LAN

WAN

A

B

1

2

3

4

5

6


(Steady Green = booting.


Compact Flash


Flashing Red/Green = updating firmware


12V Power Adapter


Power/Status LED

Compact Flash Slot

(ships installed in drive)

RJ45 Ethernet Cable

FXS-A


Flashing Green = system ready for use)


to full-duplex switch

(default for


in/out FAX) FXS-B Lifeline to


FXO Cables


Phone (optional out FAX)


4


Connect Your Administrator Phone to Your LAN

To connect your Administrator phone to the AastraLink Pro 160 network:

1 . Connect the Ethernet cable (provided with your phone) to the network port (marked on the 9xxxi phones and LAN on the 5xi phones). 2. Connect the other end of the Ethernet cable to an Ethernet hub/switch or wall-jack.

NOTE: If your Ethernet network DOES NOT provide power to the phone (either from the switch, or using an in-line power adapter), you must use the supplied 48v AC adapter to power the phone. Connect the 48v adapter cable into the phone's power connector and plug the adaptor into an AC power source.

3.(Optional) Connect an Ethernet cable to the PC port (marked on the 9xxxi phones and PC on the 5xi phones).

4.(Optional) Connect the other end of the Ethernet cable to your PC.

NOTE: For port locations on the various phone models, see the AastraLink Pro 160 Quick Start User Guide.


Your phone begins the startup sequence and the phone registration process.


Go to step 5 to continue.

60%


WARNING: DO NOT unplug or remove power from the phone while it is starting up. The phone checks


Checking for Firmware


Do not unplug phone!

for new configuration and firmware updates from the AastraLink Pro 160.


5

Register Your Administrator Phone in Your Network

The first phone registered to the AastraLink Pro 160 becomes the Administrator phone by default. To register your Administrator phone in the AastraLink Pro 160 network:

1.Choose the language to use on your AastraLink Pro 160, then press <Select>.

2.Choose the country where this AastraLink Pro 160 resides, then press <Select>.

3.Choose the time zone where the AastraLink Pro 160 resides, then press <Select>.

4.If the Internet is available on your network, choose “Automatic” then press <Select> to allow the

AastraLink Pro 160 to set the local Date/Time for your phone; if the Internet is not available, choose "Manual", then press <Select> and follow the Phone UI prompts to set the date and time locally.

5. Choose “Use Default”, then press <Select>. The phone uses the following default settings: Extension Length (3), First Extension (200)

You can edit these settings later, if required, using the AastraLink Pro 160 Web UI.

6.Choose the language to use on your Administrator phone, then press <Select>.

7.Enter the first name of the Administrator, then press <Enter>.

8.Enter the last name of the Administrator, then press <Enter>.

9.(Optional) Enter the Administrator email address, then press <Enter>. (To enter the @ symbol, press the # key until it appears on your Phone UI.)

10.Enter a numeric password to be used for the Administrator password, then press <Enter>. Use the box below to record your password for future reference.

Your Administrator phone reboots. When the startup process is complete, your Phone UI displays the IP address of the AastraLink Pro 160. Use the box below to record your AastraLink Pro 160 address. You need this address to access the AastraLink Pro 160 using the Web UI. Press <Exit> to complete the installation process.

6

Access the AastraLink Pro 160 Web UI

To access the AastraLink Pro 160 Web UI:

1.Enter the IP address of the AastraLink Pro 160 in your Web browser. For example, http://10.15.13.223.

2.In the Login window, enter your Administrator extension and the password chosen during registration.

3.Select <Login> to view the AastraLink Pro 160 Web UI Main Menu. The current AastraLink Pro 160 status displays in the lower left corner of the Main Menu window.

AastraLink Pro Login Screen

Refer to the AastraLink Pro 160 Administrator’s Guide for more information about using the Web UI to configure and manage the Aastra IP Phones in your network.


7

Install and Register User Phones

After installing and registering your Administrator phone, you can use the Administrator Web UI

to pre-add User/phone accounts or have users self-register their phones on first connection to the AastraLink Pro 160.

Refer to the AastraLink Pro 160 Quick Start User Guide for more information.

Hold

Redial

Goodbye

Options

35

Xfer

Conf

Icom

Services

Administrator Password:

AastraLink Pro 160 IP Address:

AastraLink Pro Web UI Main Menu

41-001134-03 REV 00

For Administrator Guide, User Guides, Regulatory information and Conformance Statements regarding this product, refer to the online documentation at http://www.aastratelecom.com/support.

Page 1
Image 1
Aastra Telecom quick start Typical Network Setup, Unpack and Check Your AastraLink Pro 160 Contents

160 specifications

The Aastra Telecom 160 is recognized as a reliable and efficient business phone designed to meet the communication needs of various enterprises. As part of Aastra's comprehensive range of telecommunications solutions, the Aastra 160 offers a blend of functionality, advanced technology, and user-friendly design, making it an ideal choice for organizations focusing on enhancing their operational efficiency.

One of the standout features of the Aastra 160 is its ergonomically designed interface, which includes a clear, well-organized keypad that facilitates easy dialing and navigation. The large LCD display provides users with essential information at a glance, such as caller ID, call duration, and connection status, enhancing usability during busy hours. Moreover, the phone is equipped with programmable keys that can be assigned to frequently used features or contacts, allowing for streamlined communication.

In terms of technology, the Aastra 160 is designed to support both traditional analog lines and Voice over IP (VoIP) networks, making it a versatile choice for modern businesses looking to upgrade their telephony systems. The integration of VoIP technology means that users can benefit from enhanced call quality, greater flexibility, and cost savings, particularly for long-distance and international calls.

Another notable aspect of the Aastra Telecom 160 is its built-in speakerphone capability. This feature supports hands-free communication, enabling users to multitask and collaborate effectively during conference calls. Additionally, the phone includes a headset jack, offering further options for hands-free use, which is particularly beneficial in high-volume call centers or environments where employees need to maintain focus on their tasks.

The Aastra 160 also prioritizes power efficiency, with power-saving features that contribute to reduced energy consumption. This focus on sustainability is increasingly important for modern organizations looking to minimize their environmental impact.

In conclusion, the Aastra Telecom 160 is a robust and multifunctional business phone that adapts to the diverse needs of any workplace. With its combination of a user-friendly design, advanced VoIP capabilities, and energy-efficient features, the Aastra 160 stands out as a valuable asset for companies aiming to optimize their communication processes while ensuring a seamless user experience.