2 • OVERVIEW OF FEATURES - RAIN COLLECTOR
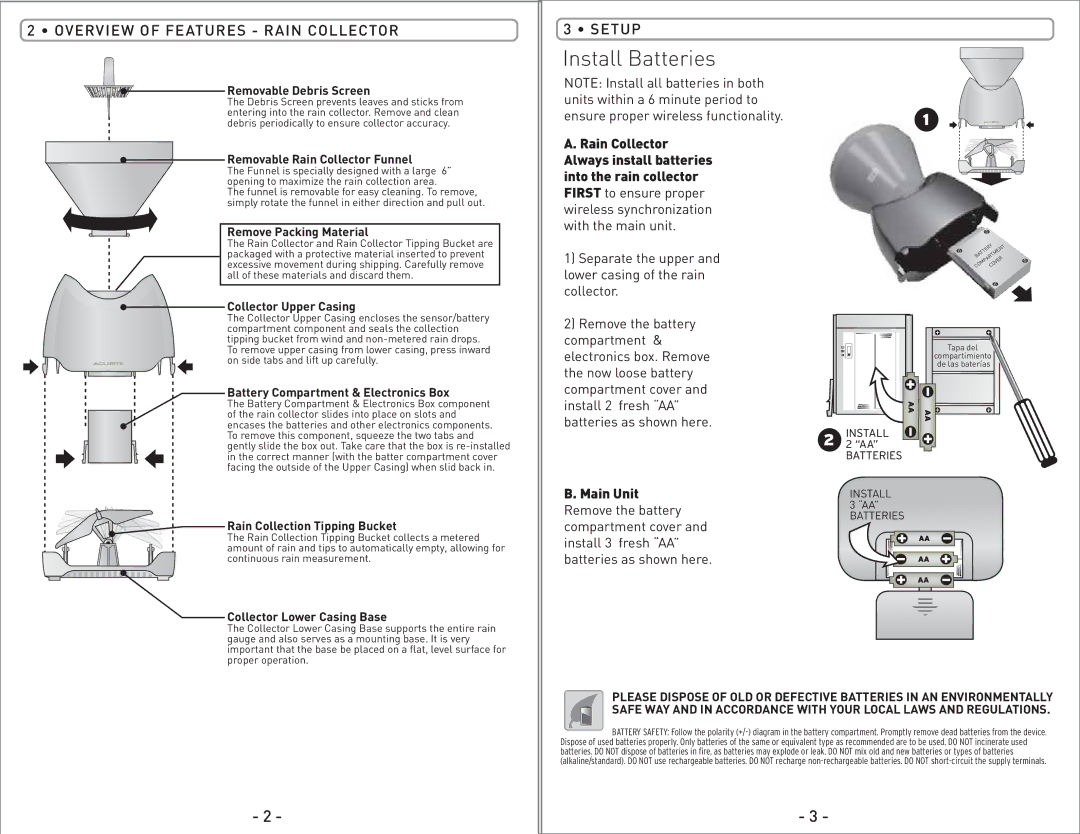
 Removable Debris Screen
The Debris Screen prevents leaves and sticks from entering into the rain collector. Remove and clean debris periodically to ensure collector accuracy.
 Removable Rain Collector Funnel
The Funnel is specially designed with a large 6” opening to maximize the rain collection area.
The funnel is removable for easy cleaning. To remove, simply rotate the funnel in either direction and pull out.
Remove Packing Material
The Rain Collector and Rain Collector Tipping Bucket are packaged with a protective material inserted to prevent excessive movement during shipping. Carefully remove all of these materials and discard them.
 Collector Upper Casing
The Collector Upper Casing encloses the sensor/battery compartment component and seals the collection tipping bucket from wind and
Battery Compartment & Electronics Box
The Battery Compartment & Electronics Box component of the rain collector slides into place on slots and encases the batteries and other electronics components. To remove this component, squeeze the two tabs and gently slide the box out. Take care that the box is
3 • SETUP
Install Batteries
NOTE: Install all batteries in both units within a 6 minute period to ensure proper wireless functionality.
A. Rain Collector Always install batteries into the rain collector FIRST to ensure proper wireless synchronization with the main unit.
1)Separate the upper and lower casing of the rain collector.
2)Remove the battery compartment & electronics box. Remove the now loose battery compartment cover and install 2 fresh “AA” batteries as shown here.
A B C![]()
![]()
![]()
COMPARTMENTBATTERY
COVER
Tapa del
compartimiento de las baterías
Rain Collection Tipping Bucket
The Rain Collection Tipping Bucket collects a metered amount of rain and tips to automatically empty, allowing for continuous rain measurement.
Collector Lower Casing Base
The Collector Lower Casing Base supports the entire rain gauge and also serves as a mounting base. It is very important that the base be placed on a flat, level surface for proper operation.
- 2 -
B. Main Unit | INSTALL | |
Remove the battery | 3 “AA” | |
BATTERIES | ||
compartment cover and | ||
| ||
install 3 fresh “AA” |
| |
batteries as shown here. |
|
PLEASE DISPOSE OF OLD OR DEFECTIVE BATTERIES IN AN ENVIRONMENTALLY SAFE WAY AND IN ACCORDANCE WITH YOUR LOCAL LAWS AND REGULATIONS.
BATTERY SAFETY: Follow the polarity
- 3 -
