2 • SETUP
3 • PLACEMENT
Install Batteries |
|
|
|
|
|
|
|
|
|
|
|
|
|
|
| |
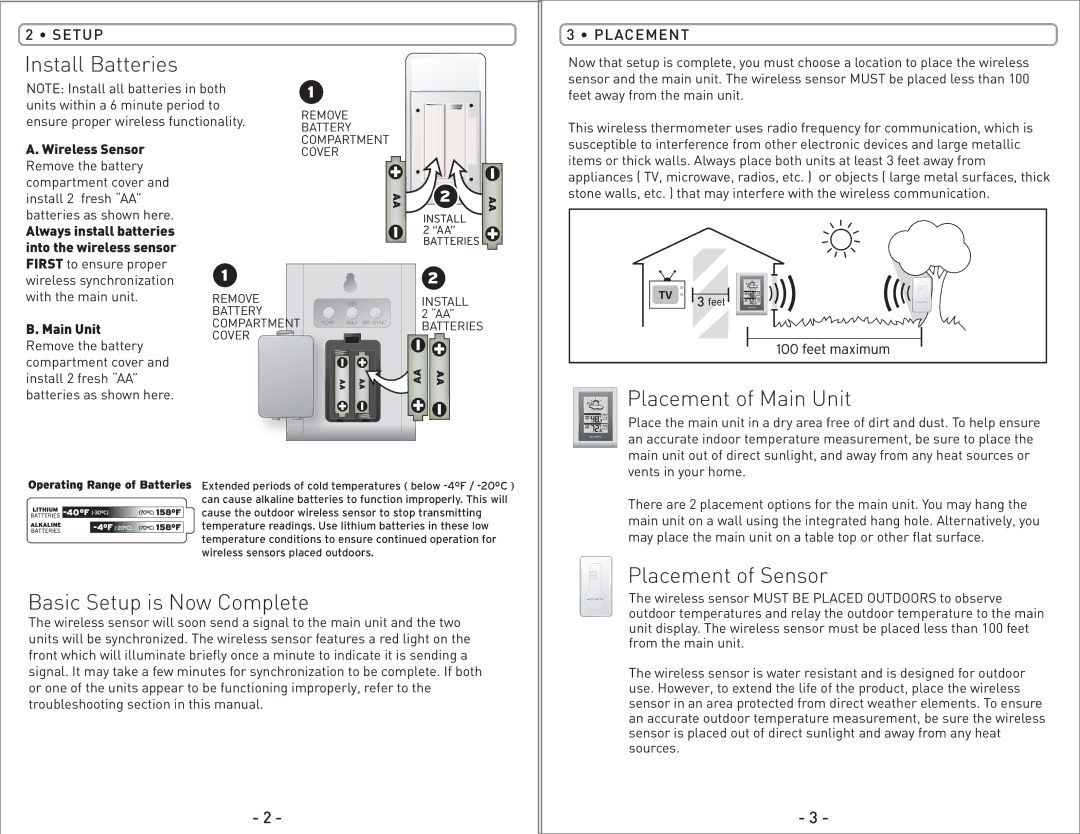
NOTE: Install all batteries in both |
|
|
|
|
|
|
|
|
|
|
| |||||
units within a 6 minute period to | REMOVE | |||||||||||||||
ensure proper wireless functionality. | ||||||||||||||||
BATTERY | ||||||||||||||||
|
|
|
|
| ||||||||||||
A. Wireless Sensor |
|
|
|
| COMPARTMENT | |||||||||||
|
|
|
| COVER | ||||||||||||
Remove the battery |
|
|
|
|
|
|
|
|
|
|
|
|
|
|
| |
compartment cover and |
|
|
|
|
|
|
|
|
|
|
|
|
|
|
| |
install 2 fresh “AA” |
|
|
|
|
|
|
|
|
|
|
|
|
|
|
| |
batteries as shown here. |
|
|
|
|
|
|
|
|
|
|
|
|
|
|
| |
Always install batteries |
|
|
|
|
|
|
|
|
|
|
|
|
|
|
| |
into the wireless sensor |
|
|
|
|
|
|
|
|
|
|
|
|
|
|
| |
FIRST to ensure proper |
|
|
|
|
|
|
|
|
|
|
|
|
|
|
| |
|
|
|
|
|
|
|
|
|
|
|
|
|
|
| ||
wireless synchronization |
|
|
|
|
|
|
|
|
|
|
|
|
|
|
| |
with the main unit. | REMOVE |
|
|
|
|
|
|
| MIN |
| ||||||
| BATTERY |
|
|
|
|
|
|
|
|
|
|
|
|
| ||
B. Main Unit | COMPARTMENT |
|
|
| ºC/ºF MAX |
| ||||||||||
|
|
|
|
|
|
|
|
|
|
|
|
|
|
| ||
COVER |
|
|
|
|
|
|
|
|
|
|
|
|
| |||
Remove the battery |
|
|
|
|
|
|
|
|
|
|
|
|
| |||
|
|
|
|
|
|
|
|
|
|
|
|
|
|
| ||
compartment cover and |
|
|
|
|
|
|
|
|
|
|
|
|
|
|
| |
install 2 fresh “AA” |
|
|
|
|
|
|
|
|
|
|
|
|
|
|
| |
batteries as shown here. |
|
|
|
|
|
|
|
|
|
|
|
|
|
|
| |
|
|
|
|
|
|
|
|
|
|
|
|
|
|
|
| |
|
|
|
|
|
|
|
|
|
|
|
|
|
|
|
| |
|
|
|
|
|
|
|
|
|
|
|
|
|
|
|
| |
INSTALL
2“AA”
BATTERIES
Now that setup is complete, you must choose a location to place the wireless sensor and the main unit. The wireless sensor MUST be placed less than 100 feet away from the main unit.
This wireless thermometer uses radio frequency for communication, which is susceptible to interference from other electronic devices and large metallic items or thick walls. Always place both units at least 3 feet away from appliances ( TV, microwave, radios, etc. ) or objects ( large metal surfaces, thick stone walls, etc. ) that may interfere with the wireless communication.
TV ![]()
![]()
![]() 3
3 ![]()
![]()
![]()
Placement of Main Unit |
Place the main unit in a dry area free of dirt and dust. To help ensure |
an accurate indoor temperature measurement, be sure to place the |
main unit out of direct sunlight, and away from any heat sources or |
vents in your home.
|
| Extended periods of cold temperatures ( below |
|
| can cause alkaline batteries to function improperly. This will |
|
| cause the outdoor wireless sensor to stop transmitting |
40 |
| |
|
| temperature readings. Use lithium batteries in these low |
|
| |
|
| temperature conditions to ensure continued operation for |
|
| wireless sensors placed outdoors. |
Basic Setup is Now Complete
The wireless sensor will soon send a signal to the main unit and the two units will be synchronized. The wireless sensor features a red light on the front which will illuminate briefly once a minute to indicate it is sending a signal. It may take a few minutes for synchronization to be complete. If both or one of the units appear to be functioning improperly, refer to the troubleshooting section in this manual.
- 2 -
There are 2 placement options for the main unit. You may hang the main unit on a wall using the integrated hang hole. Alternatively, you may place the main unit on a table top or other flat surface.
Placement of Sensor
The wireless sensor MUST BE PLACED OUTDOORS to observe outdoor temperatures and relay the outdoor temperature to the main unit display. The wireless sensor must be placed less than 100 feet from the main unit.
The wireless sensor is water resistant and is designed for outdoor use. However, to extend the life of the product, place the wireless sensor in an area protected from direct weather elements. To ensure an accurate outdoor temperature measurement, be sure the wireless sensor is placed out of direct sunlight and away from any heat sources.
- 3 -
