MODELO 4CH69/9530
OPERATING INSTRUCTIONS & PARTS MANUAL
la cabeza del ventilador. Saque los botones y los aros interiores de caucho. Tire suavemente de los extremos del yugo hasta que salgan y saque los ejes roscados de los orficios del yugo. Agarre suavemente la parte superior e inferior del ventilador. Presione lentamente sólo hasta que las cubiertas se desmonten. Limpie las aspas del ventilador con un paño humedecido. NO DEJE QUE EL AGUA ENTRE EN EL MOTOR. Vuelva a instalar las rejillas tal como se habian montado anteriormente invirtiendo el orden seguido para desmontarlas. Asegúrese de que el ventilador esté completamente seco antes de enchufarlo.
LUBRICACIÓN
Los cojinetes de precisión vienen sellados de fábrica de por vida y no requieren de lubricación adicional.
ALMACENAMIENTO
Cuando no esté en uso, guarde la unidad en un lugar limpio y seco.
ADVERTENCIA: PARA REDUCIR EL RIESGO DE INCENDIOS O DESCARGAS ELÉCTRICAS, NO USE ESTE VENTILADOR CON NINGÚN DISPOSITIVO DE CONTROL DE VELOCIDAD DE ESTADO SÓLIDO.
9" (22.9 cm) PIVOT FAN
MODEL 4CH69/9525
READ AND SAVE THESE INSTRUCTIONS
READ CAREFULLY BEFORE ATTEMPTING TO ASSEMBLE, INSTALL, OPERATE OR MAINTAIN THE PRODUCT DESCRIBED.
PROTECT YOURSELF AND OTHERS BY OBSERVING ALL SAFETY INFORMATION. FAILURE TO COMPLY WITH
INSTRUCTIONS COULD RESULT IN PERSONAL INJURY AND/OR PROPERTY DAMAGE!
161
RETAIN INSTRUCTIONS FOR FUTURE REFERENCE.
|
|
|
|
|
| 4 |
| |
6 | 7 |
|
|
|
|
| 10 | |
|
|
|
|
| 5 | |||
|
|
|
|
|
| 2 | ||
|
|
| 7 |
| 13 | |||
|
|
|
|
|
|
| ||
|
|
|
| 3 | 6 |
|
| 8 |
|
|
|
| 14 |
| 12 | ||
|
|
|
|
|
|
| ||
|
|
|
|
| 15 |
|
| |
|
|
|
|
|
|
|
| |
|
|
|
|
|
| 11 |
|
|
|
|
| 9 |
|
|
|
| |
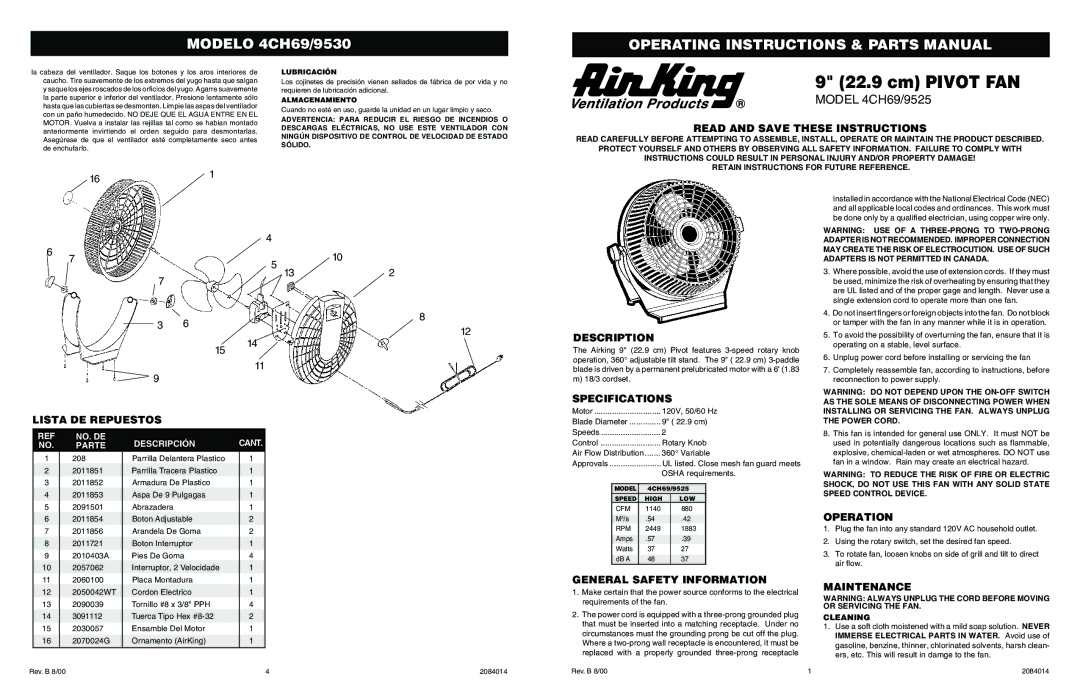
LISTA DE REPUESTOS |
|
|
|
| ||||
|
|
|
|
|
|
|
|
|
| REF | NO. DE | DESCRIPCIÓN | CANT. |
|
| ||
| NO. | PARTE |
|
| ||||
1 | 208 | Parrilla Delantera Plastico | 1 |
|
| |||
| 2 | 2011851 | Parrilla Tracera Plastico | 1 |
|
| ||
3 | 2011852 | Armadura De Plastico | 1 |
|
| |||
| 4 | 2011853 | Aspa De 9 Pulgagas | 1 |
|
| ||
5 | 2091501 | Abrazadera |
| 1 |
|
| ||
6 | 2011854 | Boton Adjustable | 2 |
|
| |||
7 | 2011856 | Arandela De Goma | 2 |
|
| |||
8 | 2011721 | Boton Interruptor | 1 |
|
| |||
9 | 2010403A | Pies De Goma | 4 |
|
| |||
| 10 | 2057062 | Interruptor, 2 Velocidade | 1 |
|
| ||
DESCRIPTION
The Airking 9" (22.9 cm) Pivot features
SPECIFICATIONS
Motor | 120V, 50/60 Hz | ||||
Blade Diameter | 9" ( 22.9 cm) | ||||
Speeds | 2 |
|
| ||
Control | Rotary Knob | ||||
Air Flow Distribution | ....... 360° Variable | ||||
Approvals | UL listed. Close mesh fan guard meets | ||||
|
|
| OSHA requirements. | ||
|
|
|
|
|
|
| MODEL |
| 4CH69/9525 |
| |
| SPEED |
| HIGH | LOW |
|
| CFM |
| 1140 | 880 |
|
|
|
|
|
|
|
| M3/s |
| .54 | .42 |
|
| RPM |
| 2449 | 1883 |
|
|
|
|
|
|
|
| Amps |
| .57 | .39 |
|
| Watts |
| 37 | 27 |
|
|
|
|
|
|
|
| dB A |
| 48 | 37 |
|
installed in accordance with the National Electrical Code (NEC) and all applicable local codes and ordinances. This work must be done only by a qualified electrician, using copper wire only.
WARNING: USE OF A
3.Where possible, avoid the use of extension cords. If they must be used, minimize the risk of overheating by ensuring that they are UL listed and of the proper gage and length. Never use a single extension cord to operate more than one fan.
4.Do not insert fingers or foreign objects into the fan. Do not block or tamper with the fan in any manner while it is in operation.
5.To avoid the possibility of overturning the fan, ensure that it is operating on a stable, level surface.
6.Unplug power cord before installing or servicing the fan
7.Completely reassemble fan, according to instructions, before reconnection to power supply.
WARNING: DO NOT DEPEND UPON THE
8.This fan is intended for general use ONLY. It must NOT be used in potentially dangerous locations such as flammable, explosive,
WARNING: TO REDUCE THE RISK OF FIRE OR ELECTRIC SHOCK, DO NOT USE THIS FAN WITH ANY SOLID STATE SPEED CONTROL DEVICE.
OPERATION
1.Plug the fan into any standard 120V AC household outlet.
2.Using the rotary switch, set the desired fan speed.
3.To rotate fan, loosen knobs on side of grill and tilt to direct air flow.
11 | 2060100 | Placa Montadura | 1 |
12 | 2050042WT | Cordon Electrico | 1 |
13 | 2090039 | Tornillo #8 x 3/8" PPH | 4 |
14 | 3091112 | Tuerca Tipo Hex | 2 |
15 | 2030057 | Ensamble Del Motor | 1 |
|
|
|
|
16 | 2070024G | Ornamento (AirKing) | 1 |
|
|
|
|
GENERAL SAFETY INFORMATION
1.Make certain that the power source conforms to the electrical requirements of the fan.
2.The power cord is equipped with a
MAINTENANCE
WARNING: ALWAYS UNPLUG THE CORD BEFORE MOVING OR SERVICING THE FAN.
CLEANING
1.Use a soft cloth moistened with a mild soap solution. NEVER IMMERSE ELECTRICAL PARTS IN WATER. Avoid use of gasoline, benzine, thinner, chlorinated solvents, harsh clean- ers, etc. This will result in damge to the fan.
Rev. B 8/00 | 4 | 2084014 |
Rev. B 8/00 | 1 | 2084014 |