MODEL 3LA80A/9915A
MODEL 3LA80A/9915A
3. | Even though your Humidifier will produce approximately 3 gal- | ||||
| lons in a 24 hour period*, the water capacity (amount of water | ||||
| the Humidifier will hold at one time) is 1.75 gallons. | ||||
4. | You may fill your Recirculating Evaporative Humidifier two | ||||
| different ways: | ||||
| A) Fill the Base with cool water to level indicated | ||||
| in Figure 2A. | ||||
| B) Replace the Upper Housing on the Base and push Water | ||||
|
|
|
|
|
|
|
|
|
|
|
|
|
|
|
|
|
|
|
|
|
|
|
|
CLEANING and FILTER CARE
1.Regular cleaning is necessary to ensure proper and efficient operation. The frequency of cleaning depends on the amount of impurities which may be found in the water or how often the Humidifier is in operation. In either instance, it is recommended that the Humidifier be cleaned at least once a week.
CAUTION: To prevent electric shock, always turn Control Knob to OFF (0) position and unplug before cleaning.
9.Use a dry soft cloth to wipe the Chassis area, which includes the motor area. DO NOT use water to clean the Motor or
Switch area. Doing so may result in electrical shock or dam- age to the Humidifier.
10.Commercial "Descalers" and "Bacteriostats" are available at your local home improvement center.
11.Do not operate Humidifier when there is still cleaner in the water.
OFF SEASON STORAGE
1.Clean and dry Humidifier thoroughly per the CLEANING and FILTER CARE section. Do not leave any water in the
Unit while storing.
2.Dispose of the Evaporative Pad. Do not store a used Evapora- tive Pad in the Humidifier. Do not dispose of Pad Holder.
3.Place Humidifier back in its carton and store in a cool dry place.
Lens down to pour water into the Humidifier (Figure 2B) |
until it reaches the level indicated in Figure 2A. |
2.Remove Upper Housing from Base. Be careful not to let ex- cess water from pump spill onto furniture or flooring.
TROUBLE SHOOTING GUIDE
TROUBLE | PROBABLE CAUSE | SOLUTION |
Foul odor | • Filters need to be replaced | Replace Filter |
Figure 2A |
Maximum Water Level |
Figure 2B
Water Lens
Figure 4
Filter
3.With water lens pushed
down, the filter may be re- moved for cleaning or re- placing. (Figure 4)
4.Remove Evaporative Pad Holder from Base and inspect Small
Water Drip Holes for any blockage. (Figure 5)
| • Base/reservoir needs to be cleaned | Follow Instructions under CLEANING |
|
| and FILTER CARE |
| • Whole humidifier needs cleaning | Follow Instructions under CLEANING |
|
| and FILTER CARE |
Filter discoloration | • Mineral deposits in water | Replace Filter |
Water discoloration | • Humidifier needs to be cleaned | Follow Instructions under CLEANING |
|
| and FILTER CARE |
| • Hard water - Iron in water | Use filtered or distilled water |
| • Some humidifier additives can cause |
|
| discoloration |
|
No water show | • No water in Humidifier | Fill with cool water |
| • Hose not connected to water show | Connect Hose to Water Show |
Do not overfill and never use hot water.
CAUTION: Do not pour water through the Ex- haust Grill on the Upper Housing. Doing so
It is important that these Drip Holes remain open at all times for proper water supply to Evaporative Pad.
• Hose not connected to pump | Connect Hose to Pump |
1 |
may cause damage and personal injury.
Do not overfill. Overfilling the Unit may cause motor damage.
Always carry filled Humidifier carefully. Never move water filled Humidifier while plugged in.
5. Take extra care to prevent water spillage that may damage furni- |
ture or flooring. The manufacturer will not accept responsibil- |
ity for damage to property caused by water spillage. |
6. Always be sure that the Power Control Knob is in the OFF (0) |
| Figure 5 |
Evaporative | Drip Holes |
Pad Holder |
Figure 6
Evaporative Pad
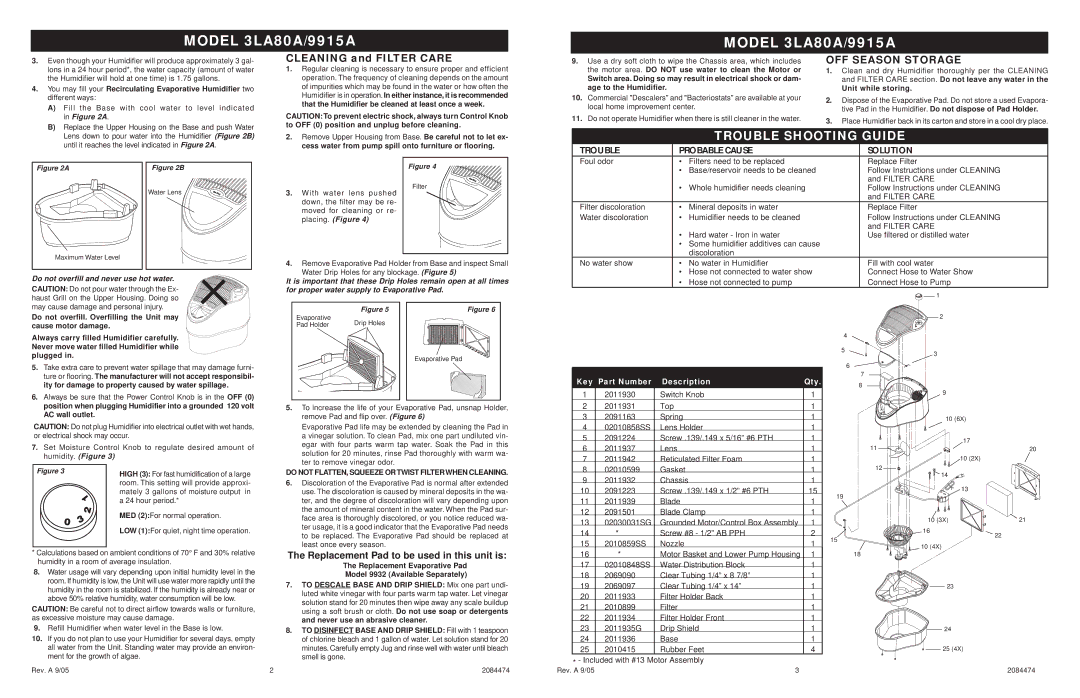
Key | Part Number | Description | Qty. |
1 | 2011930 | Switch Knob | 1 |
|
|
|
|
|
|
|
|
|
|
|
|
|
|
|
|
|
|
|
|
|
|
|
|
|
|
|
|
|
|
|
|
|
|
|
|
|
|
|
|
|
|
|
|
|
|
|
|
|
|
|
|
|
|
|
|
|
|
|
|
|
|
|
|
|
|
|
|
|
|
|
|
|
|
|
|
|
|
|
|
|
|
|
|
|
|
|
|
|
|
|
|
|
|
|
|
| 2 |
4 |
|
5 | 3 |
| |
6 |
|
| 7 |
| 8 |
| 9 |
position when plugging Humidifier into a grounded 120 volt |
AC wall outlet. |
CAUTION: Do not plug Humidifier into electrical outlet with wet hands, or electrical shock may occur.
7.Set Moisture Control Knob to regulate desired amount of humidity. (Figure 3)
Figure 3 | HIGH (3): For fast humidification of a large |
| |
| room. This setting will provide approxi- |
| mately 3 gallons of moisture output in |
| a 24 hour period.* |
| MED (2):For normal operation. |
| LOW (1):For quiet, night time operation. |
5.To increase the life of your Evaporative Pad, unsnap Holder, remove Pad and flip over. (Figure 6)
Evaporative Pad life may be extended by cleaning the Pad in a vinegar solution. To clean Pad, mix one part undiluted vin- egar with four parts warm tap water. Soak the Pad in this solution for 20 minutes, rinse Pad thoroughly with warm wa- ter to remove vinegar odor.
DO NOT FLATTEN, SQUEEZE OR TWIST FILTER WHEN CLEANING.
6.Discoloration of the Evaporative Pad is normal after extended use. The discoloration is caused by mineral deposits in the wa- ter, and the degree of discoloration will vary depending upon the amount of mineral content in the water. When the Pad sur- face area is thoroughly discolored, or you notice reduced wa- ter usage, it is a good indicator that the Evaporative Pad needs to be replaced. The Evaporative Pad should be replaced at least once every season.
2 | 2011931 | Top | 1 |
3 | 2091163 | Spring | 1 |
4 | 02010858SS | Lens Holder | 1 |
5 | 2091224 | Screw .139/.149 x 5/16” #6 PTH | 1 |
6 | 2011937 | Lens | 1 |
7 | 2011942 | Reticulated Filter Foam | 1 |
8 | 02010599 | Gasket | 1 |
9 | 2011932 | Chassis | 1 |
10 | 2091223 | Screw .139/.149 x 1/2” #6 PTH | 15 |
11 | 2011939 | Blade | 1 |
12 | 2091501 | Blade Clamp | 1 |
13 | 02030031SG | Grounded Motor/Control Box Assembly | 1 |
14 | * | Screw #8 - 1/2” AB PPH | 2 |
15 | 2010859SS | Nozzle | 1 |
10 (6X) |
| |
17 |
| |
11 | 20 | |
10 (2X) |
| |
12 |
| |
14 |
| |
13 |
| |
19 |
| |
10 (3X) | 21 | |
16 | 22 | |
15 | ||
| ||
10 (4X) |
|
* Calculations based on ambient conditions of 70° F and 30% relative |
| The Replacement Pad to be used in this unit is: | ||
humidity in a room of average insulation. |
|
| The Replacement Evaporative Pad | |
8. | Water usage will vary depending upon initial humidity level in the |
|
| |
|
| Model 9932 (Available Separately) | ||
| room. If humidity is low, the Unit will use water more rapidly until the |
|
| |
|
| 7. | TO DESCALE BASE AND DRIP SHIELD: Mix one part undi- | |
| humidity in the room is stabilized. If the humidity is already near or |
| ||
|
|
| luted white vinegar with four parts warm tap water. Let vinegar | |
| above 50% relative humidity, water consumption will be low. |
|
| |
|
|
| solution stand for 20 minutes then wipe away any scale buildup | |
CAUTION: Be careful not to direct airflow towards walls or furniture, |
|
| ||
|
| using a soft brush or cloth. Do not use soap or detergents | ||
as excessive moisture may cause damage. |
|
| ||
|
| and never use an abrasive cleaner. | ||
9. | Refill Humidifier when water level in the Base is low. |
| 8. | TO DISINFECT BASE AND DRIP SHIELD: Fill with 1 teaspoon |
10. | If you do not plan to use your Humidifier for several days, empty |
| ||
|
| of chlorine bleach and 1 gallon of water. Let solution stand for 20 | ||
| all water from the Unit. Standing water may provide an environ- |
|
| minutes. Carefully empty Jug and rinse well with water until bleach |
| ment for the growth of algae. |
|
| smell is gone. |
Rev. A 9/05 | 2 |
| 2084474 | |
16 | * | Motor Basket and Lower Pump Housing | 1 |
17 | 02010848SS | Water Distribution Block | 1 |
18 | 2069090 | Clear Tubing 1/4” x 8 7/8” | 1 |
19 | 2069097 | Clear Tubing 1/4” x 14” | 1 |
20 | 2011933 | Filter Holder Back | 1 |
21 | 2010899 | Filter | 1 |
22 | 2011934 | Filter Holder Front | 1 |
23 | 2011935G | Drip Shield | 1 |
24 | 2011936 | Base | 1 |
25 | 2010415 | Rubber Feet | 4 |
* - Included with #13 Motor Assembly |
| ||
Rev. A 9/05 |
| 3 |
|
18 |
23 |
24
![]()
![]() 25 (4X)
25 (4X)
2084474