Housing

Joist


Housing

Locating Tabs


Figure 4

Mounting Rails


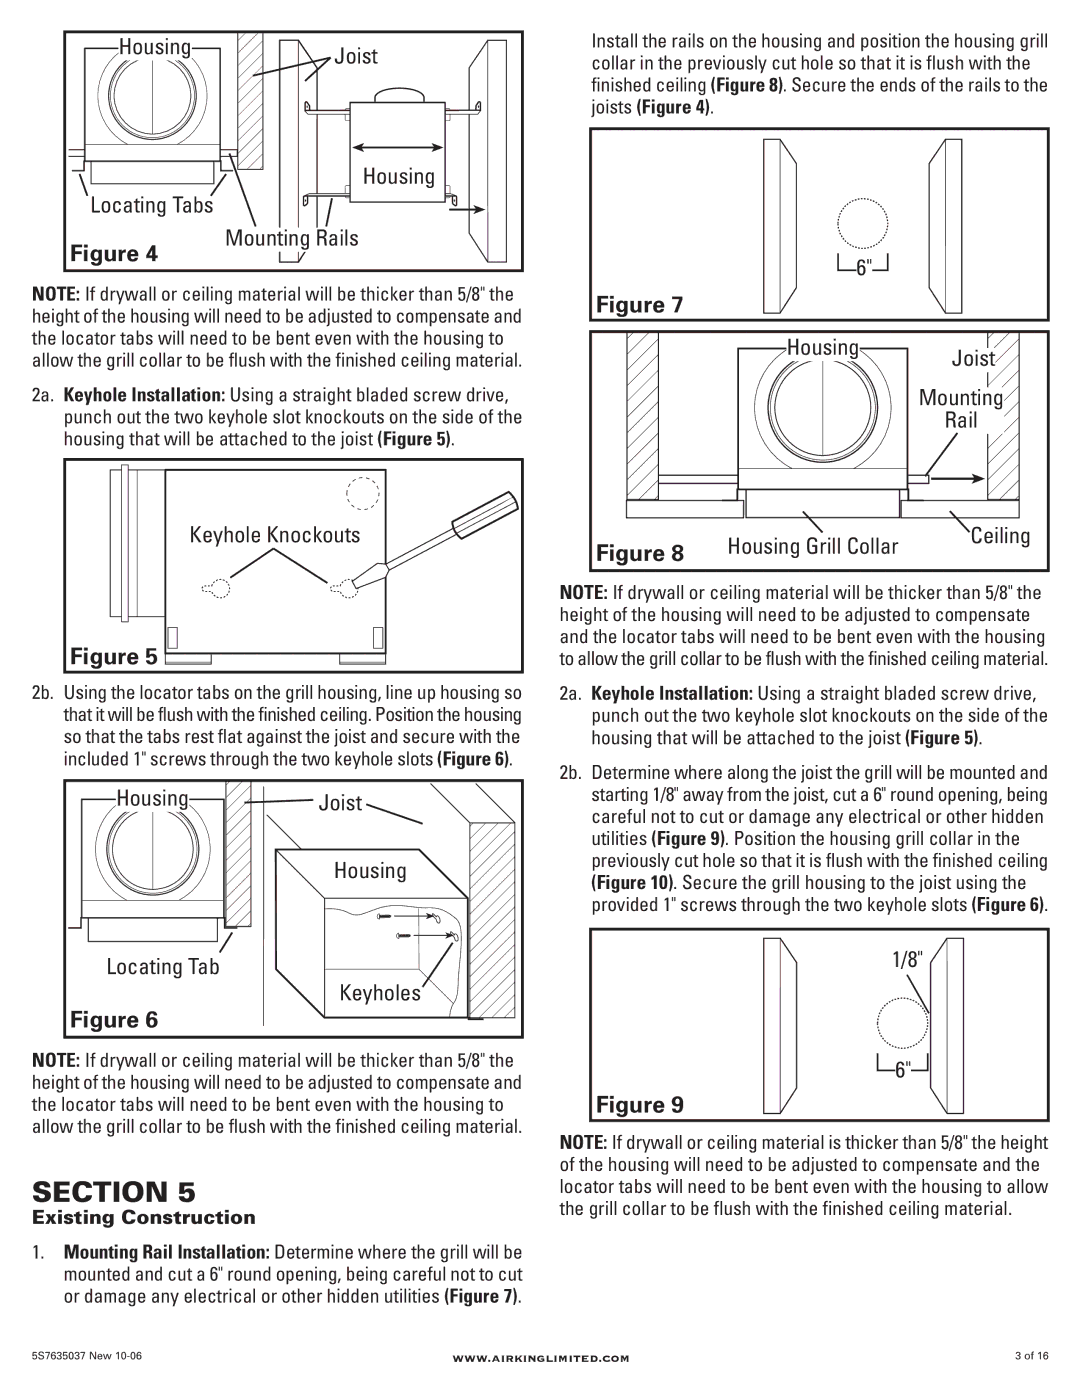
NOTE: If drywall or ceiling material will be thicker than 5/8" the height of the housing will need to be adjusted to compensate and the locator tabs will need to be bent even with the housing to allow the grill collar to be flush with the finished ceiling material.

2a. Keyhole Installation: Using a straight bladed screw drive, punch out the two keyhole slot knockouts on the side of the housing that will be attached to the joist (Figure 5).

Keyhole Knockouts

Figure 5

2b. Using the locator tabs on the grill housing, line up housing so that it will be flush with the finished ceiling. Position the housing so that the tabs rest flat against the joist and secure with the included 1" screws through the two keyhole slots (Figure 6).

Housing

Joist


Housing

Locating Tab

Keyholes


Figure 6


NOTE: If drywall or ceiling material will be thicker than 5/8" the height of the housing will need to be adjusted to compensate and the locator tabs will need to be bent even with the housing to allow the grill collar to be flush with the finished ceiling material.

SECTION 5

Existing Construction

1.Mounting Rail Installation: Determine where the grill will be mounted and cut a 6" round opening, being careful not to cut or damage any electrical or other hidden utilities (Figure 7).

Install the rails on the housing and position the housing grill collar in the previously cut hole so that it is flush with the finished ceiling (Figure 8). Secure the ends of the rails to the joists (Figure 4).

6"

Figure 7


Housing

Joist


Mounting


Rail

Figure 8

Housing Grill Collar

Ceiling


NOTE: If drywall or ceiling material will be thicker than 5/8" the height of the housing will need to be adjusted to compensate and the locator tabs will need to be bent even with the housing to allow the grill collar to be flush with the finished ceiling material.

2a. Keyhole Installation: Using a straight bladed screw drive, punch out the two keyhole slot knockouts on the side of the housing that will be attached to the joist (Figure 5).

2b. Determine where along the joist the grill will be mounted and starting 1/8" away from the joist, cut a 6" round opening, being careful not to cut or damage any electrical or other hidden utilities (Figure 9). Position the housing grill collar in the previously cut hole so that it is flush with the finished ceiling (Figure 10). Secure the grill housing to the joist using the provided 1" screws through the two keyhole slots (Figure 6).

1/8"

6"

Figure 9

NOTE: If drywall or ceiling material is thicker than 5/8" the height of the housing will need to be adjusted to compensate and the locator tabs will need to be bent even with the housing to allow the grill collar to be flush with the finished ceiling material.

5S7635037 New 10-06

www.airkinglimited.com

3 of 16

Page 3
Image 3
Air King AIG46HL, AIK14XL, AIK14XF manual Locating Tabs Mounting Rails, Housing Joist Locating Tab, Housing Grill Collar

AIG46F, AIK26YL, AIG46HL, AIK26YF, AIK14XF specifications

The Air King series of exhaust fans, including the AIK26YL, AIG46F, AIG46HL, AIK14XL, and AIK14XF, is engineered to enhance indoor air quality while maintaining ease of use and efficiency. Each model features distinct characteristics suited for different applications, ensuring there is an optimal choice for various environments.

Starting with the AIK26YL, this fan stands out with its powerful and quiet operation, making it ideal for both residential and commercial settings. It boasts a sleek design and high airflow capacity, ensuring that spaces are well-ventilated without excessive noise. The robust build and energy-efficient motor help users save on energy costs over time.

Next, the AIG46F is designed for those seeking high performance in a compact size. This model incorporates advanced technology such as a multi-speed setting and an integrated, adjustable grille that allows for precise airflow direction. Its durable construction and easy installation process further enhance its appeal.

The AIG46HL variant adds another layer, featuring humidity sensing technology. This innovative feature automatically activates the fan when humidity levels rise, making it particularly suitable for bathrooms and kitchens where moisture control is critical. Additionally, it retains the efficiency and quiet operation characteristic of the Air King brand.

Moving on to the AIK14XL, this model is an excellent choice for larger spaces that require robust ventilation. With its larger blade span, it can move a significant amount of air while still operating at low sound levels. The user-friendly controls and adaptability make it a favorite for serious DIY enthusiasts and professional installers alike.

Lastly, the AIK14XF is equipped with an energy-efficient motor and a centrifugal design, which allows it to deliver powerful airflow with reduced energy consumption. This model is especially suitable for use in industrial settings or larger facilities where high ventilation rates are necessary. Its durable casing is designed to withstand rigorous use, ensuring longevity and reliability.

Overall, the Air King AIK series exemplifies efficiency, durability, and cutting-edge technology. Whether you need humidity control, energy efficiency, or high airflow, these models provide versatile solutions to meet your specific ventilation needs. With their focus on user comfort and environmental sustainability, Air King fans are a wise investment for both home and commercial use.