Clock Radio
AR263
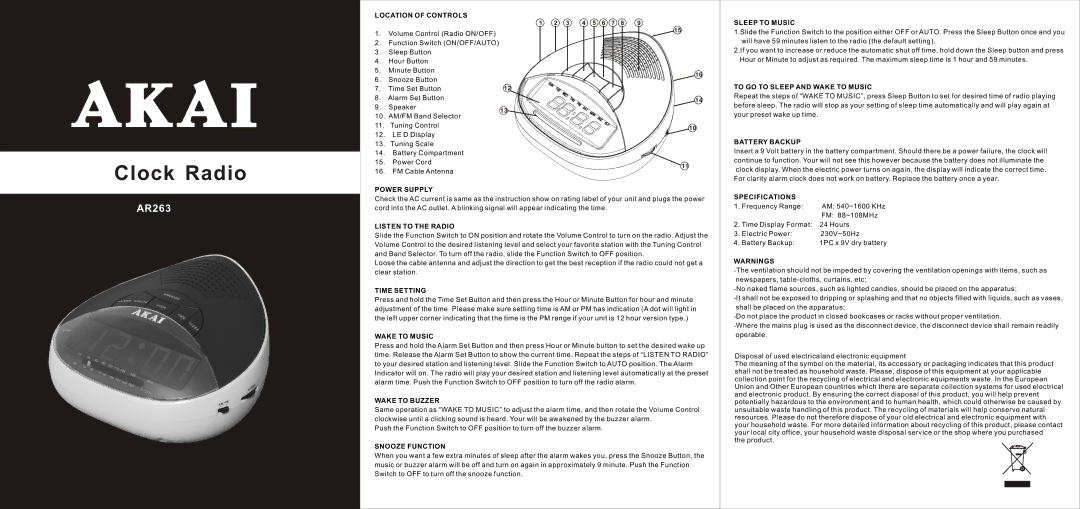
LOCATION OF CONTROLS
|
| 1 | 2 | 3 | 4 | 5 | 6 | 7 | 8 | 9 |
1. | Volume Control (Radio ON/OFF) |
|
|
|
|
|
|
|
| 15 |
|
|
|
|
|
|
|
|
| ||
2. | Function Switch (ON/OFF/AUTO) |
|
|
|
|
|
|
|
|
|
3. | Sleep Button |
|
|
|
|
|
|
|
|
|
4. | Hour Button |
|
|
|
|
|
|
|
|
|
5. | Minute Button |
|
|
|
|
|
|
|
| 16 |
6. | Snooze Button |
|
|
|
|
|
|
|
| |
|
|
|
|
|
|
|
|
| ||
7. | Time Set Button | 12 |
|
|
|
|
|
|
|
|
8. | Alarm Set Button |
|
|
|
|
|
|
|
| 14 |
9. | Speaker | 13 |
|
|
|
|
|
|
|
|
10. AM/FM Band Selector |
|
|
|
|
|
|
|
| ||
|
|
|
|
|
|
|
|
| ||
11. | Tuning Control |
|
|
|
|
|
|
|
| 10 |
12. | LE D Display |
|
|
|
|
|
|
|
| |
|
|
|
|
|
|
|
|
| ||
13. | Tuning Scale |
|
|
|
|
|
|
|
|
|
14. | Battery Compartment |
|
|
|
|
|
|
|
|
|
15.Power Cord
11
16.FM Cable Antenna
POWER SUPPLY
Check the AC current is same as the instruction show on rating label of your unit and plugs the power cord into the AC outlet. A blinking signal will appear indicating the time.
LISTEN TO THE RADIO
Slide the Function Switch to ON position and rotate the Volume Control to turn on the radio. Adjust the Volume Control to the desired listening level and select your favorite station with the Tuning Control and Band Selector. To turn off the radio, slide the Function Switch to OFF position.
Loose the cable antenna and adjust the direction to get the best reception if the radio could not get a clear station.
TIME SETTING
Press and hold the Time Set Button and then press the Hour or Minute Button for hour and minute adjustment of the time. Please make sure setting time is AM or PM has indication (A dot will light in the left upper corner indicating that the time is the PM range if your unit is 12 hour version type.)
WAKE TO MUSIC
Press and hold the Alarm Set Button and then press Hour or Minute button to set the desired wake up time. Release the Alarm Set Button to show the current time. Repeat the steps of “LISTEN TO RADIO” to your desired station and listening level. Slide the Function Switch to AUTO position. The Alarm Indicator will on. The radio will play your desired station and listening level automatically at the preset alarm time. Push the Function Switch to OFF position to turn off the radio alarm.
WAKE TO BUZZER
Same operation as “WAKE TO MUSIC” to adjust the alarm time, and then rotate the Volume Control clockwise until a clicking sound is heard. Your will be awakened by the buzzer alarm.
Push the Function Switch to OFF position to turn off the buzzer alarm.
SNOOZE FUNCTION
When you want a few extra minutes of sleep after the alarm wakes you, press the Snooze Button, the music or buzzer alarm will be off and turn on again in approximately 9 minute. Push the Function Switch to OFF to turn off the snooze function.
SLEEP TO MUSIC
1.Slide the Function Switch to the position either OFF or AUTO. Press the Sleep Button once and you
will have 59 minutes listen to the radio (the default setting).
2.If you want to increase or reduce the automatic shut off time, hold down the Sleep button and press
Hour or Minute to adjust as required. The maximum sleep time is 1 hour and 59 minutes.
TO GO TO SLEEP AND WAKE TO MUSIC
Repeat the steps of “WAKE TO MUSIC”, press Sleep Button to set for desired time of radio playing
before sleep. The radio will stop as your setting of sleep time automatically and will play again at
your preset wake up time.
BATTERY BACKUP
Insert a 9 Volt battery in the battery compartment. Should there be a power failure, the clock will
continue to function. Your will not see this however because the battery does not illuminate the
clock display. When the electric power turns on again, the display will indicate the correct time.
For clarity alarm clock does not work on battery. Replace the battery once a year.
SPECIFICATIONS |
| |
1. Frequency Range: | AM: 540~1600 KHz | |
|
| FM: 88~108MHz |
2. Time Display Format: 24 Hours | ||
3. | Electric Power: | 230V~50Hz |
4. | Battery Backup: | 1PC x 9V dry battery |
WARNINGS
newspapers,
shall be placed on the apparatus;
operable.
Disposal of used electricaland electronic equipment
The meaning of the symbol on the material, its accessory or packaging indicates that this product shall not be treated as household waste. Please, dispose of this equipment at your applicable collection point for the recycling of electrical and electronic equipments waste. In the European Union and Other European countries which there are separate collection systems for used electrical and electronic product. By ensuring the correct disposal of this product, you will help prevent potentially hazardous to the environment and to human health, which could otherwise be caused by unsuitable waste handling of this product. The recycling of materials will help conserve natural resources. Please do not therefore dispose of your old electrical and electronic equipment with your household waste. For more detailed information about recycling of this product, please contact your local city office, your household waste disposal service or the shop where you purchased
the product.