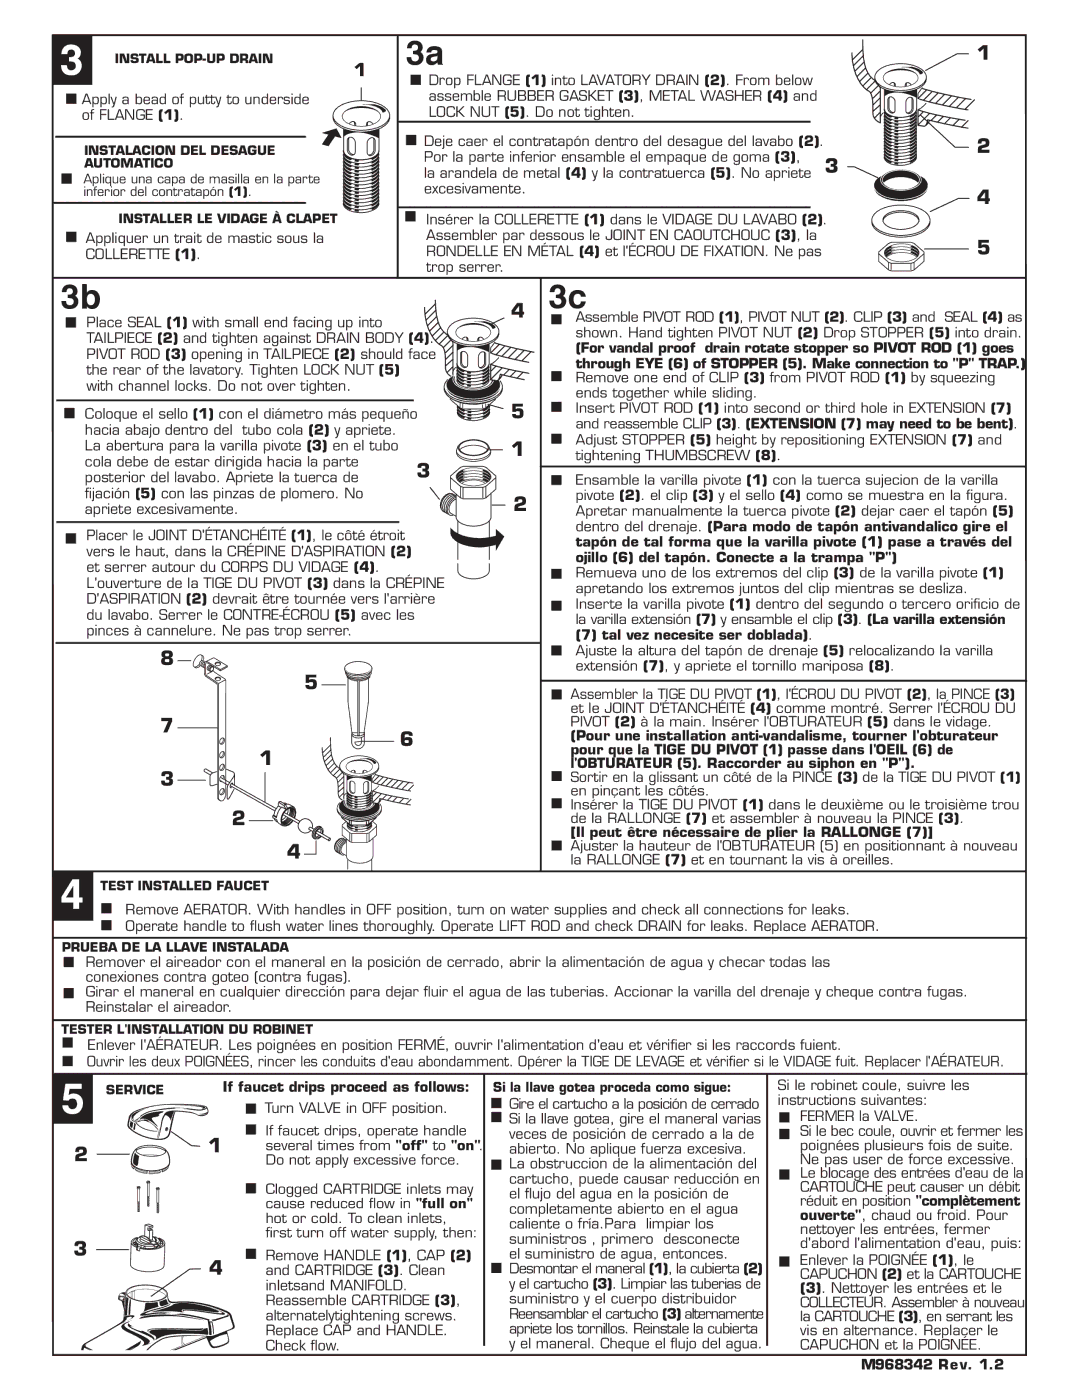
3 INSTALL POP-UP DRAIN

1

Apply a bead of putty to underside of FLANGE (1).

INSTALACION DEL DESAGUE

AUTOMATICO

Aplique una capa de masilla en la parte inferior del contratapón (1).

INSTALLER LE VIDAGE À CLAPET

Appliquer un trait de mastic sous la

COLLERETTE (1).

3a

Drop FLANGE (1) into LAVATORY DRAIN (2). From below assemble RUBBER GASKET (3), METAL WASHER (4) and LOCK NUT (5). Do not tighten.

Deje caer el contratapón dentro del desague del lavabo (2). Por la parte inferior ensamble el empaque de goma (3),

la arandela de metal (4) y la contratuerca (5). No apriete 3 excesivamente.

Insérer la COLLERETTE (1) dans le VIDAGE DU LAVABO (2). Assembler par dessous le JOINT EN CAOUTCHOUC (3), la RONDELLE EN MÉTAL (4) et l'ÉCROU DE FIXATION. Ne pas trop serrer.

1

2

4

5

3b


4

Place SEAL (1) with small end facing up into


TAILPIECE (2) and tighten against DRAIN BODY (4).


PIVOT ROD (3) opening in TAILPIECE (2) should face


the rear of the lavatory. Tighten LOCK NUT (5)


with channel locks. Do not over tighten.


Coloque el sello (1) con el diámetro más pequeño

5

hacia abajo dentro del tubo cola (2) y apriete.


La abertura para la varilla pivote (3) en el tubo


1

cola debe de estar dirigida hacia la parte

3


posterior del lavabo. Apriete la tuerca de


fijación (5) con las pinzas de plomero. No


2

apriete excesivamente.


Placer le JOINT D'ÉTANCHÉITÉ (1), le côté étroit vers le haut, dans la CRÉPINE D'ASPIRATION (2) et serrer autour du CORPS DU VIDAGE (4).

L'ouverture de la TIGE DU PIVOT (3) dans la CRÉPINE D'ASPIRATION (2) devrait être tournée vers l'arrière du lavabo. Serrer le CONTRE-ÉCROU (5) avec les pinces à cannelure. Ne pas trop serrer.

8

5

7

6

1

3

2

4

3c

Assemble PIVOT ROD (1), PIVOT NUT (2). CLIP (3) and SEAL (4) as shown. Hand tighten PIVOT NUT (2) Drop STOPPER (5) into drain.

(For vandal proof drain rotate stopper so PIVOT ROD (1) goes

through EYE (6) of STOPPER (5). Make connection to "P" TRAP.) Remove one end of CLIP (3) from PIVOT ROD (1) by squeezing

ends together while sliding.

Insert PIVOT ROD (1) into second or third hole in EXTENSION (7) and reassemble CLIP (3). (EXTENSION (7) may need to be bent). Adjust STOPPER (5) height by repositioning EXTENSION (7) and tightening THUMBSCREW (8).

Ensamble la varilla pivote (1) con la tuerca sujecion de la varilla pivote (2). el clip (3) y el sello (4) como se muestra en la figura. Apretar manualmente la tuerca pivote (2) dejar caer el tapón (5) dentro del drenaje. (Para modo de tapón antivandalico gire el tapón de tal forma que la varilla pivote (1) pase a través del ojillo (6) del tapón. Conecte a la trampa "P")

Remueva uno de los extremos del clip (3) de la varilla pivote (1) apretando los extremos juntos del clip mientras se desliza. Inserte la varilla pivote (1) dentro del segundo o tercero orificio de la varilla extensión (7) y ensamble el clip (3). (La varilla extensión

(7) tal vez necesite ser doblada).

Ajuste la altura del tapón de drenaje (5) relocalizando la varilla extensión (7), y apriete el tornillo mariposa (8).

Assembler la TIGE DU PIVOT (1), l'ÉCROU DU PIVOT (2), la PINCE (3) et le JOINT D'ÉTANCHÉITÉ (4) comme montré. Serrer l'ÉCROU DU PIVOT (2) à la main. Insérer l'OBTURATEUR (5) dans le vidage.

(Pour une installation anti-vandalisme, tourner l'obturateur pour que la TIGE DU PIVOT (1) passe dans l'OEIL (6) de l'OBTURATEUR (5). Raccorder au siphon en "P").

Sortir en la glissant un côté de la PINCE (3) de la TIGE DU PIVOT (1) en pinçant les côtés.

Insérer la TIGE DU PIVOT (1) dans le deuxième ou le troisième trou de la RALLONGE (7) et assembler à nouveau la PINCE (3).

[Il peut être nécessaire de plier la RALLONGE (7)]

Ajuster la hauteur de l'OBTURATEUR (5) en positionnant à nouveau la RALLONGE (7) et en tournant la vis à oreilles.

4

TEST INSTALLED FAUCET

Remove AERATOR. With handles in OFF position, turn on water supplies and check all connections for leaks.

Operate handle to flush water lines thoroughly. Operate LIFT ROD and check DRAIN for leaks. Replace AERATOR.

PRUEBA DE LA LLAVE INSTALADA

Remover el aireador con el maneral en la posición de cerrado, abrir la alimentación de agua y checar todas las conexiones contra goteo (contra fugas).

Girar el maneral en cualquier dirección para dejar fluir el agua de las tuberias. Accionar la varilla del drenaje y cheque contra fugas. Reinstalar el aireador.

TESTER L'INSTALLATION DU ROBINET

Enlever l'AÉRATEUR. Les poignées en position FERMÉ, ouvrir l'alimentation d'eau et vérifier si les raccords fuient.

Ouvrir les deux POIGNÉES, rincer les conduits d'eau abondamment. Opérer la TIGE DE LEVAGE et vérifier si le VIDAGE fuit. Replacer l'AÉRATEUR.

5 SERVICE

2 1

3

4

If faucet drips proceed as follows:

Turn VALVE in OFF position.

If faucet drips, operate handle several times from "off" to "on". Do not apply excessive force.

Clogged CARTRIDGE inlets may cause reduced flow in "full on" hot or cold. To clean inlets, first turn off water supply, then:

Remove HANDLE (1), CAP (2) and CARTRIDGE (3). Clean inletsand MANIFOLD. Reassemble CARTRIDGE (3), alternatelytightening screws. Replace CAP and HANDLE. Check flow.

Si la llave gotea proceda como sigue:

Gire el cartucho a la posición de cerrado

Si la llave gotea, gire el maneral varias veces de posición de cerrado a la de abierto. No aplique fuerza excesiva.

La obstruccion de la alimentación del cartucho, puede causar reducción en el flujo del agua en la posición de completamente abierto en el agua caliente o fría.Para limpiar los suministros , primero desconecte el suministro de agua, entonces. Desmontar el maneral (1), la cubierta (2) y el cartucho (3). Limpiar las tuberias de suministro y el cuerpo distribuidor Reensamblar el cartucho (3) alternamente apriete los tornillos. Reinstale la cubierta y el maneral. Cheque el flujo del agua.

Si le robinet coule, suivre les instructions suivantes:

FERMER la VALVE.

Si le bec coule, ouvrir et fermer les poignées plusieurs fois de suite. Ne pas user de force excessive.

Le blocage des entrées d'eau de la CARTOUCHE peut causer un débit réduit en position "complètement ouverte", chaud ou froid. Pour nettoyer les entrées, fermer d'abord l'alimentation d'eau, puis:

Enlever la POIGNÉE (1), le CAPUCHON (2) et la CARTOUCHE

(3). Nettoyer les entrées et le COLLECTEUR. Assembler à nouveau la CARTOUCHE (3), en serrant les vis en alternance. Replacer le CAPUCHON et la POIGNÉE.

M968342 Rev. 1 . 2

Page 2
Image 2
American Standard 2175.207, 2175.205 Apply a bead of putty to underside of Flange, Appliquer un trait de mastic sous la

2175.21, 2175.2, 2175.205, 2175.207 specifications

The American Standard 2175 series, which includes models 2175.207, 2175.205, 2175.210, and 2175.200, showcases a perfect blend of elegance and performance in bathroom fixtures. These models are specifically designed to provide reliable functionality while enhancing the aesthetics of any bathroom setting.

One of the standout features across the American Standard 2175 series is its striking design. With clean lines and a modern silhouette, these fixtures present a chic look that effortlessly complements various interior styles. The availability of different finishes lends versatility, allowing homeowners to match the sink with their existing decor seamlessly.

In terms of functionality, these bathroom sinks prioritize user-friendly features. The spacious basin design offers ample room for daily tasks, whether washing hands or performing a quick clean-up. The deep bowls help contain water splashes, maintaining a tidy bathroom environment. Moreover, the ergonomic positioning of the faucet holes ensures easy access to water, making washing hands and brushing teeth a hassle-free experience.

The American Standard 2175 series is crafted with premium materials that prioritize durability and longevity. The sinks are built using high-quality vitreous china, which not only enhances their strength but also gives them a smooth, glossy finish that resists stains and scratches. This ensures that the sinks remain looking pristine over time, even with regular use.

To further enhance the user experience, these models feature innovative technological advancements. The ultra-clean surface technology minimizes the accumulation of dirt and grime, making maintenance a breeze. Users can easily wipe down the surfaces with minimal effort, ensuring that the sinks are always inviting and hygienic.

Additionally, the American Standard 2175 series is designed for easy installation, accommodating various plumbing configurations. This flexibility makes it suitable for both new builds and renovations, allowing homeowners to upgrade their bathrooms without hassle.

In summary, the American Standard 2175 series—including models 2175.207, 2175.205, 2175.210, and 2175.200—stands out as a leading choice for those seeking a stylish and functional bathroom sink. With its modern design, durable construction, and user-friendly features, this series perfectly balances beauty and practicality, making it an excellent addition to any bathroom space.