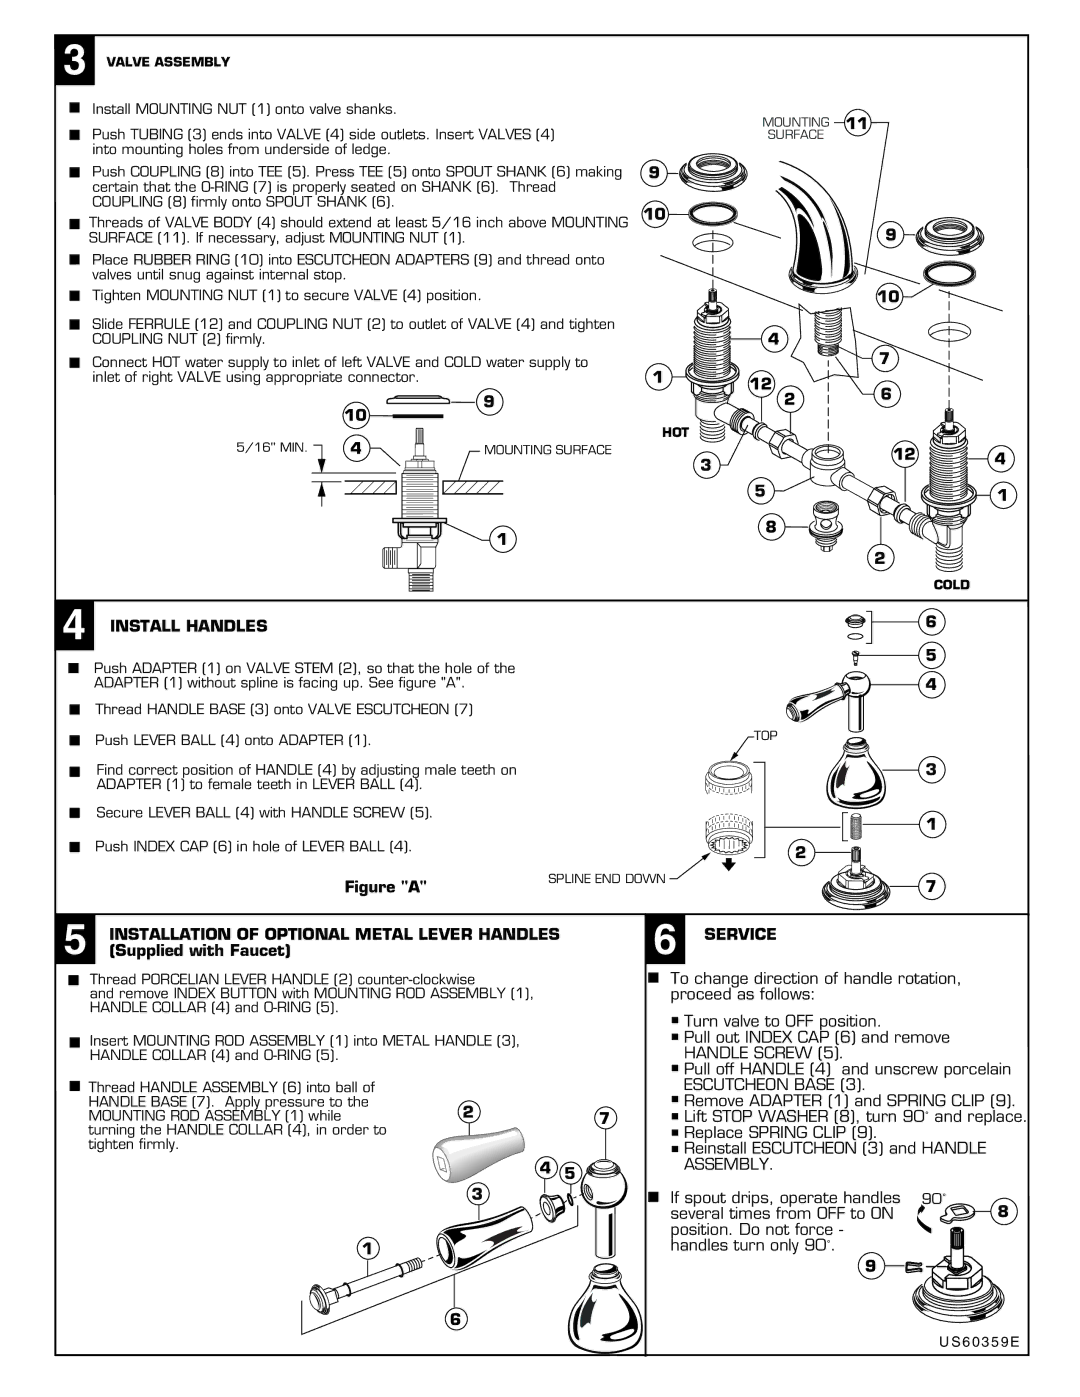
3 VALVE ASSEMBLY

Install MOUNTING NUT (1) onto valve shanks.

Push TUBING (3) ends into VALVE (4) side outlets. Insert VALVES (4) into mounting holes from underside of ledge.

Push COUPLING (8) into TEE (5). Press TEE (5) onto SPOUT SHANK (6) making certain that the O-RING (7) is properly seated on SHANK (6). Thread COUPLING (8) firmly onto SPOUT SHANK (6).

Threads of VALVE BODY (4) should extend at least 5/16 inch above MOUNTING SURFACE (11). If necessary, adjust MOUNTING NUT (1).

Place RUBBER RING (10) into ESCUTCHEON ADAPTERS (9) and thread onto valves until snug against internal stop.

Tighten MOUNTING NUT (1) to secure VALVE (4) position.

Slide FERRULE (12) and COUPLING NUT (2) to outlet of VALVE (4) and tighten COUPLING NUT (2) firmly.

Connect HOT water supply to inlet of left VALVE and COLD water supply to inlet of right VALVE using appropriate connector.


10

9


5/16'' MIN.

4

MOUNTING SURFACE

1

MOUNTING 11

SURFACE

9 10


9


10


4


1


7


12


6


2


HOT


3


12

4


5


1


8


2

COLD

4 INSTALL HANDLES

Push ADAPTER (1) on VALVE STEM (2), so that the hole of the

ADAPTER (1) without spline is facing up. See figure "A".

Thread HANDLE BASE (3) onto VALVE ESCUTCHEON (7)

Push LEVER BALL (4) onto ADAPTER (1).

TOP

Find correct position of HANDLE (4) by adjusting male teeth on

ADAPTER (1) to female teeth in LEVER BALL (4).

Secure LEVER BALL (4) with HANDLE SCREW (5).

Push INDEX CAP (6) in hole of LEVER BALL (4).

2


6

5

4

3

1

Figure "A"

SPLINE END DOWN

7

5

INSTALLATION OF OPTIONAL METAL LEVER HANDLES

(Supplied with Faucet)

Thread PORCELIAN LEVER HANDLE (2) counter-clockwise

and remove INDEX BUTTON with MOUNTING ROD ASSEMBLY (1), HANDLE COLLAR (4) and O-RING (5).

Insert MOUNTING ROD ASSEMBLY (1) into METAL HANDLE (3), HANDLE COLLAR (4) and O-RING (5).

Thread HANDLE ASSEMBLY (6) into ball of HANDLE BASE (7). Apply pressure to the

MOUNTING ROD ASSEMBLY (1) while27 turning the HANDLE COLLAR (4), in order to

tighten firmly.

4 5

3

1

6 SERVICE

To change direction of handle rotation, proceed as follows:

Turn valve to OFF position.

Pull out INDEX CAP (6) and remove HANDLE SCREW (5).

Pull off HANDLE (4) and unscrew porcelain ESCUTCHEON BASE (3).

Remove ADAPTER (1) and SPRING CLIP (9).

Lift STOP WASHER (8), turn 90˚ and replace.

Replace SPRING CLIP (9).

Reinstall ESCUTCHEON (3) and HANDLE ASSEMBLY.

If spout drips, operate handles

90˚

several times from OFF to ON

8

position. Do not force - handles turn only 90˚.

9

6

US60359E

Page 2
Image 2
American Standard 2900.SERIES, 2800.SERIES Install Handles, Installation of Optional Metal Lever Handles, Service

2800.SERIES, 2900.SERIES specifications

The American Standard 2800 and 2900 series toilets represent the pinnacle of modern bathroom design and functionality, bringing an impeccable combination of style, comfort, and efficiency. These models are designed to meet the varying needs of homeowners while maintaining the brand's commitment to quality and innovation.

One of the standout features of the 2800 series is its water-saving technology, which utilizes a high-efficiency flushing system. This system consumes only 1.28 gallons per flush (GPF), significantly reducing water usage compared to traditional toilets. This aspect not only benefits the environment but can also lead to substantial savings on water bills over time. The 2900 series builds on this concept, incorporating even more advanced flushing mechanisms, such as the EverClean surface, which helps prevent the growth of bacteria, mold, and mildew on the toilet's surface, ensuring a cleaner and more hygienic experience.

Comfort is another key area of focus for these series. Both the 2800 and 2900 models feature a chair-height design, making it easier for users to sit down and stand up. This height advantage is especially beneficial for individuals with mobility challenges and elderly users. Additionally, the elongated bowl design provides added comfort, enhancing the overall experience in the bathroom.

Installation is made simple with these toilet series, thanks to their straightforward, user-friendly installation process. The 2900 series, in particular, includes a SecureConnect system that allows for a secure fit with minimal effort, making it an ideal choice for both DIY enthusiasts and professional plumbers alike.

The aesthetic appeal of the 2800 and 2900 series is evident in their sleek, modern designs that complement any bathroom decor. They come in various color options, allowing homeowners to choose a model that fits seamlessly into their space.

Durability is another hallmark of the American Standard brand, and these toilets are no exception. Made from high-quality vitreous china, both series are built to withstand the rigors of daily use while resisting scratches and stains.

In summary, the American Standard 2800 and 2900 series toilets offer an impressive blend of technological advances and design features. With their water-saving capabilities, comfort-focused designs, ease of installation, and long-lasting durability, these toilets are an outstanding choice for modern bathrooms. Whether seeking efficiency, style, or comfort, consumers are sure to find the ideal fit in these remarkable series.