1.Remove old showerhead with wrench. Clean threads
of shower arm
2.Apply thread tape (in a clockwise direction) to threads of shower arm.
3.The slide bar can be mounted using the preassembled suction cup or by using the optional adhesive pad. The suction cup can only be used on smooth, flat surfaces. If your shower wall has
a rough surface, or if there is a grout line present, then you will need to use the adhesive pad.
Note: Some tub-surrounds will appear to have a smooth, flat surface, but will actually have a light texture that is not noticeable at first. If this is the case, it will prevent the suction cup from maintaining a hold, and you will need to use the adhesive pad. To remove the suction cup from the slide bar, rotate suction cup counter clockwise (while suction cup is facing you), and then thread on the adhesive pad.
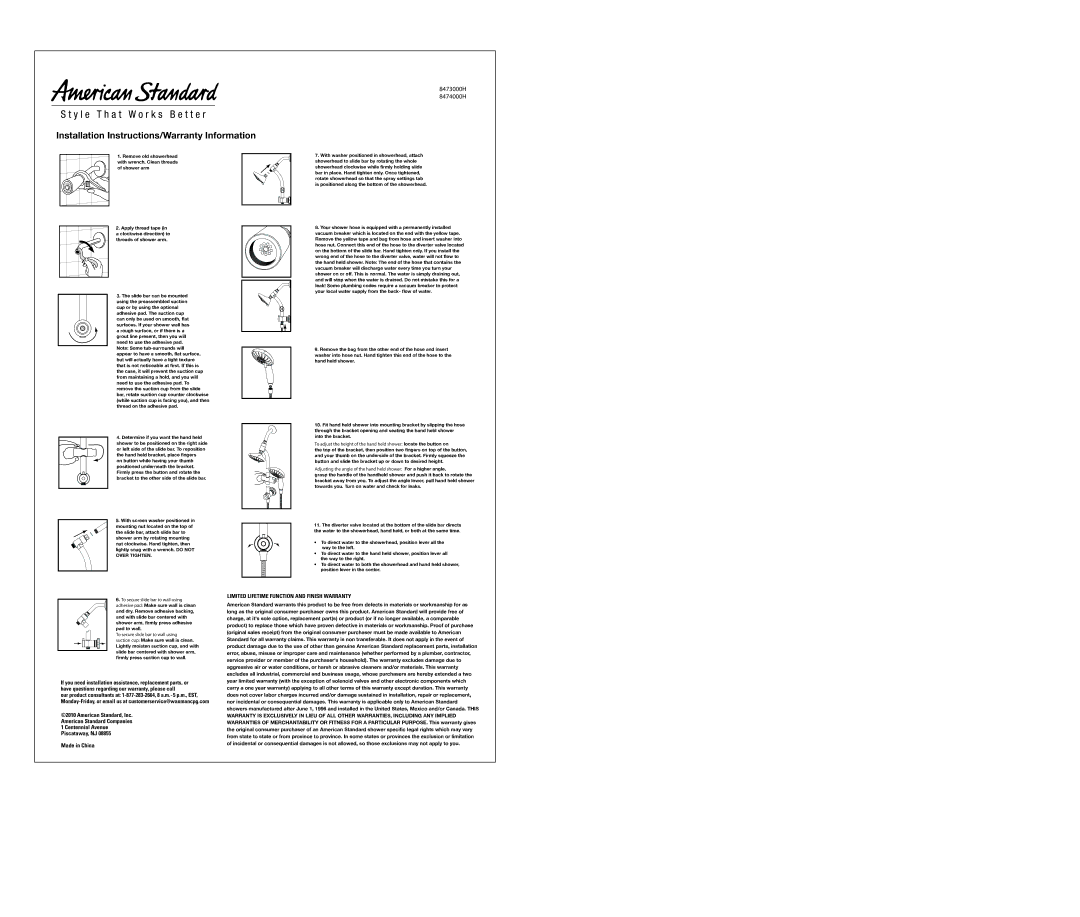
4.Determine if you want the hand held shower to be positioned on the right side
or left side of the slide bar. To reposition the hand held bracket, place fingers on button while having your thumb positioned underneath the bracket. Firmly press the button and rotate the bracket to the other side of the slide bar.
5. With screen washer positioned in mounting nut located on the top of the slide bar, attach slide bar to shower arm by rotating mounting nut clockwise. Hand tighten, then lightly snug with a wrench. DO NOT OVER TIGHTEN.
6. To secure slide bar to wall using adhesive pad: Make sure wall is clean and dry. Remove adhesive backing, and with slide bar centered with shower arm, firmly press adhesive pad to wall.
To secure slide bar to wall using
suction cup: Make sure wall is clean. Lightly moisten suction cup, and with slide bar centered with shower arm, firmly press suction cup to wall.
If you need installation assistance, replacement parts, or have questions regarding our warranty, please call
our product consultants at: 1-877-283-2664, 8 a.m.-5 p.m., EST, Monday-Friday, or email us at customerservice@waxmancpg.com
©2010 American Standard, Inc.
American Standard Companies
1 Centennial Avenue
Piscataway, NJ 08855
Made in China
7. With washer positioned in showerhead, attach showerhead to slide bar by rotating the whole showerhead clockwise while firmly holding slide bar in place. Hand tighten only. Once tightened, rotate showerhead so that the spray settings tab is positioned along the bottom of the showerhead.
8. Your shower hose is equipped with a permanently installed vacuum breaker which is located on the end with the yellow tape. Remove the yellow tape and bag from hose and insert washer into hose nut. Connect this end of the hose to the diverter valve located on the bottom of the slide bar. Hand tighten only. If you install the wrong end of the hose to the diverter valve, water will not flow to the hand held shower. Note: The end of the hose that contains the vacuum breaker will discharge water every time you turn your shower on or off. This is normal. The water is simply draining out, and will stop when the water is drained. Do not mistake this for a leak! Some plumbing codes require a vacuum breaker to protect your local water supply from the back- flow of water.
9. Remove the bag from the other end of the hose and insert washer into hose nut. Hand tighten this end of the hose to the hand held shower.
10. Fit hand held shower into mounting bracket by slipping the hose through the bracket opening and seating the hand held shower into the bracket.
To adjust the height of the hand held shower: locate the button on
the top of the bracket, then position two fingers on top of the button, and your thumb on the underside of the bracket. Firmly squeeze the button and slide the bracket up or down to desired height.
Adjusting the angle of the hand held shower: For a higher angle,
grasp the handle of the handheld shower and push it back to rotate the bracket away from you. To adjust the angle lower, pull hand held shower towards you. Turn on water and check for leaks.
11.The diverter valve located at the bottom of the slide bar directs the water to the showerhead, hand held, or both at the same time.
• To direct water to the showerhead, position lever all the way to the left.
• To direct water to the hand held shower, position lever all the way to the right.
• To direct water to both the showerhead and hand held shower, position lever in the center.
LIMITED LIFETIME FUNCTION AND FINISH WARRANTY
American Standard warrants this product to be free from defects in materials or workmanship for as long as the original consumer purchaser owns this product. American Standard will provide free of charge, at it's sole option, replacement part(s) or product (or if no longer available, a comparable product) to replace those which have proven defective in materials or workmanship. Proof of purchase (original sales receipt) from the original consumer purchaser must be made available to American Standard for all warranty claims. This warranty is non transferable. It does not apply in the event of product damage due to the use of other than genuine American Standard replacement parts, installation error, abuse, misuse or improper care and maintenance (whether performed by a plumber, contractor, service provider or member of the purchaser's household). The warranty excludes damage due to aggressive air or water conditions, or harsh or abrasive cleaners and/or materials. This warranty excludes all industrial, commercial and business usage, whose purchasers are hereby extended a two year limited warranty (with the exception of solenoid valves and other electronic components which carry a one year warranty) applying to all other terms of this warranty except duration. This warranty does not cover labor charges incurred and/or damage sustained in installation, repair or replacement, nor incidental or consequential damages. This warranty is applicable only to American Standard showers manufactured after June 1, 1996 and installed in the United States, Mexico and/or Canada. THIS WARRANTY IS EXCLUSIVELY IN LIEU OF ALL OTHER WARRANTIES, INCLUDING ANY IMPLIED WARRANTIES OF MERCHANTABILITY OR FITNESS FOR A PARTICULAR PURPOSE. This warranty gives the original consumer purchaser of an American Standard shower specific legal rights which may vary from state to state or from province to province. In some states or provinces the exclusion or limitation of incidental or consequential damages is not allowed, so those exclusions may not apply to you.