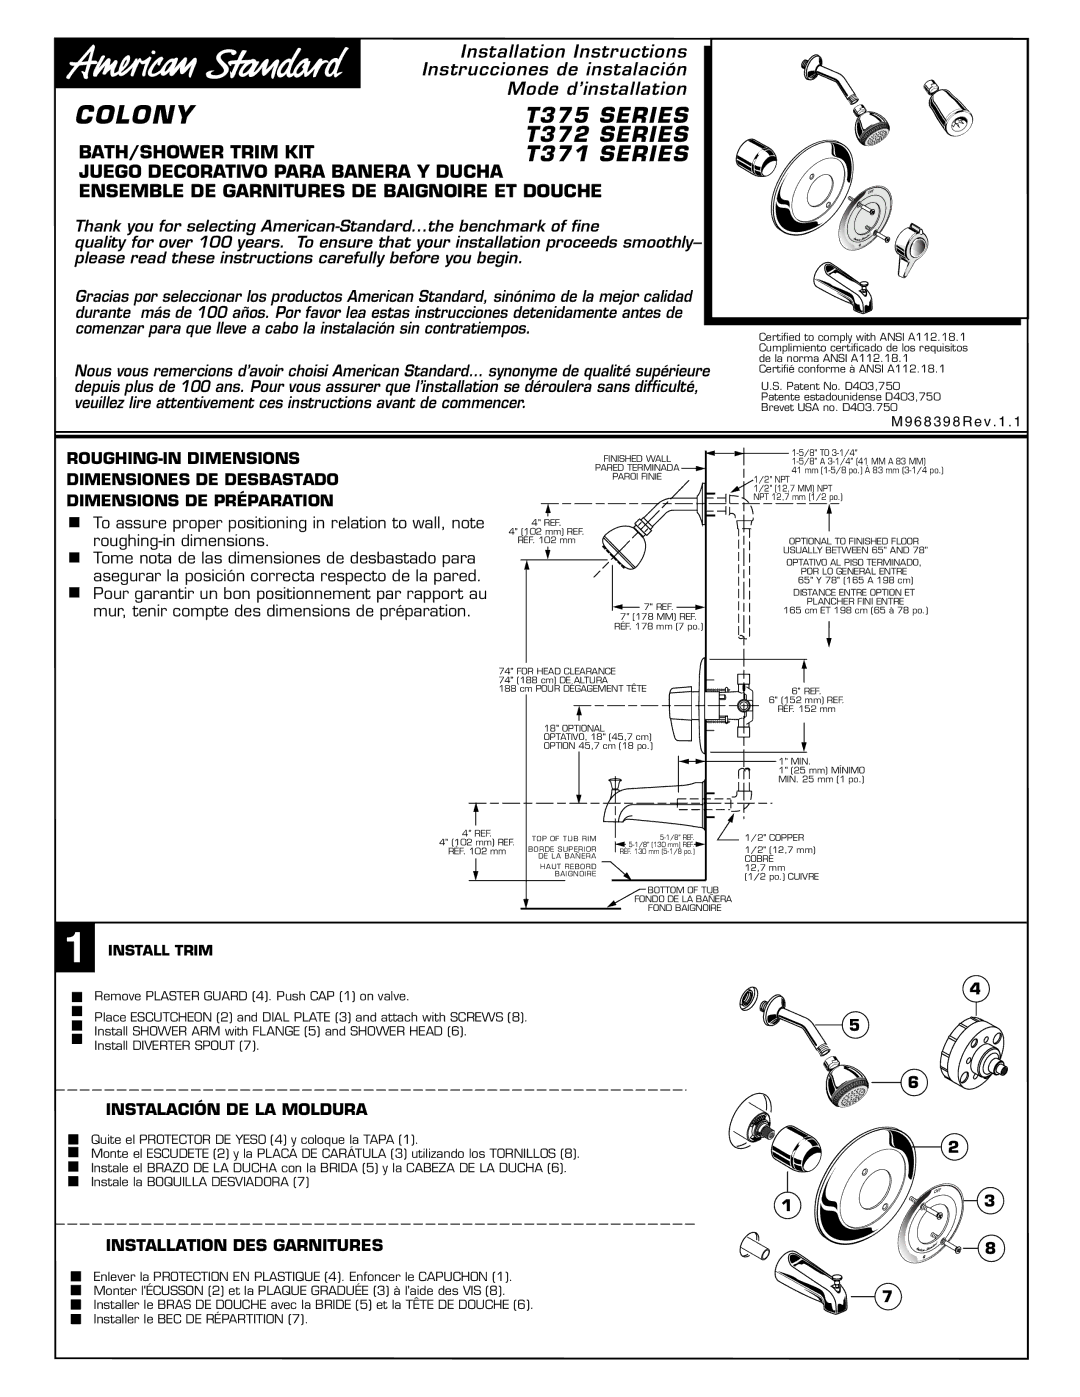
Installation Instructions
Instrucciones de instalación
Mode d’installation
COLONY
BATH/SHOWER TRIM KIT
JUEGO DECORATIVO PARA BANERA Y DUCHA ENSEMBLE DE GARNITURES DE BAIGNOIRE ET DOUCHE
Thank you for selecting
quality for over 100 years. To ensure that your installation proceeds
Gracias por seleccionar los productos American Standard, sinónimo de la mejor calidad durante más de 100 años. Por favor lea estas instrucciones detenidamente antes de comenzar para que lleve a cabo la instalación sin contratiempos.
Nous vous remercions d’avoir choisi American Standard… synonyme de qualité supérieure depuis plus de 100 ans. Pour vous assurer que l’installation se déroulera sans difficulté, veuillez lire attentivement ces instructions avant de commencer.
Certified to comply with ANSI A112.18.1 Cumplimiento certificado de los requisitos de la norma ANSI A112.18.1
Certifié conforme à ANSI A112.18.1
U.S. Patent No. D403,750 Patente estadounidense D403,750 Brevet USA no. D403.750
M 9 6 8 3 9 8 R e v . 1 . 1
|
|
|
|
| FINISHED WALL |
|
|
|
|
|
|
|
|
|
| ||||||||||||||
|
|
|
|
|
|
|
|
|
|
|
|
|
|
| |||||||||||||||
DIMENSIONES DE DESBASTADO |
|
|
|
|
| PARED TERMINADA |
|
|
|
|
|
|
|
|
|
|
|
|
| 41 mm | |||||||||
| |||||||||||||||||||||||||||||
|
|
|
|
|
|
| PAROI FINIE |
|
|
|
|
|
|
|
|
| 1/2" NPT | ||||||||||||
|
|
|
|
|
|
|
|
|
|
|
|
|
|
|
|
|
|
|
|
|
|
| |||||||
DIMENSIONS DE PRÉPARATION |
|
|
|
|
|
|
|
|
|
|
|
|
|
|
|
|
|
|
|
|
|
|
| 1/2" (12,7 MM) NPT | |||||
|
| To assure proper positioning in relation to wall, note |
|
|
|
|
|
|
|
|
|
|
|
|
|
|
|
|
|
|
|
|
|
|
| NPT 12,7 mm (1/2 po.) | |||
|
|
|
|
|
|
|
|
|
|
|
|
|
|
|
|
|
|
|
|
|
|
|
|
|
|
|
| ||
|
|
|
| 4" REF. |
|
|
|
|
|
|
|
|
|
|
|
|
|
| |||||||||||
|
|
|
|
|
|
|
|
|
|
|
|
|
|
|
|
|
| ||||||||||||
|
| 4" (102 mm) REF. |
|
|
|
|
|
|
|
|
|
|
|
|
| ||||||||||||||
|
| RÉF. 102 mm |
|
|
|
|
|
|
|
|
|
| OPTIONAL TO FINISHED FLOOR | ||||||||||||||||
|
| Tome nota de las dimensiones de desbastado para |
|
|
|
|
|
|
|
|
|
|
|
|
|
|
|
|
|
|
|
|
|
|
| USUALLY BETWEEN 65'' AND 78'' | |||
|
|
|
|
|
|
|
|
|
|
|
|
|
|
|
|
|
|
|
|
|
|
|
|
| OPTATIVO AL PISO TERMINADO, | ||||
|
|
|
|
|
|
|
|
|
|
|
|
|
|
|
|
|
|
|
|
|
|
| |||||||
|
|
|
|
|
|
|
|
|
|
|
|
|
|
|
|
|
|
|
|
|
|
|
|
| |||||
|
| asegurar la posición correcta respecto de la pared. |
|
|
|
|
|
|
|
|
|
|
|
|
|
|
|
|
|
|
|
|
|
|
|
| 65" Y 78" (165 A 198 cm) | ||
|
| Pour garantir un bon positionnement par rapport au |
|
|
|
|
|
|
|
|
|
|
|
|
|
|
|
|
|
|
|
|
|
|
|
| POR LO GENERAL ENTRE | ||
|
|
|
|
|
|
|
|
|
|
|
|
|
|
|
|
|
|
|
|
|
|
|
|
|
| DISTANCE ENTRE OPTION ET | |||
|
|
|
|
|
|
|
|
|
|
|
|
|
|
|
|
|
|
|
|
|
|
|
|
|
| ||||
|
| mur, tenir compte des dimensions de préparation. |
|
|
|
|
|
|
|
|
|
|
|
|
|
|
|
|
|
|
|
|
|
|
|
|
| PLANCHER FINI ENTRE | |
|
|
|
|
|
|
|
|
| 7" (178 MM) | REF. |
|
|
|
|
|
|
|
|
|
|
|
|
|
| |||||
|
|
|
|
|
|
|
|
|
| 7" REF. |
|
|
|
|
|
|
|
|
|
|
| 165 cm ET 198 cm (65 à 78 po.) | |||||||
|
|
|
|
|
|
|
|
|
| RÉF. 178 mm (7 po.) |
|
|
|
|
|
|
|
|
|
|
|
|
| ||||||
|
|
|
|
|
|
|
|
|
|
|
|
|
|
|
|
|
|
|
|
|
|
|
|
|
|
|
| ||
|
|
| 74" FOR HEAD CLEARANCE |
|
|
|
|
|
|
|
|
|
|
|
|
| |||||||||||||
|
|
| 74" (188 cm) DE ALTURA |
|
|
|
|
|
|
|
|
|
|
|
|
| |||||||||||||
|
|
| 188 cm POUR DÉGAGEMENT TÊTE |
|
|
|
|
|
|
|
|
|
| 6" REF. | |||||||||||||||
|
|
|
|
|
|
|
|
|
|
|
|
|
|
|
|
|
|
|
|
|
|
|
|
|
| 6" (152 mm) REF. | |||
|
|
|
|
|
|
|
|
|
|
|
|
|
|
|
|
|
|
|
|
|
|
|
|
|
| ||||
|
|
|
|
|
|
|
|
|
|
|
|
|
|
|
|
|
|
|
|
|
|
|
|
|
| RÉF. 152 mm |
18" OPTIONAL OPTATIVO, 18" (45,7 cm)
OPTION 45,7 cm (18 po.)
1" MIN.
1" (25 mm) MÍNIMO MIN. 25 mm (1 po.)
4" REF. | TOP OF TUB RIM |
| 1/2" COPPER | |||||
4" (102 mm) REF. |
| |||||||
BORDE SUPERIOR |
| 1/2" (12,7 mm) | ||||||
RÉF. 102 mm | RÉF. 130 mm | |||||||
|
|
| DE LA BAÑERA |
|
|
| COBRE | |
|
|
| HAUT REBORD |
|
|
| 12,7 mm | |
|
|
| BAIGNOIRE |
|
|
| (1/2 po.) CUIVRE | |
|
|
|
|
|
|
|
|
|
|
|
|
|
|
| BOTTOM OF TUB |
| |
|
|
|
|
|
| FONDO DE LA BAÑERA |
| |
|
|
|
|
|
| FOND BAIGNOIRE |
| |
|
|
|
|
|
|
|
1INSTALL TRIM
Remove PLASTER GUARD (4). Push CAP (1) on valve.
Place ESCUTCHEON (2) and DIAL PLATE (3) and attach with SCREWS (8). Install SHOWER ARM with FLANGE (5) and SHOWER HEAD (6).
Install DIVERTER SPOUT (7).
INSTALACIÓN DE LA MOLDURA
4
5
6
Quite el PROTECTOR DE YESO (4) y coloque la TAPA (1). | 2 | |
Monte el ESCUDETE (2) y la PLACA DE CARÁTULA (3) utilizando los TORNILLOS (8). | ||
| ||
Instale el BRAZO DE LA DUCHA con la BRIDA (5) y la CABEZA DE LA DUCHA (6). |
| |
Instale la BOQUILLA DESVIADORA (7) |
| |
1 | 3 | |
INSTALLATION DES GARNITURES | 8 | |
Enlever la PROTECTION EN PLASTIQUE (4). Enfoncer le CAPUCHON (1). |
|
| Monter l'ÉCUSSON (2) et la PLAQUE GRADUÉE (3) à l'aide des VIS (8). |
| 7 |
|
| ||
| Installer le BRAS DE DOUCHE avec la BRIDE (5) et la TÊTE DE DOUCHE (6). |
| |
|
| ||
| Installer le BEC DE RÉPARTITION (7). |
|
|
|
|
|