Installation Guide

MMS Servers - Rack Rail Kit

Overview

All MMS Multimedia servers come with a Rack Rail Installation Kit, which includes the hardware required to mount the MMS servers in a standard 19-inch (48-cm) rack.

MMS-900 Servers use a more heavy-duty version of the installation kit to accommodate their size and weight. The rack-rail kit that comes with the MMS-900 comes with its own installation instructions.

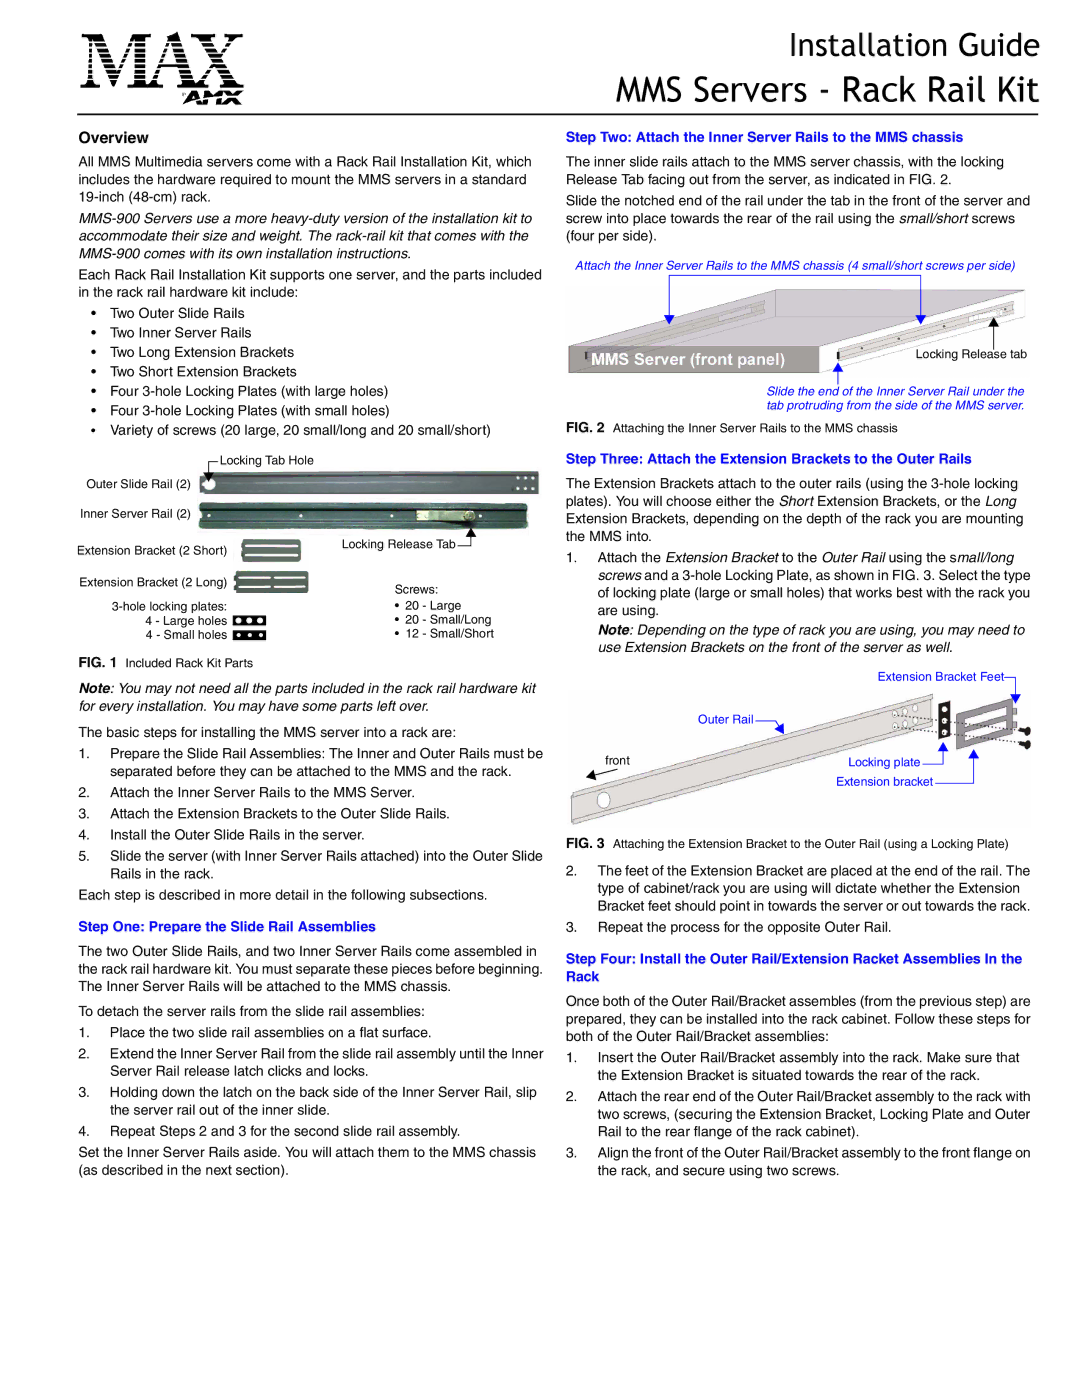
Each Rack Rail Installation Kit supports one server, and the parts included in the rack rail hardware kit include:

Two Outer Slide Rails

Two Inner Server Rails

Two Long Extension Brackets

Two Short Extension Brackets

Four 3-hole Locking Plates (with large holes)

Four 3-hole Locking Plates (with small holes)

Variety of screws (20 large, 20 small/long and 20 small/short)

Locking Tab Hole

Outer Slide Rail (2)

Inner Server Rail (2)

Extension Bracket (2 Short)


Locking Release Tab


Extension Bracket (2 Long)


Screws:


3-hole locking plates:


• 20

- Large

4 - Large holes


• 20

- Small/Long


4 - Small holes


• 12

- Small/Short


FIG. 1 Included Rack Kit Parts

Note: You may not need all the parts included in the rack rail hardware kit for every installation. You may have some parts left over.

The basic steps for installing the MMS server into a rack are:

1.Prepare the Slide Rail Assemblies: The Inner and Outer Rails must be separated before they can be attached to the MMS and the rack.

2.Attach the Inner Server Rails to the MMS Server.

3.Attach the Extension Brackets to the Outer Slide Rails.

4.Install the Outer Slide Rails in the server.

5.Slide the server (with Inner Server Rails attached) into the Outer Slide Rails in the rack.

Each step is described in more detail in the following subsections.

Step Two: Attach the Inner Server Rails to the MMS chassis

The inner slide rails attach to the MMS server chassis, with the locking Release Tab facing out from the server, as indicated in FIG. 2.

Slide the notched end of the rail under the tab in the front of the server and screw into place towards the rear of the rail using the small/short screws (four per side).

Attach the Inner Server Rails to the MMS chassis (4 small/short screws per side)

Locking Release tab

Slide the end of the Inner Server Rail under the tab protruding from the side of the MMS server.

FIG. 2 Attaching the Inner Server Rails to the MMS chassis

Step Three: Attach the Extension Brackets to the Outer Rails

The Extension Brackets attach to the outer rails (using the 3-hole locking plates). You will choose either the Short Extension Brackets, or the Long Extension Brackets, depending on the depth of the rack you are mounting the MMS into.

1.Attach the Extension Bracket to the Outer Rail using the small/long screws and a 3-hole Locking Plate, as shown in FIG. 3. Select the type of locking plate (large or small holes) that works best with the rack you are using.

Note: Depending on the type of rack you are using, you may need to use Extension Brackets on the front of the server as well.


Extension Bracket Feet

front

Outer Rail


Locking plate


Extension bracket


FIG. 3 Attaching the Extension Bracket to the Outer Rail (using a Locking Plate)

2.The feet of the Extension Bracket are placed at the end of the rail. The type of cabinet/rack you are using will dictate whether the Extension Bracket feet should point in towards the server or out towards the rack.

Step One: Prepare the Slide Rail Assemblies

The two Outer Slide Rails, and two Inner Server Rails come assembled in the rack rail hardware kit. You must separate these pieces before beginning. The Inner Server Rails will be attached to the MMS chassis.

To detach the server rails from the slide rail assemblies:

1.Place the two slide rail assemblies on a flat surface.

2.Extend the Inner Server Rail from the slide rail assembly until the Inner Server Rail release latch clicks and locks.

3.Holding down the latch on the back side of the Inner Server Rail, slip the server rail out of the inner slide.

4.Repeat Steps 2 and 3 for the second slide rail assembly.

Set the Inner Server Rails aside. You will attach them to the MMS chassis (as described in the next section).

3.Repeat the process for the opposite Outer Rail.

Step Four: Install the Outer Rail/Extension Racket Assemblies In the Rack

Once both of the Outer Rail/Bracket assembles (from the previous step) are prepared, they can be installed into the rack cabinet. Follow these steps for both of the Outer Rail/Bracket assemblies:

1.Insert the Outer Rail/Bracket assembly into the rack. Make sure that the Extension Bracket is situated towards the rear of the rack.

2.Attach the rear end of the Outer Rail/Bracket assembly to the rack with two screws, (securing the Extension Bracket, Locking Plate and Outer Rail to the rear flange of the rack cabinet).

3.Align the front of the Outer Rail/Bracket assembly to the front flange on the rack, and secure using two screws.

Page 1
Image 1
AMX installation instructions MMS Servers Rack Rail Kit, Overview, Step One Prepare the Slide Rail Assemblies

MMS Servers specifications

AMX MMS (Media Management Server) is an essential technology for managing multimedia content within various audiovisual systems. Designed to optimize the delivery and distribution of media, AMX MMS servers serve as robust platforms for organizations looking to enhance their communication, collaboration, and content-sharing capabilities.

One of the key features of AMX MMS servers is their capability to handle a wide array of media types, including video, audio, and images. This versatility allows users to manage everything from simple presentation materials to complex broadcast-quality video. The server ensures high-quality media playback, providing a seamless user experience across various platforms, including desktop, mobile, and web-based applications.

Another significant characteristic of AMX MMS servers is their scalability. As organizations grow and their media demands increase, the MMS servers can be easily scaled to accommodate additional users and content without compromising performance. This flexibility makes them suitable for small businesses to large enterprises, ensuring that all user requirements can be met effectively.

AMX MMS servers also leverage advanced streaming technologies. They support multiple streaming protocols, ensuring reliable and efficient delivery of content, even in bandwidth-constrained environments. Features such as adaptive bitrate streaming further enhance user experience, as the server automatically adjusts the quality of the media being delivered based on the user's connection speed.

Additionally, the integration capabilities of AMX MMS servers play a vital role in their functionality. They can easily connect with various content creation tools, digital asset management systems, and AV control systems. This integration enhances collaboration, allowing users to streamline the content creation and distribution process.

Security is also a top priority for AMX MMS servers. They implement robust authentication measures and encryption protocols to protect sensitive media content. This ensures that only authorized users can access specific media files, maintaining confidentiality and compliance with organizational policies.

In conclusion, AMX MMS servers are a powerful solution for effective media management and distribution. Their key features, including support for diverse media types, scalability, advanced streaming technologies, integration capabilities, and strong security measures make them a valuable asset for any organization looking to leverage multimedia for communication and collaboration. With a focus on delivering high-quality content seamlessly, AMX MMS servers stand out as a leading choice in media management technology.