IMPORTANT SAFEGUARDS
When using an electrical appliance, basic precautions should always be followed, including the following: Read all instructions before using the Andis clipper/ trimmer.
DANGER: To reduce the risk of electric shock:
1.Do not reach for an appliance that has fallen into water. Unplug immediately.
2.Do not use while bathing or in a shower.
3.Do not place or store appliance where it can fall or be pulled into a tub or sink. Do not place in or drop into water or other liquid.
4.Always unplug this appliance from the electrical outlet immediately after using.
5.Unplug this appliance before cleaning, removing or assembling parts.
WARNING: To reduce the risk of burns, fire electric shock, or injury to persons:
1.An appliance should never be left unattended when plugged in.
2.Close supervision is necessary when this appliance is used by, on or near children or invalids.
3.Use this appliance only for its intended use as described in this manual. Do not use attachments not recommended by Andis.
4.Never operate this appliance if it has a damaged cord or plug, if it is not working properly, if it has been dropped or damaged, or dropped into water. Return the appliance to an Andis Service Center for examination and repair.
5.Keep the cord away from heated surfaces.
6.Never drop or insert any object into any opening.
7.Do not use outdoors or operate with aerosol (spray) products are being used or where oxygen is being administered.
8.Do not use this appliance with a damaged or broken blade, as injury to the skin may occur.
9.To disconnect turn control to “off” then remove plug from outlet.
10.If this clipper/trimmer has means for grounding, connect to a properly grounded outlet only. See Grounding Instructions.
11.If used as an animal clipper/trimmer or shear: during use, do not place or leave appliance where it may be (1) damaged by an animal or (2) exposed to the weather.
THIS PRODUCT INTENDED FOR PROFESSIONAL USE
SAVE THESE INSTRUCTIONS
OPERATING INSTRUCTIONS
Please read the following instructions before using your new Andis cordless clipper/trimmer. Give it the care that a fine precision built instrument deserves and it will give you years of service.
READ THE FOLLOWING BEFORE CHARGING THIS CLIPPER/TRIMMER
Remove Andis clipper/trimmer and charger from carton and plug into 120V or 230V outlet as identified on the bottom of the charger, or on the outside of the carton. Note that the clipper/trimmer ON/OFF switch must be in the OFF position for the battery to charge. Place cordless clipper/trimmer into form fitting pocket in charger. The unit is "keyed" to fit one way only. The green light on the charger will turn on. The clipper/trimmer has electrical contacts that touch electrical contacts in the charger. The weight of the unit will give sufficient contact. The clipper/trimmer is not charged at the factory. Please recharge clipper /trimmer for 12 hours (overnight) before first use for maximum performance.
You may keep the clipper/trimmer in the charger when not in use. The charger will maintain the battery at full charge and the green light will stay on. The unit has a Nickel Metal Hydride battery that cannot be damaged by overcharging. However, we recommend that the charger be unplugged if the clipper/trimmer won't be used for seven or more days.
PLEASE NOTE: Nickel Metal Hydride batteries have less "Memory Effect" than Nickel Cadmium batteries. Memory Effect is caused by repeated short uses of the clipper/trimmer, followed by charging. The battery never fully discharges and, therefore, "forgets" how much energy it can store. In order to maximize the performance of your Nickel Metal Hydride battery, please follow these steps:
1)Oil blade. Turn clipper/trimmer on and allow it run until the blade slows significantly. It is not necessary to let the blade stop completely.
2)Turn clipper/trimmer off. Charge overnight.
3)Conduct the above exercise every sixty days.
FAILURE TO CHARGE:
1)Make sure voltage is present at the wall outlet (confirm with an appliance you know is working).
2)Check the alignment of the contacts between the clipper/trimmer and those in the charger. The contacts in the charger should be centered in the small openings, and protrude slightly into the charger
pocket. Disconnect power to the charger, and correct if necessary.
3)Make sure contacts on both charger and clipper/trimmer are clean. Disconnect power to the
charger and rub contacts with a pencil eraser until shiny. Wipe contacts and brush off remaining dust with a soft dry cloth.
4.If failure to charge still exists, return trimmer to Andis or an Andis Authorized Service Station listed in this manual for examination and repair or replacement.
ATTENTION: The product you have purchased contains a rechargeable battery. The battery is recyclable. At the end of its useful life, under various state and local laws, it may be illegal to dispose of this
battery into the municipal waste stream. Check with your local solid waste officials (or call 1-800-822-8837) for details in your area for recycling options or proper disposal.
USER MAINTENANCE
The internal mechanism of your clipper/trimmer has been permanently lubricated at the factory. Other than the recommended maintenance described in this manual, no other maintenance should be performed, except by Andis Company or an Andis Authorized Repair Service Station.
CARE AND SERVICING OF YOUR ANDIS TRIMMER BLADES- (Trimmer shown in diagrams may vary to the one that you have.)
| Blades should be | |
| oiled before, | |
| during, and after | |
| each use. If your | |
| trimmer blades | |
| leave streaks or | |
| slow down, it’s a | |
| sure sign blades | Diagram A |
| need oil. The |
| |
| clipper/trimmer should be | OIL |
| held in a position shown in |
| |
| Diagram A to prevent oil | |
| from getting into motor. | |
| Place a few drops of Andis | |
| Clipper Oil on the front and OIL | OIL |
| side of the cutter blades | |
| (See Diagram B). Wipe | |
| excess oil off blades with a | |
| soft dry cloth. Spray | |
| lubricants contain | Diagram B |
| insufficient oil for good | |
lubrication, but are an excellent clipper coolant. Always replace broken or nicked blades to prevent injury. You can clean the excess hair from your blades by using a
small brush or worn out tooth brush. To clean the blades we suggest to immerse the blades only into a shallow pan of Andis Clipper Oil, while the clipper is running. Any excess hair and dirt that has accumulated between the blades should come out. After cleaning, turn your clipper/trimmer off and dry blades with a dry cloth and start clipping again.
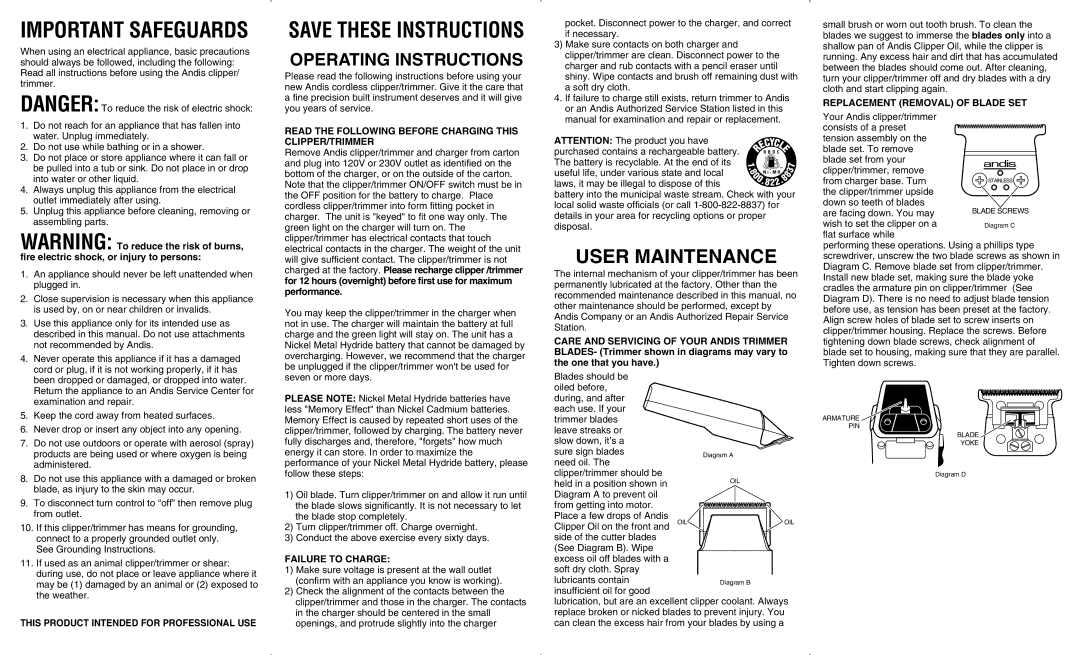
REPLACEMENT (REMOVAL) OF BLADE SET
Your Andis clipper/trimmer
consists of a preset tension assembly on the
blade set. To remove blade set from your
clipper/trimmer, remove from charger base. Turn the clipper/trimmer upside
down so teeth of blades are facing down. You may wish to set the clipper on a flat surface while
performing these operations. Using a phillips type screwdriver, unscrew the two blade screws as shown in Diagram C. Remove blade set from clipper/trimmer. Install new blade set, making sure the blade yoke cradles the armature pin on clipper/trimmer (See Diagram D). There is no need to adjust blade tension before use, as tension has been preset at the factory. Align screw holes of blade set to screw inserts on clipper/trimmer housing. Replace the screws. Before tightening down blade screws, check alignment of blade set to housing, making sure that they are parallel. Tighten down screws.
ARMATURE
PIN
BLADE
YOKE
Diagram D