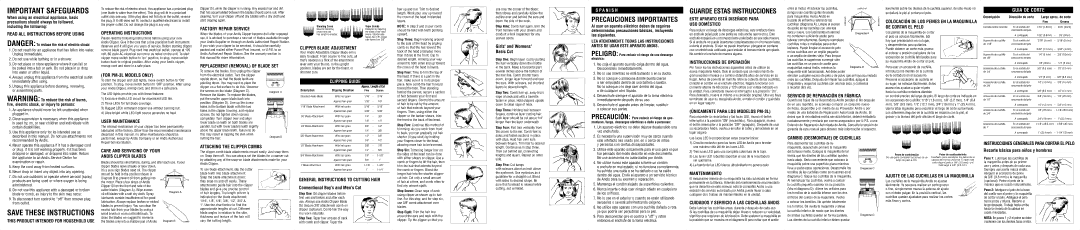
IMPORTANT SAFEGUARDS
When using an electrical appliance, basic precautions should always be followed, including the following:
READ ALL INSTRUCTIONS BEFORE USING
DANGER: To reduce the risk of electric shock:
1.Do not reach for an appliance that has fallen into water. Unplug immediately.
2.Do not use while bathing or in a shower.
3.Do not place or store appliance where it can fall or be pulled into a tub or sink. Do not place in or drop into water or other liquid.
4.Always unplug this appliance from the electrical outlet immediately after using.
5.Unplug this appliance before cleaning, removing, or assembling parts.
WARNING: To reduce the risk of burns, fire, electric shock, or injury to persons:
1. An appliance should never be left unattended when |
plugged in. |
2. Close supervision is necessary when this appliance |
is used by, on, or near children and individuals with |
certain disablilities. |
3. Use this appliance only for its intended use as |
To reduce the risk of electric shock, this appliance has a polarized plug (one blade is wider than the other). This plug will fit in a polarized outlet only one way. If the plug does not fit fully in the outlet, reverse the plug. If it still does not fit, contact a qualified electrician to install the proper outlet. Do not change the plug in any way.
OPERATING INSTRUCTIONS
Please read the following instructions before using your new Andis Clipper. Give it the care that a fine precision built instrument deserves and it will give you years of service. Before starting clipper remove blade guard. Plug cord into electrical outlet, operate at 120 volt, 60 cycle AC electrical current or as noted on the unit. To start clipper move switch button to "on" position, to stop, move switch button back to original position. After using your Andis clipper, rewrap cord and store in a safe place.
(FOR PM-3L MODELS ONLY)
To start the clipper and LED lights, move switch button to "ON" position. To stop, move switch button to "OFF" position. After using your Andis Clipper, rewrap cord, and store in a safe place.
The LED lights provide you with these features:
1)Exclusive Andis LED circuit for maximized LED life.
2)Three LEDs for full blade coverage.
3)Rugged LEDs withstand clipper use without burning out.
4)
USER MAINTENANCE
The internal mechanism of your clipper has been permanently lubricated at the factory. Other than the recommended maintenance described in this manual, no other maintenance should be
Clipper Oil, while the clipper is running. Any excess hair and dirt that has accumulated between the blades should come out. After cleaning, turn your clipper off and dry blades with a dry cloth and start clipping again.
FACTORY REPAIR SERVICE
When the blades of your Andis Clipper become dull after repeated use, it is advised to purchase a new set of blades available through your Andis Supplier or through an Andis Authorized Repair Station. If you wish your clipper to be serviced, it should be carefully packed and mailed either Parcel Post Insured, or U.P.S. to an Andis Authorized Repair Station. See the warranty section in
this manual for more information.
REPLACEMENT (REMOVAL) OF BLADE SET
To remove the blades, first unplug the clipper |
|
|
|
|
|
|
|
| |
from the electrical outlet. Turn the clipper |
|
|
|
|
|
|
|
| |
upside down, so that the blade teeth are |
|
|
|
|
|
|
|
| |
pointing down. You may want to place the |
|
|
|
|
|
|
|
| |
clipper on a flat surface to do this. Unscrew |
|
|
|
|
|
|
|
| |
the screws on the blade (Diagram C). |
|
|
|
|
|
|
|
|
|
|
| Diagram C |
| ||||||
Remove the blades. To replace the blades, |
|
|
| ||||||
|
|
|
|
|
|
|
|
| |
put the smaller upper blade back into |
|
|
|
|
|
|
|
| |
position (Diagram D). Line up the screw |
|
|
|
|
|
|
|
| |
|
|
|
|
|
|
|
| ||
|
|
|
|
|
|
|
| ||
holes in the bottom blade with the two |
|
|
|
|
|
|
|
| |
holes in the clipper housing, and replace |
|
|
|
|
|
|
|
| |
screws. Do not tighten down screws |
|
|
|
|
|
|
|
| |
completely. Turn clipper over and align |
|
|
|
|
|
|
|
| |
lower blade so teeth on both blades are |
|
|
|
|
|
|
|
| |
parallel, but with lower blade’s teeth slightly |
|
|
|
|
|
|
|
| |
above the upper blade teeth. Failure to do |
|
|
|
|
|
|
|
| |
this may result in nipping the skin when |
|
|
|
|
|
|
|
| |
Blending Comb | Taper Combs |
Used for blending | Designed for tapering |
areas from one | the sides of the head |
hair length to another. | evenly. Shorter side |
| leaves hair 1/8", longer |
| side leaves hair 3/8". |
CLIPPER BLADE ADJUSTMENT
Your Andis Adjustable Clipper Blade set is easy to adjust. From coarse to fine cuts, all that’s needed is a flick of the adjustment lever with your thumb. In the upright position, blades are set for the finest, or shortest cuts.
CLIPPING GUIDE
|
| Approx. Length of Cut | |||
Description | Clipping Direction | Fine |
| Coarse | |
|
|
|
|
|
|
Standard Andis Blade | With hair grain | 1/16" | - | 3/16" |
|
| Against hair grain | 1/32" | - | 1/8" |
|
|
|
|
|
|
|
1/16" Blade Attachment | With hair grain | 3/16" | - | 5/16" |
|
| Against hair grain | 3/32" | - | 5/32" |
|
|
|
|
|
|
|
1/8" Blade Attachment | With hair grain | 1/4" | - | 3/8" |
|
| Against hair grain | 1/8" | - | 1/4" |
|
|
|
|
|
|
|
1/4" Blade Attachment | With hair grain | 3/8" | - | 1/2" |
|
| Against hair grain | 1/4" | - | 3/8" |
|
hair up and out. Trim to desired length. Work your way up toward the crown of the head in blended layers.
NOTE: In step 2 and 3 your comb should be held with teeth pointing upward.
Step Three: Begin working around to the side of the head by angling comb so that the hair toward the back of the head protrudes more than it does at the front. Clip to desired length, working your way around to both sides and up toward the crown of the head in layers.
Step Four: Time to trim the top of the head. If there is a part in the hair, make sure it is in its proper place. Now comb the hair forward toward the face. Then standing behind the person, secure a section of hair between your first and second fingers. Control the amount of hair to be cut by the amount
of hair that extends beyond your fingers. Then, using either the clipper or the barber shears, trim the front to the back of the head.
Step Five: Continue this method of trimming. As you work from front to back, you can gradually cut hair
use only the corner of the blade; then slowly and carefully follow the outline over and behind the ears and down the side of the neck.
Step Nine: Comb hair again, trim the front hairline with your shears and conduct a final inspection for any uneven spots.
Girls' and Womens'
Basic Cut
Step One: Begin layer cut by parting the hair vertically down the middle in the back. Make a horizontal part several inches above the bottom of the hair line. Comb shorter hairs down, longer layer forward and over the ears. With scissors, cut shortest layers to desired length.
Step Two: Comb hair up, away from nape of neck and with a barrette fasten in place. Hold clippers upside down to clean nape of neck.
Step Three: Holding hair between fingers, continue layer cutting hair. Each layer should be cut about 1/4" longer than the layer underneath
Step Four: Part hair vertically from the crown to the ear. Comb hair to sides and fasten sections in place
S P A N I S H
PRECAUCIONES IMPORTANTES
Al usar un aparato eléctrico deben de seguirse determinadas precauciones básicas, incluyendo las siguientes.
LEA ATENTAMENTE TODAS LAS INSTRUCCIONES ANTES DE USAR ESTE APARATO ANDIS.
PELIGRO: Para reducir el riesgo de una descarga eléctrica:
1.No coja el aparato cuando caiga dentro del agua. Desconéctelo inmediatamente.
2.No lo use mientras se esté bañando o en la ducha.
3.No lo coloque o almacene donde pueda caerse o ser empujado dentro de una bañera o lavabo. No lo coloque o lo deje caer dentro del agua
o de cualquier otro líquido.
4.Desenchufe siempre el aparato de la toma eléctrica inmediatamente después de su uso.
5.Desenchufe el aparato antes de limpiar, sustituir o colocar sus partes.
PRECAUCIÓN: Para reducir el riesgo de que- maduras, fuego, descargas eléctricas o daño a personas:
1. Un aparato eléctrico no debe dejarse desatendido una |
vez enchufado. |
GUARDE ESTAS INSTRUCCIONES
ESTE APARATO ESTÁ DISEÑADO PARA USO DOMÉSTICO
Para reducir el riesgo de descargas eléctricas, este artefacto tiene un enchufe polarizado (una patilla es más ancha que la otra). Este enchufe encajará en un tomacorriente polarizado de una sola manera. Si el enchufe no puede insertarse completamente en el tomacorriente, invierta el enchufe. Si aún no puede insertarse, póngase en contacto con un electricista calificado para instalar el tomacorriente apropiado. No cambie el enchufe de manera alguna.
INSTRUCCIONES DE OPERACIÓN
Por favor lea las instrucciones siguientes antes de utilizar su nueva maquinilla Andis. Dele el cuidado que un instrumento de gran precisión merece y a cambio obtendrá años de servicio en su hogar. Antes de ponerla en marcha retire la cubierta de las cuchillas, conecte el cordón en el enchufe eléctrico, hágala funcionar con corriente alterna de 60 ciclos y 120 voltios o el voltaje indicado en la unidad. Para conectarla mueva el interruptor a la posición “On”. Para detenerla, mueva el mismo a su posición original. Una vez haya terminado de usar su maquinilla Andis, enrolle el cordón y guárdela en un lugar seguro.
(ÚNICAMENTE PARA LOS MODELOS PM-3L)
Para encender la recortadora y las luces LED, mueva el botón interruptor a la posición "ON" (encendido). Para apagarla, mueva el botón interruptor a la posición "OFF" (apagado). Después de usar su recortadora Andis, vuelva a enrollar el cable y almacénela en un lugar seguro.
entre al motor. Al lubricar las cuchillas, |
|
|
|
|
|
|
|
|
| LUBRICAR | |||
ponga unas cuantas gotas de aceite |
|
|
|
|
|
|
|
|
|
|
|
| |
para maquinillas marca Andis en | LUBRICAR |
|
|
| LUBRICAR | |
la parte de enfrente y lateral de las |
|
|
| |||
cuchillas (diagrama A). Limpie el exceso |
|
|
| |||
de aceite en las cuchillas con una tela |
|
|
|
|
|
|
seca y suave. Los lubricantes en aerosol |
|
|
|
|
|
|
|
|
| Diagrama A | |||
no contienen suficiente aceite para |
|
|
| |||
|
|
|
|
|
| |
lubricar correctamente. Siempre reemplace |
|
|
|
|
|
|
cuchillas rotas o melladas para evitar |
|
|
|
|
|
|
lesiones. Puede limpiar el exceso de pelo |
|
|
|
|
|
|
en las cuchillas con un cepillo pequeño |
|
|
|
|
|
|
o un cepillo de dientes viejo. Para limpiar |
|
|
|
|
|
|
las cuchillas le sugerimos sumergir sólo |
|
|
|
|
|
|
las cuchillas en un poco de aceite para |
|
| Diagrama B | |||
maquinillas marca Andis, mientras la |
|
| ||||
maquinilla esté funcionando. Así debe poder
eliminar cualquier exceso de pelo o de polvo que se haya acumulado entre las cuchillas. Después de limpiar las cuchillas, apague la maquinilla y seque las cuchillas con una tela seca, y comience
a recortar otra vez.
SERVICIO DE REPARACIÓN EN FÁBRICA
Cuando las hojas de su Recortadora Andis pierdan el filo después de un uso repetido, se aconseja comprar un conjunto nuevo de hojas, disponible p or medio de su Proveedor Andis o por medio de una Estación de Reparación Autorizada de Andis. Si desea que la recortadora reciba servicio técnico, deberá embalarla cuidadosamente y enviarla por correo asegurado o por U.P.S. a una Estación de Reparación Autorizada de Andis. Consulte la sección de garantía de este manual para obtener más información al respecto.
levemente sobre los dientes de la cuchilla superior, de este modo no se dañará la piel al cortarse el pelo.
COLOCACIÓN DE LOS PEINES EN LA MAQUINILLA DE CORTAR EL PELO
Los peines de la maquinilla de cortar el pelo se colocan fácilmente. Sól hay que presionarlos en su lugar,
y desprenderlos para quitarlos. Puede obtener un corte más grueso al colocar a presión cualquiera de los accesorios de cuchilla fabricados para su maquinilla Andis de cortar el pelo.
Para usar un accesorio de cuchilla, introduzca los dientes de la cuchilla de la cortadora en el accesorio.
Presione el accesorio de cuchilla en su lugar; se colocan fácilmente. Estos accesorios ayudan a guiar el pelo hacia la cuchilla cortadora dándole
un control preciso del largo de pelo. El largo de corte es indicado en los accesorios de cuchilla: 1/16" (1.6 mm), 1/8" (3.2 mm), 1/4" (6.4 mm), 3/8" (9.5 mm), 1/2" (12.7 mm), 3/4" (19 mm) y 1" (25.4 mm). Use la tabla siguiente para encontrar el largo de corte aproximado.
Los diferentes ángulos de la cuchilla en relación con la piel, el grosor y la textura del pelo afectan el largo de corte.
GUIA DE CORTE
Descripción | Dirección de corte | Largo aprox. de corte | ||
|
| Fino |
| Grueso |
Cuchilla Andis estándar | En el sentido del | 1/16" (1.6mm) | - | 3/16" (5mm) |
| crecimiento del pelo |
|
|
|
| A contrapelo | 1/32" (0.8mm) | - | 1/8" (3mm) |
|
|
|
|
|
Accesorio de cuchilla | En el sentido del | 3/16" (5 mm) | - | 5/16" (8 mm) |
de 1/16" | crecimiento del pelo |
|
|
|
| A contrapelo | 3/32" (2.5 mm) | - | 5/32" (4 mm) |
|
|
|
|
|
Accesorio de cuchilla | En el sentido del | 1/4" (5 mm) | - | 3/8" (9.5mm) |
de 1/8" | crecimiento del pelo |
|
|
|
| A contrapelo | 1/8" (3mm) | - | 1/4" (5 mm) |
|
|
|
|
|
Accesorio de cuchilla | En el sentido del | 3/8" (9.5 mm) | - | 1/2" (13 mm) |
de 1/4" | crecimiento del pelo |
|
|
|
| A contrapelo | 1/4" (5 mm) | - | 3/8" (9.5 mm) |
|
|
|
|
|
Accesorio de cuchilla | En el sentido del | 1/2" (13 mm) | - | 5/8" (16 mm) |
de 3/8" | crecimiento del pelo |
|
|
|
| A contrapelo | 3/8" (9.5 mm) | - | 1/2" (13 mm) |
|
|
|
|
|
Accesorio de cuchilla | En el sentido del | 5/8" (16 mm) | - | 7/8" (22 mm) |
de 1/2" | crecimiento del pelo |
|
|
|
| A contrapelo | 1/2" (13 mm) | - | 5/8" (16 mm) |
|
|
|
| |
Accesorio de cuchilla | En el sentido del | 7/8" (22 mm) | - | |
de 3/4" | crecimiento del pelo |
|
|
|
| A contrapelo | 3/4" (19 mm) | - | 1" (25.4 mm) |
|
|
| ||
Accesorio de cuchilla | En el sentido del | |||
de 1" | crecimiento del pelo |
|
|
|
| A contrapelo | 1" (25.4 mm) | - | |
described in this manual. Do not use attachments not |
recommended by Andis. |
performed, except by Andis Company or an Andis Authorized
cutting the hair. | Diagram D |
|
3/8" Blade Attachment | With hair grain | 1/2" | - | 5/8" |
| Against hair grain | 3/8" | - | 1/2" |
shorter (if you wish) by holding your fingers closer to the head,
with clips. Hold hair over ears
2. Es necesaria una supervisión muy de cerca cuando |
este artefacto sea usado por, en o cerca de niños |
Las luces LED le proporcionan estas características:
CAMBIO (DESMONTAJE) DE CUCHILLAS
4. Never operate this appliance if it has a damaged cord |
or plug, if it is not working properly, if it has been |
dropped or damaged, or dropped into water. Return |
the appliance to an Andis Service Center for |
examination or repair. |
5. Keep the cord away from heated surfaces. |
6. Never drop or insert any object into any opening. |
7. Do not use outdoors or operate where aerosol (spray) |
products are being used or where oxygen is being |
administered. |
8. Do not use this appliance with a damaged or broken |
blade or comb, as injury to the skin may occur. |
9. To disconnect turn control to “off” then remove plug |
from outlet. |
SAVE THESE INSTRUCTIONS
THIS PRODUCT INTENDED FOR HOUSEHOLD USE
Repair Service Station.
CARE AND SERVICING OF YOUR
ANDIS CLIPPER BLADES
Blades should be oiled before, during, and after each use. If your clipper blades leave streaks or slow down,
it’s a sure sign blades need oil. The clipper should be held in the position shown in Diagram B to prevent oil from getting into the motor. Place a few drops of Andis Clipper Oil on the front and side of the cutter blades (Diagram A). Wipe excess oil off blades with a soft dry cloth. Spray lubricants contain insufficient oil for good lubrication. Always replace broken or nicked blades to prevent injury. You can clean the excess hair from your blades by using a
small brush or worn out toothbrush. To clean the blades we suggest to immerse the blades only into a shallow pan of Andis
ATTACHING THE CLIPPER COMBS
The clipper comb blade attachments mount easily. Just snap them on. Snap them off. You can always set the blades for a coarser cut by attaching any of the
To use blade attachment, slip the cutter blade teeth into blade attachment. Snap the blade attachment down; they snap on and off easily. These attachments guide hair into the clipper blades and give you precise control of hair lengths. The length of trim is indicated on the blade attachment: 1/16", 1/8", 1/4", 3/8", 1/2", 3/4" &
1". Use the chart below to find the approximate lengths of cut. Different blade angles in relation to the skin, thickness and texture of the hair will vary the cutting length.
1/2" Blade Attachment | With hair grain | 5/8" | - | 7/8" |
| Against hair grain | 1/2" | - | 5/8" |
|
|
|
|
|
3/4" Blade Attachment | With hair grain | 7/8" | - | |
| Against hair grain | 3/4" | - | 1" |
|
|
|
|
|
1" Blade Attachment | With hair grain | - | ||
| Against hair grain | 1" | - | |
|
|
|
|
|
GENERAL INSTRUCTIONS TO CUTTING HAIR Conventional Boy’s and Men’s Cut
Step One: Oil clipper blades before first use and before and after each use. Always use Andis Clipper Blade Oil. Secure 3/8" attachment comb on clipper (optional). Comb hair the way it is worn naturally.
Step Two: Taper hair at base of neck with comb and clipper. Taper the
allowing more hair to be trimmed.
Step Six: Trimming longer hair on the sides of the head can be done with either shears or clipper. Use a comb or fingers to lift the hair, then trim the hair that extends beyond the comb or fingers. Blend the longer hair into the shorter clipper- cut hair. Cut only a small amount of hair at a time, and comb often to find any uneven spots.
Step Seven: Clean nape of neck using clipper as shown up to hair line. For this step, and for step six, use 3/8" comb attachment over blades.
Step Eight: Trim the hair line around the ears and neck with the clipper. Tip the clipper so that you
between fingers. Trim hair to desired length. Continue as in step three. Then cut behind ear, connecting lengths and layers. Repeat on other side.
Step Five: Cut bangs
with scissors about an inch above the eyebrows. Use eyebrows as a guideline for a straight cut. Blend with sides to desired shape. Be sure that forehead is relaxed while cutting, not wrinkled.
| y personas con ciertas discapacidades. |
3. | Utilice este aparato únicamente para el uso para el que |
| fue pensado del modo descrito en este documento. |
| No use accesorios no autorizados por Andis. |
4. | No utilice nunca este aparato si tiene un cordón |
| o enchufe en mal estado, si no funciona correctamente, |
| ha sufrido una caída o se ha dañado o se ha caído |
| dentro del agua. Envíe el aparato a un servicio técnico |
| de Andis para su examen y reparación. |
5. | Mantenga el cordón alejado de superficies calientes. |
6. | Nunca inserte o deje caer ningún objeto en cualquiera |
| de los orificios. |
7. | No lo use en el exterior o cuando se estén utilizando |
| aerosoles o se esté administrando oxígeno. |
8. | No utilice este aparato con una cuchilla dañada o rota |
| ya que podría ser perjudicial para la piel. |
9. | Para desconectar gire el control a “off” y retire |
| entonces el enchufe de la toma eléctrica. |
1)Circuito exclusivo para las luces LED de Andis para brindar una máxima vida útil de las luces LED.
2)Tres luces LED para una completa cobertura de la hoja.
3)Las luces LED robustas soportan el uso de la recortadora sin quemarse.
4)La fuente de luz LED blanca ultrabrillante no genera calor
MANTENIMIENTO
El mecanismo interno de su maquinilla ha sido lubricado en forma permanente en la fábrica. Además del mantenimiento recomendado que se describe en este manual, sólo la compañía Andis o una estación de servicio autorizada por Andis puede llevar a cabo cualquier otro trabajo de mantenimiento en la unidad.
CUIDADOS Y SERVICIO A LAS CUCHILLAS ANDIS
Debe lubricar las cuchillas antes, durante y después de cada uso.
Si las cuchillas de su maquinilla dejan líneas o reducen su velocidad, significa que requieren de lubricación. Debe sostener la maquinilla en la posición que se muestra en el diagrama B para evitar que el aceite
Para desmontar las cuchillas de su maquinilla, desenchufe primero la maquinilla del tomacorriente. Coloque la maquinilla de tal forma que los dientes de las cuchillas queden hacia abajo. Sería conveniente que colocara la maquinilla sobre una superficie plana mientras lleva a acabo estas operaciones. Desatornille los tornillos de las cuchillas como se muestran en el diagrama C. Saque las cuchillas de la maquinilla. Al reemplazar las cuchillas, vuelva a colocar
la cuchilla pequeña superior en su posición. (Vea el diagrama D). Alinee los orificios para los tornillos de la cuchilla inferior con los dos orificios del cuerpo de la maquinilla. Vuelva a colocar los tornillos. No apriete totalmente los tornillos. Dé vuelta la maquinilla y alinee la cuchilla inferior de modo que los dientes de ambas cuchillas queden en forma paralela. Los dientes de la cuchilla inferior deben quedar
Peine de combinación | Peine de escalonamiento |
Se usa para combinar las zonas de un | Diseñado para escalonar los lados de la |
largo de pelo a otro. | cabeza en forma uniforme. El lado más |
| corto deja el pelo a 1/8" (3.2 mm), y el |
| más largo a 3/8" (9.5 mm). |
Diagrama C
AJUSTE DE LAS CUCHILLAS EN LA MAQUINILLA
Las cuchillas de la maquinilla Andis se ajustan fácilmente. Ya sea para realizar un corte grueso o fino, simplemente mueva la palanca de ajuste con el dedo pulgar. En la posición vertical, las cuchillas quedan ajustadas para realizar los cortes más finos y cortos.
Diagrama D
INSTRUCCIONES GENERALES PARA CORTAR EL PELO Recorte básico para niños y hombres
Paso 1: Lubrique las cuchillas de la maquinilla antes de su primer uso y antes y después de cada uso. Siempre use aceite marca Andis. Asegure el accesorio de peine
de 3/8" (9.5 mm) a la maquinilla (opcional). Peine el pelo de la manera que es usado naturalmente.
Paso 2: Adelgace el pelo de la base del cuello con el peine y la maquinilla de cortar el pelo. Adelgace el pelo hacia arriba y afuera. Recorte al largo deseado. Trabaje hacia arriba hacia la corona de la cabeza en capas mezcladas.
NOTA: En pasos 1 y 2 el peine se debe mantener con los dientes hacia arriba.