VIDEO INPUT

IMAGE LEVEL ADJUSTMENT

1

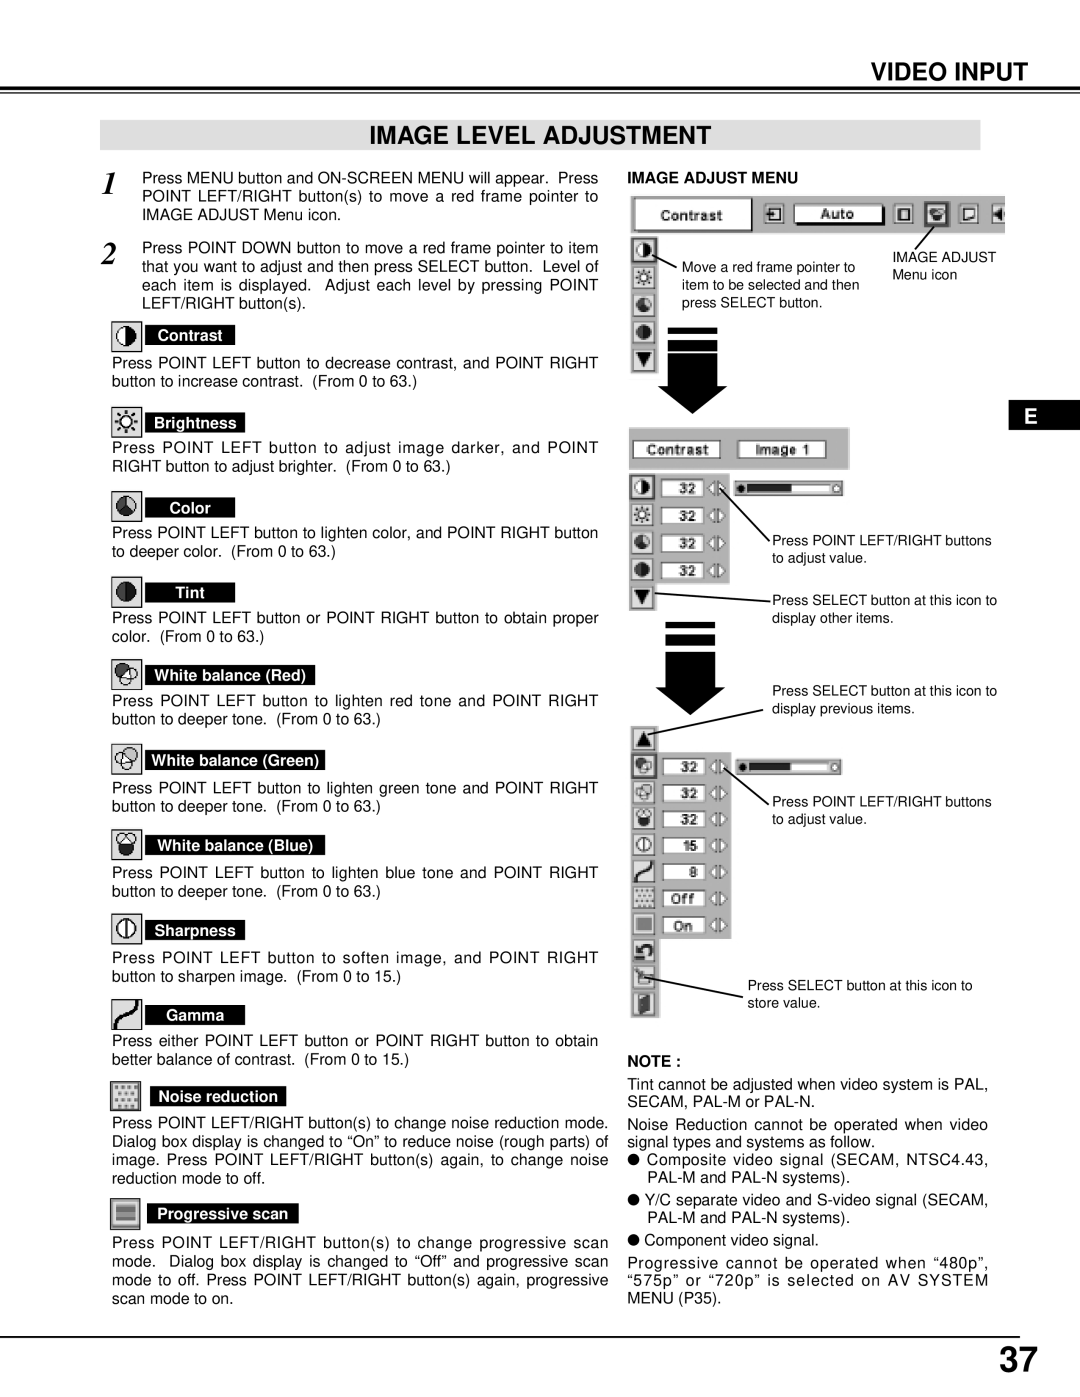
Press MENU button and ON-SCREEN MENU will appear. Press

POINT LEFT/RIGHT button(s) to move a red frame pointer to


IMAGE ADJUST Menu icon.

2

Press POINT DOWN button to move a red frame pointer to item

that you want to adjust and then press SELECT button. Level of

IMAGE ADJUST MENU

Move a red frame pointer to

IMAGE ADJUST Menu icon

each item is displayed. Adjust each level by pressing POINT LEFT/RIGHT button(s).

Contrast

Press POINT LEFT button to decrease contrast, and POINT RIGHT button to increase contrast. (From 0 to 63.)

Brightness

Press POINT LEFT button to adjust image darker, and POINT RIGHT button to adjust brighter. (From 0 to 63.)

Color

Press POINT LEFT button to lighten color, and POINT RIGHT button to deeper color. (From 0 to 63.)

Tint

Press POINT LEFT button or POINT RIGHT button to obtain proper color. (From 0 to 63.)

White balance (Red)

Press POINT LEFT button to lighten red tone and POINT RIGHT button to deeper tone. (From 0 to 63.)

White balance (Green)

Press POINT LEFT button to lighten green tone and POINT RIGHT button to deeper tone. (From 0 to 63.)

White balance (Blue)

Press POINT LEFT button to lighten blue tone and POINT RIGHT button to deeper tone. (From 0 to 63.)

Sharpness

Press POINT LEFT button to soften image, and POINT RIGHT button to sharpen image. (From 0 to 15.)

Gamma

Press either POINT LEFT button or POINT RIGHT button to obtain better balance of contrast. (From 0 to 15.)

Noise reduction

Press POINT LEFT/RIGHT button(s) to change noise reduction mode. Dialog box display is changed to “On” to reduce noise (rough parts) of image. Press POINT LEFT/RIGHT button(s) again, to change noise reduction mode to off.

Progressive scan

Press POINT LEFT/RIGHT button(s) to change progressive scan mode. Dialog box display is changed to “Off” and progressive scan mode to off. Press POINT LEFT/RIGHT button(s) again, progressive scan mode to on.

item to be selected and then press SELECT button.

E

Press POINT LEFT/RIGHT buttons to adjust value.

Press SELECT button at this icon to display other items.

Press SELECT button at this icon to display previous items.

Press POINT LEFT/RIGHT buttons to adjust value.

Press SELECT button at this icon to store value.

NOTE :

Tint cannot be adjusted when video system is PAL, SECAM, PAL-M or PAL-N.

Noise Reduction cannot be operated when video signal types and systems as follow.

Composite video signal (SECAM, NTSC4.43, PAL-M and PAL-N systems).

Y/C separate video and S-video signal (SECAM, PAL-M and PAL-N systems).

Component video signal.

Progressive cannot be operated when “480p”, “575p” or “720p” is selected on AV SYSTEM MENU (P35).

37

Page 37
Image 37
Ask Proxima Pro AV 9500 manual Video Input Image Level Adjustment, Color, Tint, Noise reduction, Progressive scan

Pro AV 9500 specifications

The Ask Proxima Pro AV 9500 is a remarkable addition to the world of professional audiovisual equipment, offering a symphony of advanced features and cutting-edge technologies. Designed for dynamic presentations and immersive experiences, this projector is perfect for corporate environments, educational settings, and multipurpose venues.

One of the most striking features of the Pro AV 9500 is its exceptional brightness. With a luminosity of up to 5,000 lumens, it ensures vibrant and clear images, even in well-lit rooms. This brightness allows users to conduct presentations without the need for dimming lights, making it an ideal solution for various settings where versatility is crucial.

The Pro AV 9500 also boasts an impressive resolution of 1080p (1920 x 1080), delivering stunning clarity and detail for both video and text. This high-definition capability makes it suitable for displaying complex visuals, graphics, and video content, ensuring that the audience remains engaged and informed.

Connectivity is another area where the Pro AV 9500 excels. With multiple input options, including HDMI, VGA, and USB ports, it provides seamless integration with a variety of devices, such as laptops, media players, and even mobile devices. This versatility allows users to connect their preferred technology without hassle, streamlining the setup process.

The projector is equipped with advanced DLP (Digital Light Processing) technology, which enhances image quality by delivering sharper images and more dynamic colors. This technology helps to reduce blurriness and improves the overall viewing experience, making it an excellent choice for high-stakes presentations.

In addition to its performance metrics, the Pro AV 9500 offers several user-friendly features. Its intuitive interface allows for easy navigation and adjustment of settings, while the remote control adds convenience for users who need to tweak settings from afar. Furthermore, the projector includes built-in speakers, eliminating the necessity for additional audio equipment in smaller presentations.

Durability and energy efficiency are also key attributes of the Pro AV 9500. With a long-lasting lamp life, users can expect extended service without frequent replacements, reducing overall maintenance costs. The projector's eco-friendly design contributes to energy savings, making it a sustainable choice for conscious consumers.

In conclusion, the Ask Proxima Pro AV 9500 is a powerful, versatile, and efficient projector that meets the demanding needs of modern presentations. With its impressive brightness, resolution, connectivity options, and advanced technologies, it stands out as a top choice for professionals who value quality and convenience in their audiovisual tools.