ARIC65 & ARIW6
ARIC65 & ARIW6
Wiring
Cableado
Câblage
Red (+) to Red (+) Roja (+) a Roja (+)
Rouge (+) à Rouge (+)
Black
Noir
Red (+) | Black |
Roja (+) | Negro |
Rouge (+) | Noir |
3/8” (9mm) Bare Wire
3/8” (9mm) Alambre Pelado
3/8” (9mm) Fil Nu
Connect the red (+) terminal on the speaker to the red (+) terminal on the receiver. Connect the black
Conecte (+) el terminal rojo en el altavoz con (+) el terminal rojo en el receptor. Conecte
Reliez (+) la borne rouge sur le
àla borne rouge sur le récepteur. Reliez
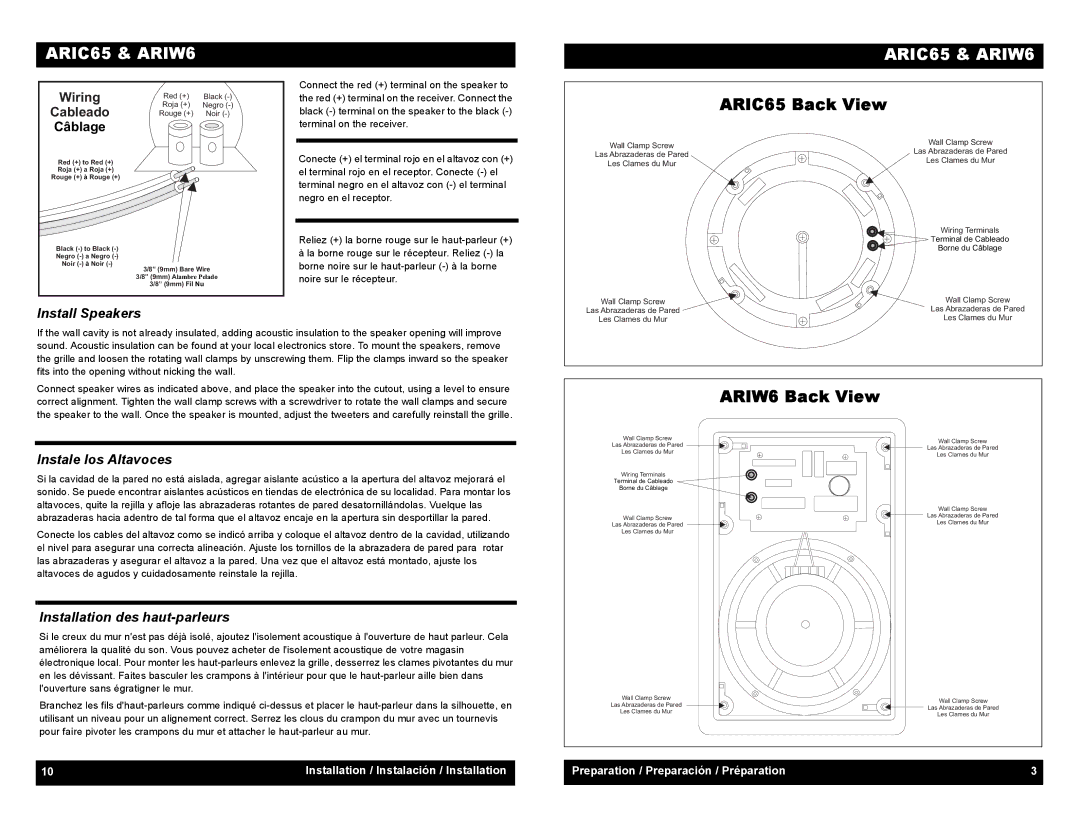
ARIC65 Back View
Wall Clamp Screw | Wall Clamp Screw | |
Las Abrazaderas de Pared | ||
Las Abrazaderas de Pared | ||
Les Clames du Mur | ||
Les Clames du Mur | ||
|
| Wiring Terminals |
| Terminal de Cableado |
| Borne du Câblage |
Wall Clamp Screw | Wall Clamp Screw |
|
Install Speakers
If the wall cavity is not already insulated, adding acoustic insulation to the speaker opening will improve sound. Acoustic insulation can be found at your local electronics store. To mount the speakers, remove the grille and loosen the rotating wall clamps by unscrewing them. Flip the clamps inward so the speaker fits into the opening without nicking the wall.
Connect speaker wires as indicated above, and place the speaker into the cutout, using a level to ensure correct alignment. Tighten the wall clamp screws with a screwdriver to rotate the wall clamps and secure the speaker to the wall. Once the speaker is mounted, adjust the tweeters and carefully reinstall the grille.
Instale los Altavoces
Si la cavidad de la pared no está aislada, agregar aislante acústico a la apertura del altavoz mejorará el sonido. Se puede encontrar aislantes acústicos en tiendas de electrónica de su localidad. Para montar los altavoces, quite la rejilla y afloje las abrazaderas rotantes de pared desatornillándolas. Vuelque las abrazaderas hacia adentro de tal forma que el altavoz encaje en la apertura sin desportillar la pared.
Conecte los cables del altavoz como se indicó arriba y coloque el altavoz dentro de la cavidad, utilizando el nivel para asegurar una correcta alineación. Ajuste los tornillos de la abrazadera de pared para rotar las abrazaderas y asegurar el altavoz a la pared. Una vez que el altavoz está montado, ajuste los altavoces de agudos y cuidadosamente reinstale la rejilla.
Installation des haut-parleurs
Si le creux du mur n'est pas déjà isolé, ajoutez l'isolement acoustique à l'ouverture de haut parleur. Cela améliorera la qualité du son. Vous pouvez acheter de l'isolement acoustique de votre magasin électronique local. Pour monter les
Branchez les fils
10 | Installation / Instalación / Installation |
|
|
Las Abrazaderas de Pared | Las Abrazaderas de Pared | |
Les Clames du Mur | ||
Les Clames du Mur | ||
|
ARIW6 Back View
Wall Clamp Screw | Wall Clamp Screw | |
Las Abrazaderas de Pared | ||
Las Abrazaderas de Pared | ||
Les Clames du Mur | ||
Les Clames du Mur | ||
| ||
Wiring Terminals |
| |
Terminal de Cableado |
| |
Borne du Câblage |
| |
| Wall Clamp Screw | |
Wall Clamp Screw | Las Abrazaderas de Pared | |
Les Clames du Mur | ||
Las Abrazaderas de Pared | ||
| ||
Les Clames du Mur |
|
Wall Clamp Screw | Wall Clamp Screw | |
Las Abrazaderas de Pared | ||
Las Abrazaderas de Pared | ||
Les Clames du Mur | ||
Les Clames du Mur | ||
|
Preparation / Preparación / Préparation | 3 |
|
|