INSTALACIÓN

CONSIDERACIONES PARA LA INSTALACIÓN

Lo siguiente es una lista de herramientas necesitadas para la instalación:

Destornillador Philips #2

Alicates para cortar y pelar cables

Llave para postes de batería

Alicates para crimpar cables

Taladradora portátil con brocas surtidas

Alicates para cortadores

Como algunos de estos altavoces de rango completo de Jensen son usados más frecuentemente como reemplazos directos de altavoces originales, algunas de estas instrucciones no aplicarán. Para una instalación a la medida comuníquese con su agente autorizado de Jensen.

MONTAJE

1. Determine el lugar en el cual va a instalar los altavoces. Asegure un área bastante grande para

montar el altavoz uniformemente. Asegúrese de que la ubicación del montaje sea bastante honda

para que quepa el altavoz; si lo va a montar en una puerta, opere todas las funciones (ventanas,

cerrajas etc.) por todo el rango de operación para asegurar de que no haya ninguna obstrucción.

Vea página 10 para profundidades de montar de orador.

2. Consulte la tabla de las especificaciones para determinar el diámetro correcto del agujero para

JPS369

JPS368

JPS365

JPS252

JPS240

Mounting the speakers

De montage haut-parleurs

De montaje altavoces

Installation / Mounting

Installation / Montage

Instalación / Montaje

Door Panel Installation Installation du panneau de porte Instalación en el panel de la puerta

Cut-Out

Coupure

Door PanelRecorte

Panneau de porte

Panel de la puerta


Speaker

Grille

Haut-parleur

Grille

Altavoz

Rejilla


Example of standard door installation.

L'exemple d'installation de porte standard.

El ejemplo de la instalación uniforme de puerta.

Rear Deck Installation Installation sur le panneau arrière Instalación en la cubierta trasera

Grille

Bottom Mount

Grille

Mont inférieur

Rejilla

Monte inferior

Rear Deck


Panneau arrière


Cubierta trasera


Cut-Out


Coupure


Recorte

Top Mount


Premier Mont

Speaker

Monte primero

Haut-parleur


Altavoz


Example of 6" x 9" rear-deck installation

L'exemple de 6" x 9" installation de postérieur-pont

El ejemplo de 6" X 9" instalación de trasero-plataforma

cortarlo a cuerdo del modelo de su altavoz.

3.Utilizar la plantilla suministrada de orador, marque las ubicaciones para los tornillos de montaje. Haga los agujeros con una broca de 1/8”.

4.Pase los cables del altavoz por la abertura cortada y conéctelos a las terminales del altavoz. Asegúrese de observar la polaridad correcta cuando conecte los cables. La terminal positiva del altavoz está indicada con “+”.

Speaker Wire Connection

Raccord des câbles pour haut-parleurs Conexión del cableado del altavoz

Speaker Wire Connection

Raccord des câbles pour haut-parleurs

Conexión del cableado del altavoz

+

+


Actual product may differ slightly from drawing

Le produit peut différer des illustrations.

El producto actual puede ser diferente del dibujo

_ +

8

9

Page 5
Image 5
Audiovox JPS368, JPS252, JPS369, JPS240, JPS365 owner manual Montaje, Consideraciones Para LA Instalación

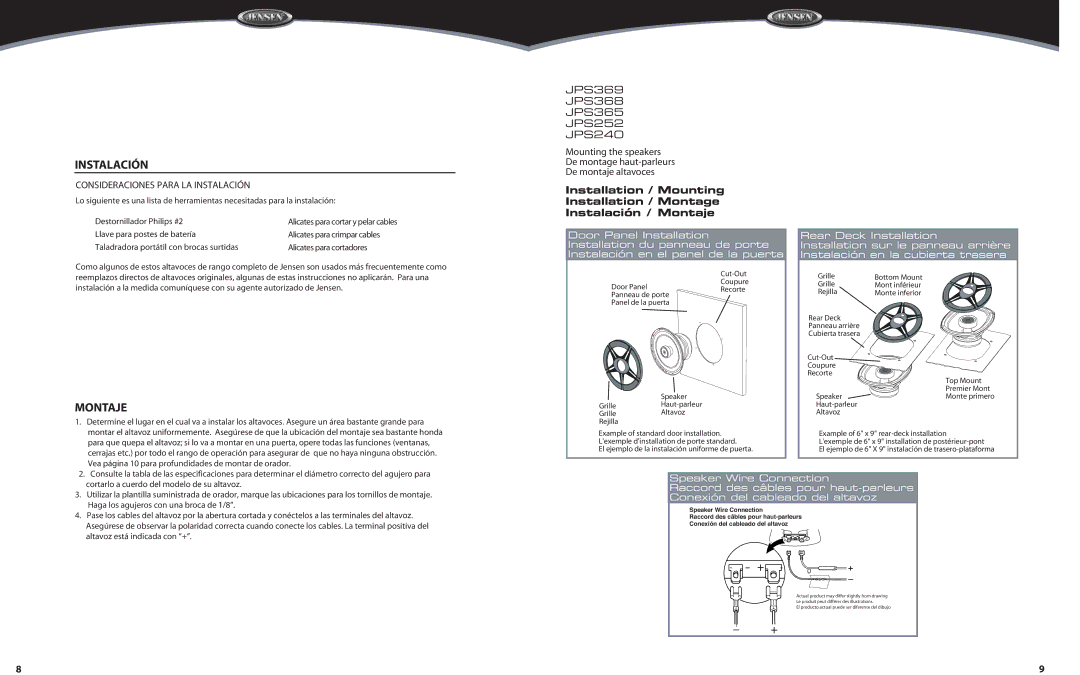
JPS240, JPS369, JPS365, JPS368, JPS252 specifications

Audiovox has long been a trusted name in the realm of audio and communication technologies, and their line of JPS products is no exception. The JPS368, JPS365, JPS252, JPS369, and JPS240 are significant models that offer a variety of features tailored to meet diverse user needs.

The Audiovox JPS368, known for its robust design, features advanced noise-cancellation technology that enhances sound clarity by reducing background noise significantly. It supports Bluetooth connectivity, providing seamless pairing with smartphones and other devices. With an integrated high-capacity battery, users can enjoy extended listening times without frequent recharges. The device boasts an impressive sound quality, with deep bass and crisp treble, making it ideal for music lovers and audiophiles alike.

The JPS365 follows closely, taking versatility a step further. This model incorporates a built-in FM tuner, allowing users to enjoy their favorite radio stations on the go. The JPS365 also offers a sleek, compact design, making it portable and easy to carry, which is perfect for outdoor activities. Enhanced voice recognition features make it easy to take calls hands-free, providing additional convenience for users who are always on the move.

Next in the lineup is the JPS252, specifically designed for those who prioritize budget without compromising quality. The JPS252 combines solid sound performance with a user-friendly interface. Its ergonomic controls and lightweight build make it an excellent choice for everyday use. Equipped with a long-lasting battery, it allows users to enjoy music, podcasts, or audiobooks for hours on end.

The JPS369 stands out with its innovative app compatibility. Users can customize their sound profiles and settings through a dedicated mobile application, providing a personalized audio experience. This model features high-definition audio technology, ensuring crystal-clear sound reproduction for all media types, from music to movies.

Finally, the JPS240 is remarkable for its durability and rugged design, making it suited for outdoor enthusiasts. It maintains a strong battery life even under heavy use in challenging environments. With water-resistant features, the JPS240 is perfect for users who want reliable sound quality in all conditions.

In summary, the Audiovox JPS product line, including the JPS368, JPS365, JPS252, JPS369, and JPS240, delivers an impressive range of features, portability, and sound quality, catering to both casual listeners and serious audiophiles. Whether it's the advanced noise cancellation of the JPS368 or the rugged reliability of the JPS240, these models embody Audiovox’s commitment to quality and innovation in audio technology.