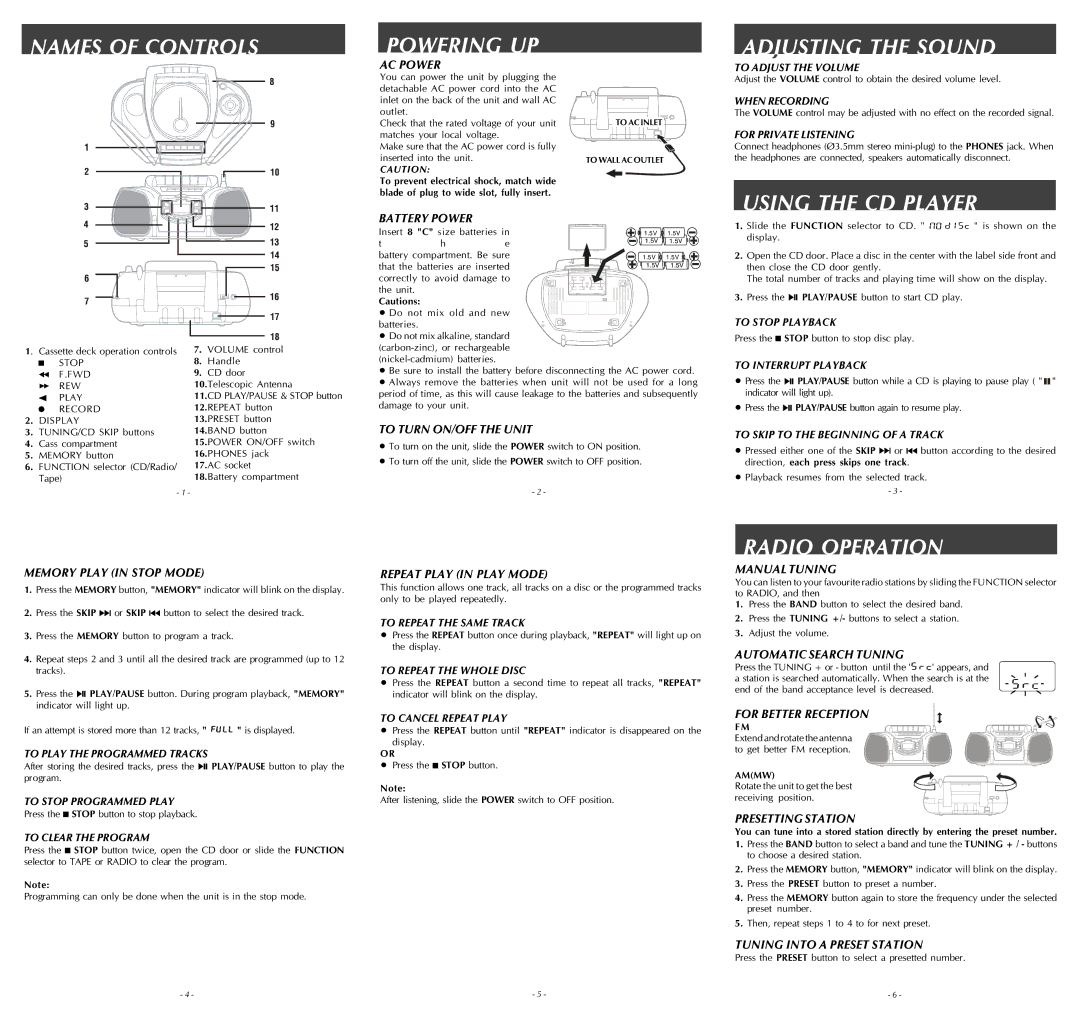
NAMES OF CONTROLS
POWERING UP
AC POWER
You can power the unit by plugging the detachable AC power cord into the AC inlet on the back of the unit and wall AC outlet.
Check that the rated voltage of your unit matches your local voltage.
Make sure that the AC power cord is fully inserted into the unit.
CAUTION:
To prevent electrical shock, match wide blade of plug to wide slot, fully insert.
TO AC INLET![]()
![]()
TO WALL AC OUTLET
ADIUSTINGJ THE SOUND
TO ADJUST THE VOLUME
Adjust the VOLUME control to obtain the desired volume level.
WHEN RECORDING
The VOLUME control may be adjusted with no effect on the recorded signal.
FOR PRIVATE LISTENING
Connect headphones (Ø3.5mm stereo
USING THE CD PLAYER
1. Cassette deck operation controls | 7. | VOLUME control | |||
|
|
| STOP | 8. | Handle |
|
|
| |||
|
|
| F.FWD | 9. | CD door |
|
|
| REW | 10.Telescopic Antenna | |
|
|
| PLAY | 11.CD PLAY/PAUSE & STOP button | |
|
|
| RECORD | 12.REPEAT button | |
2. | DISPLAY | 13.PRESET button | |||
3. | TUNING/CD SKIP buttons | 14.BAND button | |||
4. | Cass compartment | 15.POWER ON/OFF switch | |||
5. | MEMORY button | 16.PHONES jack | |||
6. | FUNCTION selector (CD/Radio/ | 17.AC socket | |||
| Tape) | 18.Battery compartment | |||
| - 1 - |
|
| ||
BATTERY POWER
Insert 8 "C" size batteries in | 1.5V | 1.5V | ||
t | h | e | 1.5V | 1.5V |
battery compartment. Be sure | 1.5V | 1.5V | ||
that the batteries are inserted | 1.5V | 1.5V | ||
correctly to avoid damage to |
|
| ||
the unit. |
|
|
|
|
Cautions:
• Do not mix old and new batteries.
• Do not mix alkaline, standard
•Be sure to install the battery before disconnecting the AC power cord.
•Always remove the batteries when unit will not be used for a long period of time, as this will cause leakage to the batteries and subsequently damage to your unit.
TO TURN ON/OFF THE UNIT
•To turn on the unit, slide the POWER switch to ON position.
•To turn off the unit, slide the POWER switch to OFF position.
-2 -
1.Slide the FUNCTION selector to CD. " ![]()
![]()
![]()
![]()
![]()
![]()
![]()
![]()
![]()
![]() " is shown on the display.
" is shown on the display.
2.Open the CD door. Place a disc in the center with the label side front and then close the CD door gently.
The total number of tracks and playing time will show on the display.
3.Press the ![]()
![]()
![]() PLAY/PAUSE button to start CD play.
PLAY/PAUSE button to start CD play.
TO STOP PLAYBACK
Press the ![]()
![]() STOP button to stop disc play.
STOP button to stop disc play.
TO INTERRUPT PLAYBACK
•Press the ![]()
![]() PLAY/PAUSE button while a CD is playing to pause play ( "
PLAY/PAUSE button while a CD is playing to pause play ( " ![]()
![]() " indicator will light up).
" indicator will light up).
•Press the ![]()
![]() PLAY/PAUSE button again to resume play.
PLAY/PAUSE button again to resume play.
TO SKIP TO THE BEGINNING OF A TRACK
•Pressed either one of the SKIP ![]()
![]() or
or ![]()
![]()
![]() button according to the desired direction, each press skips one track.
button according to the desired direction, each press skips one track.
•Playback resumes from the selected track.
-3 -
MEMORY PLAY (IN STOP MODE)
1.Press the MEMORY button, "MEMORY" indicator will blink on the display.
2.Press the SKIP ![]()
![]() or SKIP
or SKIP ![]()
![]()
![]() button to select the desired track.
button to select the desired track.
3.Press the MEMORY button to program a track.
4.Repeat steps 2 and 3 until all the desired track are programmed (up to 12 tracks).
5.Press the ![]()
![]()
![]() PLAY/PAUSE button. During program playback, "MEMORY" indicator will light up.
PLAY/PAUSE button. During program playback, "MEMORY" indicator will light up.
If an attempt is stored more than 12 tracks, " ![]()
![]()
![]()
![]()
![]() " is displayed.
" is displayed.
TO PLAY THE PROGRAMMED TRACKS
After storing the desired tracks, press the ![]()
![]()
![]() PLAY/PAUSE button to play the program.
PLAY/PAUSE button to play the program.
TO STOP PROGRAMMED PLAY
Press the ![]()
![]() STOP button to stop playback.
STOP button to stop playback.
TO CLEAR THE PROGRAM
Press the ![]() STOP button twice, open the CD door or slide the FUNCTION selector to TAPE or RADIO to clear the program.
STOP button twice, open the CD door or slide the FUNCTION selector to TAPE or RADIO to clear the program.
Note:
Programming can only be done when the unit is in the stop mode.
REPEAT PLAY (IN PLAY MODE)
This function allows one track, all tracks on a disc or the programmed tracks only to be played repeatedly.
TO REPEAT THE SAME TRACK
•Press the REPEAT button once during playback, "REPEAT" will light up on the display.
TO REPEAT THE WHOLE DISC
•Press the REPEAT button a second time to repeat all tracks, "REPEAT" indicator will blink on the display.
TO CANCEL REPEAT PLAY
•Press the REPEAT button until "REPEAT" indicator is disappeared on the display.
OR
• Press the ![]()
![]() STOP button.
STOP button.
Note:
After listening, slide the POWER switch to OFF position.
RADIO OPERATION
MANUAL TUNING
You can listen to your favourite radio stations by sliding the FUNCTION selector to RADIO, and then
1.Press the BAND button to select the desired band.
2.Press the TUNING +/- buttons to select a station.
3.Adjust the volume.
AUTOMATIC SEARCH TUNING
Press the TUNING + or - button until the '![]()
![]()
![]()
![]() ' appears, and a station is searched automatically. When the search is at the end of the band acceptance level is decreased.
' appears, and a station is searched automatically. When the search is at the end of the band acceptance level is decreased.
FOR BETTER RECEPTION
FM
Extend and rotate the antenna to get better FM reception.
AM(MW)
Rotate the unit to get the best
receiving position.
PRESETTING STATION
You can tune into a stored station directly by entering the preset number.
1.Press the BAND button to select a band and tune the TUNING + / - buttons to choose a desired station.
2.Press the MEMORY button, "MEMORY" indicator will blink on the display.
3.Press the PRESET button to preset a number.
4.Press the MEMORY button again to store the frequency under the selected preset number.
5.Then, repeat steps 1 to 4 to for next preset.
TUNING INTO A PRESET STATION
Press the PRESET button to select a presetted number.
- 4 - | - 5 - | - 6 - |