1720

Connection

Module

3mm

Screw

Power

Board

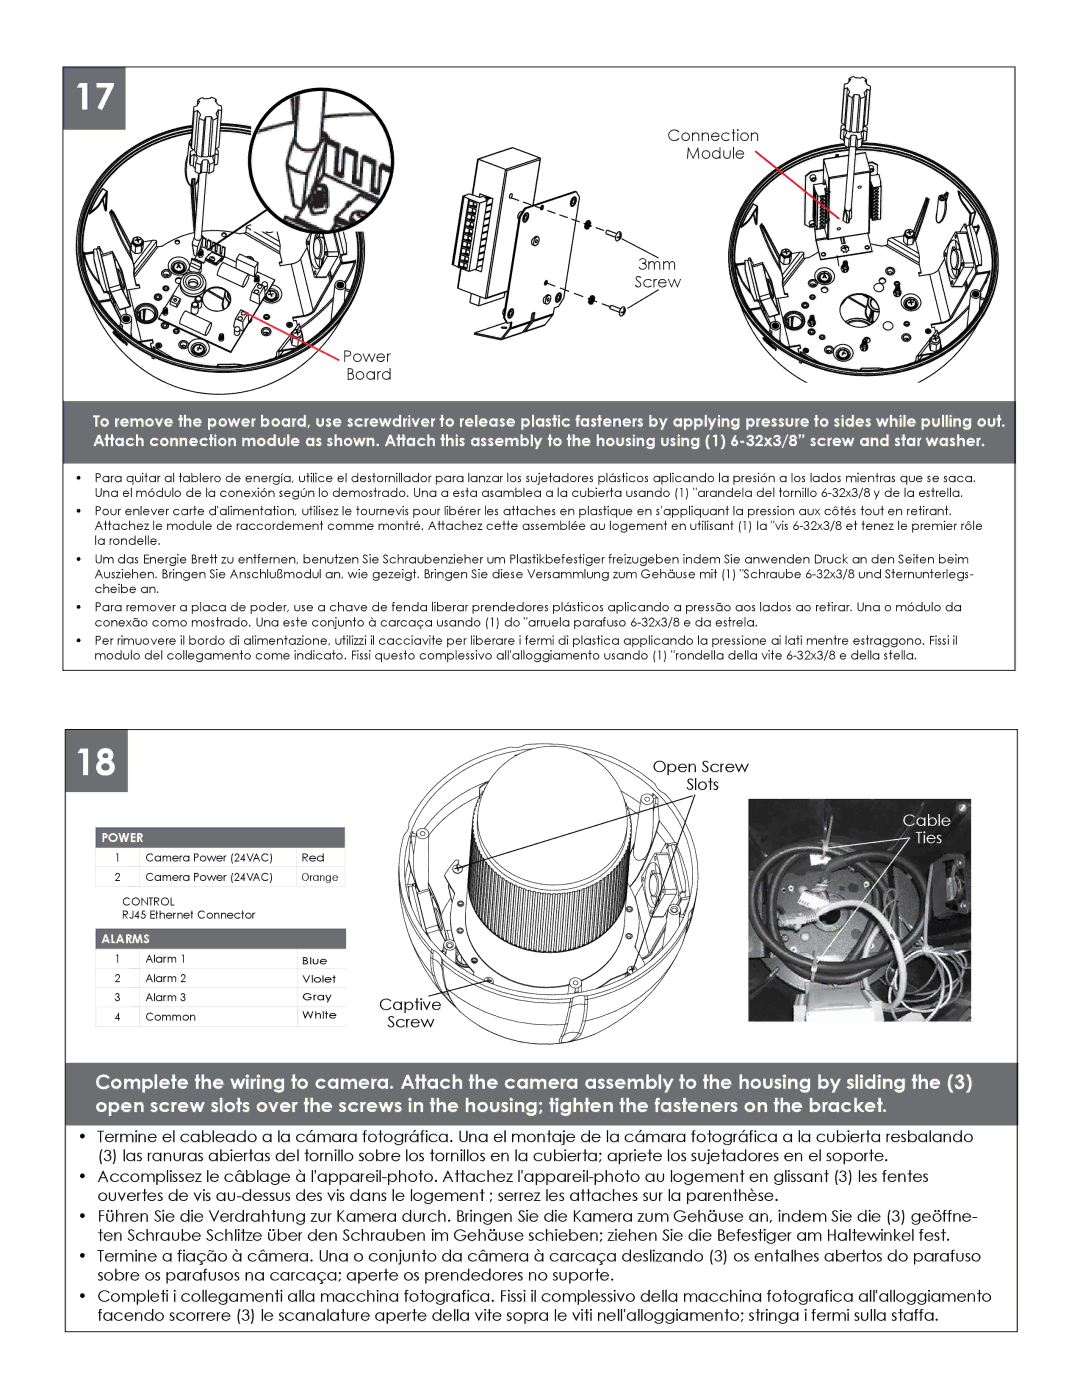
ToThisremoveis whatthethepowertypicalboard,pathuse screwdriverof illuminationto releasewillplasticlook likefastenerswithbytheapplyingsettingpressureat 30 degrto sideeswhile. pulling out. Attach connection module as shown. Attach this assembly to the housing using (1) 6-32x3/8” screw and star washer.

Para quitar al tablero de energía, utilice el destornillador para lanzar los sujetadores plásticos aplicando la presión a los lados mientras que se saca. Una el módulo de la conexión según lo demostrado. Una a esta asamblea a la cubierta usando (1) "arandela del tornillo 6-32x3/8 y de la estrella.

Pour enlever carte d'alimentation, utilisez le tournevis pour libérer les attaches en plastique en s'appliquant la pression aux côtés tout en retirant. Attachez le module de raccordement comme montré. Attachez cette assemblée au logement en utilisant (1) la "vis 6-32x3/8 et tenez le premier rôle la rondelle.

Um das Energie Brett zu entfernen, benutzen Sie Schraubenzieher um Plastikbefestiger freizugeben indem Sie anwenden Druck an den Seiten beim Ausziehen. Bringen Sie Anschlußmodul an, wie gezeigt. Bringen Sie diese Versammlung zum Gehäuse mit (1) "Schraube 6-32x3/8 und Sternunterlegs- cheibe an.

Para remover a placa de poder, use a chave de fenda liberar prendedores plásticos aplicando a pressão aos lados ao retirar. Una o módulo da conexão como mostrado. Una este conjunto à carcaça usando (1) do "arruela parafuso 6-32x3/8 e da estrela.

Per rimuovere il bordo di alimentazione, utilizzi il cacciavite per liberare i fermi di plastica applicando la pressione ai lati mentre estraggono. Fissi il modulo del collegamento come indicato. Fissi questo complessivo all'alloggiamento usando (1) "rondella della vite 6-32x3/8 e della stella.

18


Open Screw

21


Slots


Cable

POWER

Ties

1

Camera Power (24VAC)

Red

2

Camera Power (24VAC)

Orange


CONTROL


RJ45 Ethernet Connector


ALARMS

1

Alarm 1

Blue

2

Alarm 2

Violet

3

Alarm 3

Gray

4

Common

White

Captive Screw

Complete the wiring to camera. Attach the camera assembly to the housing by sliding the (3) open screw slots over the screws in the housing; tighten the fasteners on the bracket.

Termine el cableado a la cámara fotográfica. Una el montaje de la cámara fotográfica a la cubierta resbalando

(3) las ranuras abiertas del tornillo sobre los tornillos en la cubierta; apriete los sujetadores en el soporte.

Accomplissez le câblage à l'appareil-photo. Attachez l'appareil-photo au logement en glissant (3) les fentes ouvertes de vis au-dessus des vis dans le logement ; serrez les attaches sur la parenthèse.

Führen Sie die Verdrahtung zur Kamera durch. Bringen Sie die Kamera zum Gehäuse an, indem Sie die (3) geöffne- ten Schraube Schlitze über den Schrauben im Gehäuse schieben; ziehen Sie die Befestiger am Haltewinkel fest.

Termine a fiação à câmera. Una o conjunto da câmera à carcaça deslizando (3) os entalhes abertos do parafuso sobre os parafusos na carcaça; aperte os prendedores no suporte.

Completi i collegamenti alla macchina fotografica. Fissi il complessivo della macchina fotografica all'alloggiamento facendo scorrere (3) le scanalature aperte della vite sopra le viti nell'alloggiamento; stringa i fermi sulla staffa.

Page 9
Image 9
Axis Communications 25734 manual 1720

25734 specifications

Axis Communications is renowned for its innovative security solutions, and the Axis 25734 is a testament to this legacy in surveillance technology. This network camera prides itself on delivering high-quality video monitoring, perfect for various applications, from retail environments to large-scale public spaces.

A standout feature of the Axis 25734 is its exceptional resolution capabilities. It offers an impressive 12 MP resolution, providing crystal-clear imagery that captures minute details, essential for forensic analysis and security evaluations. The camera's ability to provide Wide Dynamic Range (WDR) allows it to perform optimally in complex lighting conditions, ensuring that all parts of a scene are visible, despite bright and dark areas coexisting.

Designed for versatility, the Axis 25734 includes a motorized zoom lens, enabling users to adjust the focal length effortlessly. This feature is particularly valuable in dynamic environments where surveillance needs may vary, allowing operators to quickly switch their focus from a wide view to a more detailed perspective without compromising image quality.

The camera is built with advanced analytics capabilities that can enhance security operations significantly. With built-in video analytics, users can set up motion detection alerts, helping to promptly identify suspicious activities. This technology contributes to proactive security measures, allowing for quick responses to potential threats.

In terms of connectivity, the Axis 25734 supports Power over Ethernet (PoE), simplifying installation by allowing the camera to receive power and network connectivity through a single cable. This feature not only reduces installation complexity but also enhances flexibility in camera placement.

Axis Communications has also focused on cybersecurity, integrating robust security features within the Axis 25734. The camera includes secure communication protocols and firmware updates designed to protect against unauthorized access, ensuring that sensitive surveillance data remains safe.

Additionally, the camera is designed for resilience, featuring an IP66-rated enclosure that offers protection against dust and water ingress. This durability allows for deployment in diverse environmental conditions, from humid outdoor settings to dust-laden industrial sites.

In summary, the Axis 25734 is a powerful tool in the landscape of network cameras, offering superior image quality, flexibility through zoom capabilities, intelligent analytics, and strong cybersecurity measures. Its durable design further extends its applicability across various environments, making it an ideal choice for comprehensive surveillance needs.