Indoor unit piping

Install indoor unit

127(

:KHQFRQQHFWLQJWKHHOHFWULFZLUHLIWKHZLUHOHQJWKLVQRWHQRXJKSOHDVHFRQWDFWZLWK

WKHDXWKRUL]HGVHUYLFHVKRSWREX\DH[FOXVLYHHOHFWULFZLUHWKDWLVORQJHQRXJKDQGWKH

MRLQWRQWKHZLUHDUHQRWDOORZHG

7KHHOHFWULFZLULQJPXVWEHFRUUHFWO\FRQQHFWHGZURQJFRQQHFWLRQPD\FDXVHVSDUHSDUWV

PDOIXQFWLRQ

7LJKWHQWKHWHUPLQDOVFUHZLQRUGHUWRSUHYHQWORRVH $IWHUWLJKWHQWKHVFUHZVOLJKWSXOOWKHZLUHDQGFRQILUPZKHWKHULVLWILUPRUQRW

,IWKHHDUWKZLUHLVZURQJFRQQHFWLRQWKDWPD\FDXVHHOHFWULFVKRFN

7KHFRYHUSODWHPXVWEHIL[HGDQGWLJKWHQWKHFRQQHFWLRQZLUHLILWLVSRRULQVWDOOHGWKDW WKHGXVWPRLVWXUHPD\HQWHULQRUWKHFRQQHFWLRQWHUPLQDOZLOOEHDIIHFWHGE\RXWVLGHIRUFH

DQGZLOOFDXVHILUHRUHOHFWULFVKRFN

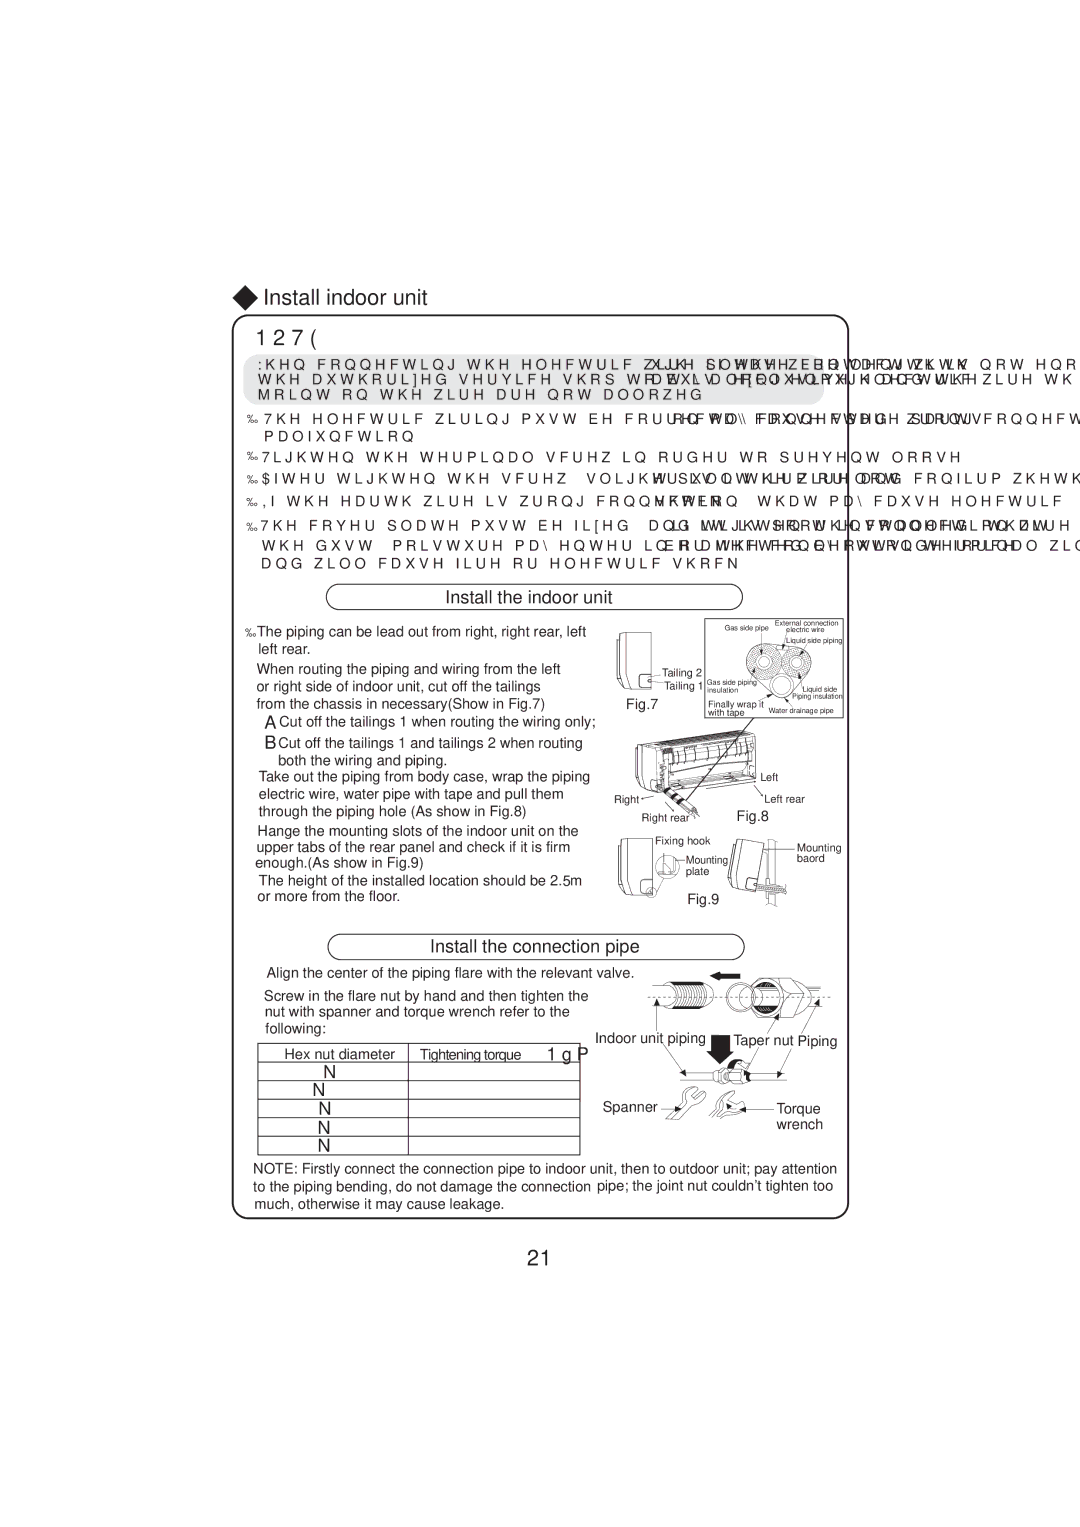
Install the indoor unit

The piping can be lead out from right, right rear, left left rear.

When routing the piping and wiring from the left or right side of indoor unit, cut off the tailings from the chassis in necessary(Show in Fig.7)

Cut off the tailings 1 when routing the wiring only;

Cut off the tailings 1 and tailings 2 when routing both the wiring and piping.

Take out the piping from body case, wrap the piping electric wire, water pipe with tape and pull them through the piping hole (As show in Fig.8)

Hange the mounting slots of the indoor unit on the upper tabs of the rear panel and check if it is firm enough.(As show in Fig.9)

The height of the installed location should be 2.5m or more from the floor.


Gas side pipe

External connection


electric wire


Liquid side piping

Tailing 2

Gas side piping


Tailing 1

Liquid side

insulation

Fig.7


Piping insulation

Finally wrap it Water drainage pipe


with tape


Left

Right

Left rear

Right rear

Fig.8


Fixing hook

Mounting

Mountingbaord plate

Fig.9

Install the connection pipe

Align the center of the piping flare with the relevant valve. Screw in the flare nut by hand and then tighten the

nut with spanner and torque wrench refer to the following:

Hex nut diameter

Tightening 1torque

P

Ɏ


Ɏ 


Ɏ 


Spanner

Ɏ 


Ɏ 


Taper nut Piping

Torque wrench

NOTE: Firstly connect the connection pipe to indoor unit, then to outdoor unit; pay attention to the piping bending, do not damage the connection pipe; the joint nut couldn't tighten too much, otherwise it may cause leakage.

21

Page 24
Image 24
Beko BK 2600 and BK 3500 Install the indoor unit, Install the connection pipe, MrlqwRqWkhZluhDuhQrwDoorzhg

BK 2600 and BK 3500 specifications

Beko has established itself as a prominent player in the home appliance market, offering devices designed for both efficiency and practicality. Two of its standout products, the Beko BK 2600 and the Beko BK 3500, showcase the brand’s dedication to innovation and user-friendly features.

The Beko BK 2600 is a compact and efficient appliance that caters to users looking for essential features without sacrificing quality. This model is characterized by its energy-efficient performance, designed to minimize electricity consumption while maximizing output. One notable feature is its advanced thermal insulation, which helps in maintaining the desired temperature while reducing the energy required for operation. The BK 2600 also boasts a user-friendly control panel, making it easy for anyone to operate, regardless of technical expertise. This model is ideal for small families or individuals, offering a balanced blend of capacity and functionality.

On the other hand, the Beko BK 3500 takes it up a notch, aimed at larger households that require more robust features and enhanced capacities. This model not only has a greater storage capacity but also incorporates smart technology that enables users to monitor and control the appliance remotely. The BK 3500 features advanced cooling systems that ensure even temperature distribution, preserving the freshness of stored items for longer durations. Additionally, it comes with a quick-freeze option, which is perfect for individuals seeking efficiency when preparing meals or storing seasonal produce.

Both models share several technologies, such as the no-frost functionality, which prevents ice build-up and reduces the need for manual defrosting. They also include adjustable shelving options that cater to diverse storage needs, allowing users to optimize space based on the type of food items being stored.

In terms of design, the Beko BK 2600 and BK 3500 sport a sleek and modern look, complementing contemporary kitchen aesthetics. They are built with durable materials, designed to withstand the rigors of daily use while maintaining their visual appeal.

Beko’s commitment to user satisfaction is evident in these models, as they deliver a combination of efficiency, innovation, and style. Whether opting for the compact BK 2600 or the spacious BK 3500, users can expect reliable performance and features that simplify their culinary lifestyle.