Setup Instructions
1.Power on the iPod.
2.Connect the Digital Camera Link (the Unit) to the iPod. The Unit will turn on automatically. After a few seconds, the LED will turn green to indicate proper connection. See below LED chart for further LED interpretation.
3.Connect your digital camera to the Unit.
4.Press the button once on the Unit to initiate file archive.
5.After transfer is complete* (see LED chart below), the user has three options:
a)Press the button again to begin the data verification process; or
b)Disconnect the Unit from the iPod; or
c)Manually check the iPod for complete file transfer. Once the “OK to disconnect” or the “Main Menu” screen appears after transfer is complete, select “Extras > Photo Import” and select the roll number for verification. Photos are listed on the iPod by roll number in the “Photo Import” folder.
6.The Unit will power off immediately after disconnecting the Unit from the iPod.
*You CANNOT view the photos on the iPod.
NOTE: Disconnect the Unit when not in use to preserve battery life. Belkin recommends use of high-quality alkaline batteries. Battery life depends greatly on the type of media being used and the type of battery being used; however, a single set of high-quality alkaline batteries should allow transfer of 24 or more typical 128MB CompactFlash® cards (3GB or more of data). NOTE: Do not disconnect the Unit from the iPod while files are being transferred. The message “Do Not Disconnect” will appear on your iPod during the archive and data verification process. It is safe to disconnect your Unit from the iPod when the message “OK to Disconnect” or “Main Menu” is displayed on your iPod or after the media transfer is complete.
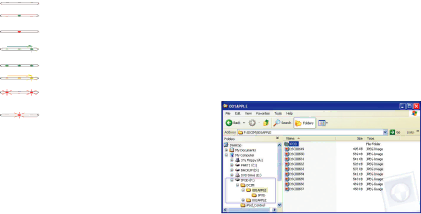
User Interface and General Operation:
LED chart
Dark - Power is off (not connected to iPod)
Solid Green (center LED) - Connected to the iPod (2–3 second recognition period)
Solid Red (center LED) - Power is on but battery power is low
Running Green - Transfer button has been pressed and stays on throughout transfer process
Solid Green (all 3 LEDs) - Transfer or verification complete
Running Amber – Verification process
Flashing Red (outside LEDs) - Incompatible source device, unable to transfer from camera (5–10 second recognition period)
Flashing Red (center LED) - Cannot write to iPod (e.g. disk full)
NOTE: After a file transfer is complete, disconnect the Unit from both the camera and the iPod. Reconnect the iPod to the Unit to reestablish the “ready” state. The Unit is now ready to connect to a camera for another file transfer.
NOTE: The Unit will perform transfers when battery status is low, however, we strongly suggest that you verify file transfers performed in this condition. Should the transfer fail, insert new batteries and repeat the transfer procedure.
Transferring photos using iPhoto™:
Connect the iPod to your computer. If you are using a Macintosh® computer, iPhoto will automatically detect photos on the iPod and iPhoto will open.
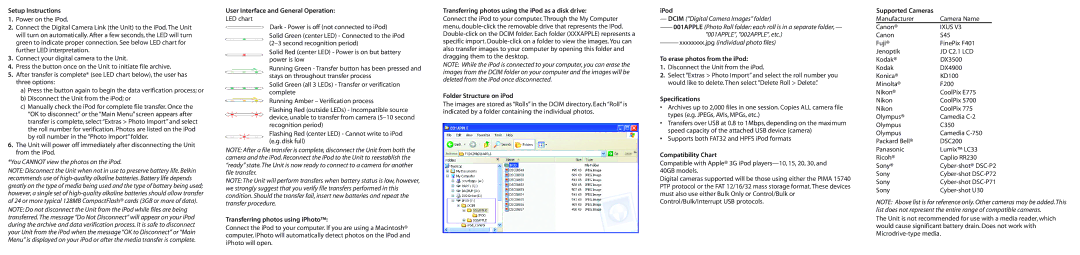
Transferring photos using the iPod as a disk drive:
Connect the iPod to your computer. Through the My Computer menu, double-click the removable drive that represents the iPod. Double-click on the DCIM folder. Each folder (XXXAPPLE) represents a specific import. Double-click on a folder to view the images. You can also transfer images to your computer by opening this folder and dragging them to the desktop.
NOTE: While the iPod is connected to your computer, you can erase the images from the DCIM folder on your computer and the images will be deleted from the iPod once disconnected.
Folder Structure on iPod
The images are stored as “Rolls” in the DCIM directory. Each “Roll” is indicated by a folder containing the individual photos.
iPod
—DCIM (“Digital Camera Images” folder)
——001APPLE (Photo Roll folder: each roll is in a separate folder, ——
——001APPLE "001APPLE", "002APPLE", etc.)
———xxxxxxxx.jpg (individual photo files)
To erase photos from the iPod:
1.Disconnect the Unit from the iPod.
2.Select “Extras > Photo Import” and select the roll number you would like to delete. Then select “Delete Roll > Delete”.
Specifications
•Archives up to 2,000 files in one session. Copies ALL camera file types (e.g. JPEGs, AVIs, MPGs, etc.)
•Transfers over USB at 0.8 to 1Mbps, depending on the maximum speed capacity of the attached USB device (camera)
•Supports both FAT32 and HPFS iPod formats
Compatibility Chart
Compatible with Apple® 3G iPod players—10, 15, 20, 30, and 40GB models.
Digital cameras supported will be those using either the PIMA 15740 PTP protocol or the FAT 12/16/32 mass storage format. These devices must also use either Bulk Only or Control/Bulk or Control/Bulk/Interrupt USB protocols.
Supported Cameras | | |
Manufacturer | Camera Name | |
Canon® | IXUS V3 |
Canon | S45 |
Fuji® | FinePix F401 |
Jenoptik | JD C2.1 LCD |
Kodak® | DX3500 |
Kodak | DX4900 |
Konica® | KD100 |
Minolta® | F200 |
Nikon® | CoolPix E775 |
Nikon | CoolPix 5700 |
Nikon | CoolPix 775 |
Olympus® | Camedia C-2 |
Olympus | C350 |
Olympus | Camedia C-750 |
Packard Bell® | DSC200 |
Panasonic | Lumix™ LC33 |
Ricoh® | Caplio RR230 |
Sony® | Cyber-shot® DSC-P2 |
Sony | Cyber-shot DSC-P72 |
Sony | Cyber-shot DSC-P71 |
Sony | Cyber-shot U30 |
NOTE: Above list is for reference only. Other cameras may be added. This list does not represent the entire range of compatible cameras.
The Unit is not recommended for use with a media reader, which would cause significant battery drain. Does not work with Microdrive-type media.