cool moisture TOWER humidifier
MODEL BCM630
Read instructions before operating.
Retain for future reference.
Instruction Leaflet
☎ INFO-LINE
If after having read this leaflet, you have any questions or comments on your humidifier, call
9100020005059
 HUMIDIFIER SAFETY
PLEASE READ AND SAVE
THESE IMPORTANT
SAFETY INSTRUCTIONS.
IMPORTANT SAFEGUARDS
When using electrical appliances, basic safety precautions should always be followed to reduce the risk of fire, electric shock, and injury to persons, including the following:
1.Read all instructions before using the appliance.
2.To avoid fire or shock hazard, plug the appliance directly into a 120V AC electrical outlet.
3.Keep the cord out of heavy traffic areas. To avoid fire hazard, NEVER put the cord under rugs or near heat registers.
4.DO NOT place humidifier near heat sources such as stoves, radiators, and heaters. Locate your humidifier on an inside wall near an electrical outlet. The humidifier should be at least 4” away from the wall for best results.
5.NEVER place humidifier in an area where it is accessible to children. NEVER use humidifier in a closed room, particularly where a child may be sleeping, resting, or playing (a closed room may result in excessive humidity).
6.WARNING: Do not attempt to refill humidifier without first unplugging the unit from its electrical outlet. Failure to heed this warning may cause personal injury. Be sure to unplug the unit by pulling on the plug and not the cord.
7.Never place anything over moisture outlet when the unit is running.
8.NEVER drop or insert any object into any openings unless instructed in this manual.
9.DO NOT operate any appliance with a damaged cord or plug, after the appliance malfunctions, or if it has been dropped or damaged in any manner. Return appliance to manufacturer for examination, electrical or mechanical adjustment, or repair.
10.Use appliance only for intended household use as described in this manual. Any other use not recommended by the manufacturer may cause fire, electric shock, or injury to persons. The use of attachments not recommended or sold by the manufacturer may cause hazards.
11.DO NOT use outdoors.
12.Always place humidifier on a firm, flat, level surface. A waterproof mat or pad is recommended for use under the humidifier. NEVER place it on a rug or carpet, or on a finished floor that may be damaged by exposure to water or moisture.
13.DO NOT allow the Moisture Outlet to directly face the wall. Moisture could cause damage, particularly to wall paper.
14.Humidifier should be unplugged when not in use.
15.NEVER tilt, move, or attempt to empty unit while it is operating. Shut off and unplug before removing the water tank and moving the unit.
16.This humidifier requires daily and weekly maintenance
to operate appropriately. Refer to daily and weekly cleaning procedures. Use only cleaners and additives recommended by the manufacturer.
17.NEVER use detergents, gasoline, glass cleaner, furniture polish, paint thinner, or other household solvents to clean any part of the humidifier.
18.Excessive humidity in a room can cause water condensation on windows and some furniture. If this happens, turn the humidifier OFF.
19.Do not use humidifier in an area where humidity level is in excess of 50%. Use a hygrometer, available at your local retailer or through the manufacturer, to measure the humidity.
20.DO NOT attempt to repair or adjust any electrical or mechanical functions on this unit. Doing so will void your warranty. The inside of the unit contains no user serviceable parts. All servicing should be performed by qualified personnel only.
21.Never place housing under water flow or immerse in liquids.
22.Do not plug in the cord with wet hands: electric shock could result.
23.Do not pour water in any openings other than the water tank.
24.To prevent damage to surfaces, do not place humidifier under overhanging surfaces.
25.NEVER operate unit without water in the tank. 26.Use both hands when carrying full tank of water.
27.Never unplug unit while it is running as arcing may occur and cause injury. Use power switch to turn off unit before unplugging.
PLEASE READ AND SAVE
THESE IMPORTANT
SAFETY INSTRUCTIONS
CONSUMER SAFETY INFORMATION
THIS PRODUCT IS EQUIPPED WITH A POLARIZED PLUG (a plug having one blade wider than the other). This plug will fit into the power outlet only one way. If the plug does not fit fully
into the outlet, reverse the plug. If it still does not fit, contact qualified personnel to install the proper outlet.
DO NOT DEFEAT THE SAFETY PURPOSE OF THIS POLARIZED PLUG IN ANY WAY
The length of cord used on this appliance was selected to reduce the hazards of becoming tangled in, or tripping over a longer cord. If a longer cord is necessary an approved extension cord may be used. The electrical rating of the extension cord must be equal to or greater than the rating of the humidifier. Care must be taken to arrange the extension cord so that it will not drape over the countertop or tabletop where it can be pulled on by children or accidentally tripped over.
This device complies with Part15 of the FCC Rules. Operation is subjected to the following two conditions: (1) this device may not cause harmful interference, and (2) this device must accept any interference received, including interference that may cause undesired operation.
HOW COOL MIST WORKS
Your Bionaire® Cool Mist humidifier draws dry air through the rear air intake grill area. This air is then passed through a
NOTE: This humidification system provides a cool, invisible moisture output. It is normal not to see the mist.
NOTE: A humidity level below 20% can be unhealthy and uncomfortable. The recommended humidity level is between
PRE-OPERATING INSTRUCTIONS
1.Be sure the humidifier is switched to OFF and the unit is disconnected from the electrical outlet.
2.Select a location for your humidifier, on a flat surface, about 4” away from the wall. DO NOT place the humidifier on a finished floor or near furniture, which can be damaged by moisture or water. Place on a
FILLING THE WATER TANK
1.Remove the tank from the housing of the humidifier by grabbing the handle of the tank and pulling forward. Lift the tank out of the housing and bring to the faucet. Turn the tank upside down and twist off the tank cap by turning counter clockwise. Fill tank with cool, fresh tap water. DO NOT fill with warm water as this may cause leaking. Replace the cap on tank FIRMLY.
2.When full, carry the tank to the humidifier and place it into the housing. There is a tab located on the tank base for easy guidance. The tank holds 1.3 gallons of water. The tank will immediately begin to empty into the base.
3.Plug the power cord into a 120V AC electrical outlet.
OPERATING INSTRUCTIONS
Your humidifier is equipped with a technologically advanced Digital Humidistat. You can set the humidifier to run continuously in manual mode or set the Digital Humidistat to your desired humidity setting. The Digital Humidistat will automatically turn the humidifier ON or OFF, depending on the preset comfort level. The comfort level ranges between 35% and 65% relative humidity.
MANUAL MODE INSTRUCTIONS
1.Plug the humidifier into a 120V AC electrical outlet.
2.The display will show the current room humidity.
3.To start the unit, push the MODE/OFF button once for the HIGH (3) manual setting.
4.Press the button again for the MEDIUM (2) manual setting and again for LOW (1). After the selection is made, the display will return to show the current room humidity.
5.To stop the unit, press and hold the button for two seconds, or keep pressing the button until the display reads OFF (OF).
DIGITAL HUMIDISTAT INSTRUCTIONS
To take advantage of the Digital Humidistat, press the MODE/OFF button until the speed is set in either the auto HIGH (A3), auto MEDIUM (A2) or auto LOW (A1) setting. Then adjust the set humidity by using the up and down buttons. Humidity will increase or decrease in increments of 5%. When the humidity level is set, the display will return to show the current room humidity. When the room humidity level rises above the set humidity, the humidifier will stop. When the humidity level drops below the set humidity, the humidifier will turn on automatically.
NOTE: Allow up to 30 minutes for the filter to fully absorb water and for the unit to produce moisture.
NOTE: The Digital Humidistat Humidifier has memory. This means that when you turn the unit back on, it will be at the last setting the humidifier was set at.
If you do not plan to use the humidifier for two or more days, make sure any residual water is drained from the water tank, base and wick filter to prevent algae or bacteria growth.
EXTENDED RUN TIME SETTING
By setting you humidifier to a specific humidity level, you are actually also extending the run time. Since the unit will turn on and off to maintain the set humidity level, less water will be used, so you will need to fill the unit less than you would on manual setting.
USING THE PROGRAMMABLE TIMER
Digital Humidistat allows the user to program the humidifier to come on at a preset time, or turn off after a set amount of time.
SETTING THE OFF TIMER
1.Set the mode and/or humidity you wish the humidifier to run in.
2.While the humidifier is running, press and hold the up and down buttons simultaneously for 2 seconds. The display will flash “00”.
3.By pressing the up and down buttons, program the humidifier to turn off up to 16 hours later in increments of 1 hour.
4.After setting the timer, the display will return to show the current room humidity. The timer light will illuminate to show that the timer is activated.
5.After the predetermined length of time has passed, the humidifier will automatically shut off.
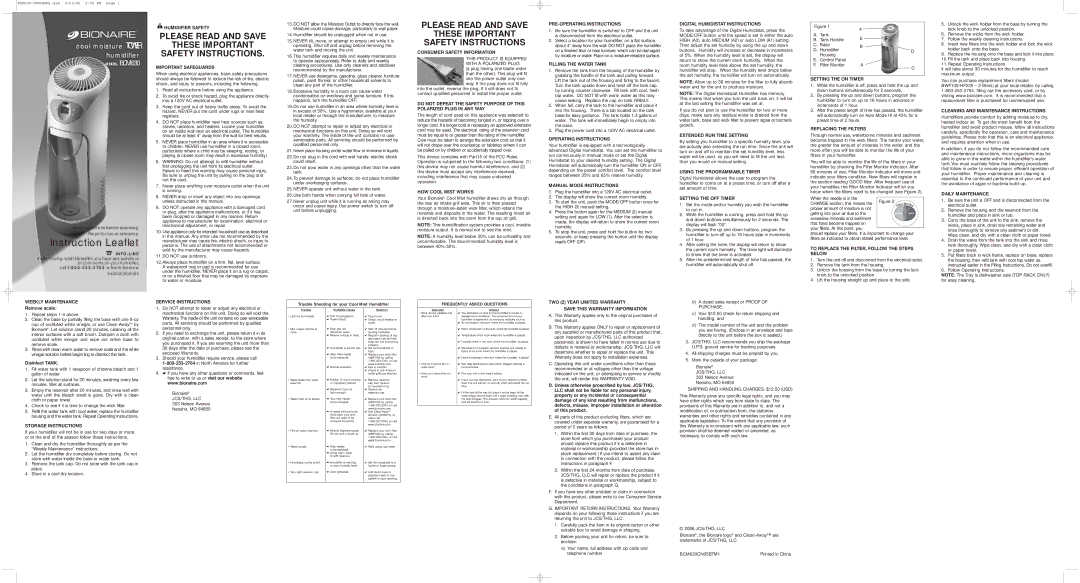
Figure 1
| F |
| |
A. Tank | E |
| |
B. Tank Handle |
| ||
C. Base | B |
| |
D. Humidifier | D | ||
| |||
Housing |
| ||
|
| ||
E. Control Panel |
|
| |
F. Filter Monitor | A | C | |
|
| ||
|
|
|
SETTING THE ON TIMER
1.While the humidifier is off, press and hold the up and down buttons simultaneously for 2 seconds.
2.By pressing the up and down buttons, program the humidifier to turn on up to 16 hours in advance in increments of 1 hour.
3.After the preset length of time has passed, the humidifier will automatically turn on Auto Mode HI at 45% for a preset time of 2 hours.
REPLACING THE FILTERS
Through normal use, waterborne minerals and sediment become trapped in the wick filters. The harder your water, the greater the amount of minerals in the water, and the more often you will be able to monitor the life of your filters in your humidifier.
You will be able to monitor the life of the filters in your humidifier by checking the Filter Monitor Indicator. After 60 minutes of use, Filter Monitor Indicator will move and indicate your filters condition. New filters will register in the section reading GOOD filter. After frequent use of your humidifier, the Filter Monitor Indicator will let you know when the filters need to be changed (see Figure 2).
When the needle is in the
CHANGE section, this means the proper amount of moisture is not
getting into your air due to the excessive minerals and sediment
that have become trapped on your filters. At this point, you
should replace your filters. It is important to change your filters as indicated to obtain stated performance level.
TO REPLACE THE FILTER, FOLLOW THE STEPS BELOW
1.Turn the unit off and disconnect from the electrical outlet.
2.Remove the tank from the housing.
3.Unlock the housing from the base by turning the lock knob to the unlocked position
4.Lift the housing straight up and place to the side
5.Unlock the wick holder from the base by turning the lock knob to the unlocked position.
6.Remove the wicks from the wick holder.
7.Follow the weekly cleaning instructions.
8.Insert new filters into the wick holder and lock the wick holder back onto the base.
9.Replace the housing onto the base and lock it into place. 10.Fill the tank and place back into housing.
11.Repeat Operating Instructions
It will take about 30 minutes for the humidifier to reach maximum output.
You can purchase replacement filters (model BWF100/HF235 – 2 filters) at your local retailer, by calling
CLEANING AND MAINTENANCE INSTRUCTIONS
Humidifiers provide comfort by adding moisture to dry, heated indoor air. To get the most benefit from the humidifier and avoid product misuse, follow all instructions carefully, specifically the operation, care and maintenance guidelines. Please note that this is an electrical appliance, and requires attention when in use.
In addition, if you do not follow the recommended care and maintenance instructions,
DAILY MAINTENANCE
1.Be sure the unit is OFF and is disconnected from the electrical outlet.
2.Remove the housing and the reservoir from the humidifier and place in sink or tub.
3.Carry the base of the unit to the sink, remove the wicks, place in sink, drain any remaining water and rinse thoroughly to remove any sediment or dirt. Wipe clean, and dry with a clean cloth or paper towel.
4.Drain the water from the tank into the sink and rinse tank thoroughly. Wipe clean, and dry with a clean cloth or paper towel.
5.Put filters back in wick frame, replace on base, replace the housing, then refill tank with cool tap water as instructed earlier in the Filling Instructions. Do not overfill.
6.Follow Operating Instructions.
NOTE: The Tray is dishwasher safe (TOP RACK ONLY) for easy cleaning.
WEEKLY MAINTENANCE
SERVICE INSTRUCTIONS
Trouble Shooting for your Cool Mist Humidifier
FREQUENTLY ASKED QUESTIONS
TWO (2) YEAR LIMITED WARRANTY
b) A dated sales receipt or PROOF OF |
PURCHASE, |
Remove scale:
1.Repeat steps
2.Clean the base by partially filling the base with one
3.Rinse with clean warm water to remove scale and the white vinegar solution before beginning to disinfect the tank.
Disinfect TANK:
1.Fill water tank with 1 teaspoon of chlorine bleach and 1 gallon of water.
2.Let the solution stand for 20 minutes, swishing every few minutes. Wet all surfaces.
3.Empty the reservoir after 20 minutes, and rinse well with water until the bleach smell is gone. Dry with a clean cloth or paper towel.
4.Check to see if it is time to change the wick filter.
5.Refill the water tank with cool water, replace the humidifier housing and the water tank. Repeat Operating Instructions.
STORAGE INSTRUCTIONS
If your humidifier will not be in use for two days or more, or at the end of the season follow these instructions.
1.Clean and dry the humidifier thoroughly as per the “Weekly Maintenance” instructions.
2.Let the humidifier dry completely before storing. Do not store with water inside the base or water tank.
3.Remove the tank cap. Do not store with the tank cap in place.
4.Store in a cool dry location.
1. | Do NOT attempt to repair or adjust any electrical or |
| mechanical functions on this unit. Doing so will void the |
| Warranty. The inside of the unit contains no user serviceable |
| parts. All servicing should be performed by qualified |
| personnel only. |
2. | If you need to exchange the unit, please return it in its |
| original carton, with a sales receipt, to the store where |
| you purchased it. If you are returning the unit more than |
| 30 days after the date of purchase, please see the |
| enclosed Warranty. |
3. | Should your humidifier require service, please call |
|
assistance.
4. ☛ If you have any other questions or comments, feel free to write to us or visit our website
www.bionaire.com
Bionaire®
JCS/THG, LLC
303 Nelson Avenue
Neosho, MO 64850
Trouble
•LED not illuminated.
•Mist output minimal to none.
•Water leaks from water reservoir.
•Water Filter turns brown.
•Film on water reservoir.
•Water cloudy.
•Humidistat cycles on/off.
•Very tight reservoir cap.
Probable Cause
☛Unit not plugged in.
☛Power failure.
☛Filter has not absorbed water.
☛Mineral buildup in base.
☛Humidistat is set too low.
☛Wick Filter needs to be replaced.
☛Normal operation.
☛Rubber
☛Reservoir Cap not tight enough.
☛Your filter needs to be changed.
☛In areas with particular hard water your wick filter will need to be changed frequently.
☛Mineral deposits cause film on tank to build up.
☛Filter needs
to be replaced.
☛Using warm water to refill reservoir.
☛Humidifier is reacting to room humidity level.
☛Over tightened.
Solution
✔Plug in unit.
✔Check circuit breaker or outlet.
✔Wait 15 minutes before starting humidifier.
✔Regular cleaning of tray after each use will help keep the unit functioning properly.
✔Set the humidistat to high.
✔Replace your wick filter (BWF100) by calling
✔Mist is invisible.
✔Check to see if inlet or outlet grills are blocked
✔Remove reservoir cap then replace or reposition ring.
✔Tighten the reservoir cap.
✔Replace your wick filter (BWF100) by calling
✔Use
✔Replace your wick filter (BWF100) by calling
✔Refill using cool water.
✔Set the humidistat to a higher or lower setting.
✔Add liquid soap or petroleum jelly to cap gasket to ease opening.
Question
•What are the variables that affect run time?
•How do I remove film on water tank?
•How can I extend the run time?
Answer
✔The estimated run time for this humidifier is based on average room conditions. The actual run time of your humidifier is dependent on numerous variables such as:
✔Air exchange in the room where the humidifier is placed.
✔Room construction of the room where the humidifier is placed.
✔Temperature of the room where the humidifier is placed.
✔Humidity levels in the room where the humidifier is placed.
✔Movement of occupants and the opening and closing of doors in the room where the humidifier is placed.
✔Home furnishings in the room where the humidifier is placed.
✔See Daily Maintenance instructions. Regular cleaning is recommended.
✔Run your unit on the lowest setting.
✔If your unit has electronics, set it to your desired humidity level. The unit will turn on and off, which will extend the run time.
✔Fill the tank all the way full, place it on the base, let the water empty into the base until it stops bubbling, then refill the tank full again. This ensures maximum water capacity and will extend run time.
SAVE THIS WARRANTY INFORMATION
A.This Warranty applies only to the original purchaser of this product.
B.This Warranty applies ONLY to repair or replacement of any supplied or manufactured parts of this product that, upon inspection by JCS/THG, LLC authorized personnel, is shown to have failed in normal use due to defects in material or workmanship. JCS/THG, LLC will determine whether to repair or replace the unit. This Warranty does not apply to installation expenses.
C.Operating this unit under conditions other than those recommended or at voltages other than the voltage indicated on the unit, or attempting to service or modify the unit, will render this WARRANTY VOID.
D.Unless otherwise proscribed by law, JCS/THG, LLC shall not be liable for any personal injury, property or any incidental or consequential damage of any kind resulting from malfunctions, defects, misuse, improper installation or alteration of this product.
E.All parts of this product excluding filters, which are covered under separate warranty, are guaranteed for a period of 2 years as follows:
1.Within the first 30 days from date of purchase, the store from which you purchased your product should replace this product if it is defective in material or workmanship (provided the store has in- stock replacement.) If you intend to assert any claim in connection with the product, please follow the instructions in paragraph F.
2.Within the first 24 months from date of purchase, JCS/THG, LLC will repair or replace the product if it is defective in material or workmanship, subject to the conditions in paragraph G.
F.If you have any other problem or claim in connection with this product, please write to our Consumer Service Department.
G.IMPORTANT RETURN INSTRUCTIONS. Your Warranty depends on your following these instructions if you are returning the unit to JCS/THG, LLC:
1.Carefully pack the item in its original carton or other suitable box to avoid damage in shipping.
2.Before packing your unit for return, be sure to enclose:
a)Your name, full address with zip code and telephone number
| c) | Your $12.50 check for return shipping and |
|
| handling, and |
| d) | The model number of the unit and the problem |
|
| you are having. (Enclose in an envelope and tape |
|
| directly to the unit before the box is sealed.) |
3. | JCS/THG, LLC recommends you ship the package | |
| U.P.S. ground service for tracking purposes. | |
4. | All shipping charges must be prepaid by you. | |
5. | Mark the outside of your package: | |
Bionaire®
JCS/THG, LLC
303 Nelson Avenue
Neosho, MO 64850
SHIPPING AND HANDLING CHARGES: $12.50 (USD)
This Warranty gives you specific legal rights, and you may have other rights which vary from state to state. The provisions of this Warranty are in addition to, and not a modification of, or subtraction from, the statutory warranties and other rights and remedies contained in any applicable legislation. To the extent that any provision of this Warranty is inconsistent with any applicable law, such provision shall be deemed voided or amended, as necessary, to comply with such law.
© 2006 JCS/THG, LLC
Bionaire®, the Bionaire logo® and
BCM630CN05EFM1 | Printed In China |