PLASTIC


CONNECTOR


CONNECTING


WIRE


PANELFROM


WIRE

LIGHT


FUSE HOLDER

STEP 6 - ATTACH THE CONTROL PANEL TO THE DASHBOARD

Place the air control panel on the dash where the holes were drilled in Step 1. Using the provided machine screws, lock nuts, and washers attach the air control panel to the dashboard or selected mounting surface see Figure "B".

STEP 7 - ROUTE THE ELECTRICAL WIRE

All necessary 16 gage electrical wire and connectors are enclosed with the kit. Review the electrical schematic before beginning installation see Figure "A".

Cut a length of 16 gage wire that will reach from the positive wire (red) on the compressor to either white wire on the control panel. Strip 1/4" off each end of the 16 gage wire and crimp a female spade connector on to each end. Crimp a male spade connector on to the positive wire (red) from the compressor. Attach the 16 gage wire to the positive compressor wire by pushing the female and male spade connectors together. Attach the other end of the 16 gage wire to either white wire on the control panel in the same manner.

Cut another length of 16 gage wire that will reach from the control panel to a positive 12 Volt, 20 Amp minimum, ignition activated power source. Strip 1/4" off one end of the 16 gage length and crimp a female spade connector onto the wire. Attach the wire to the remaining white wire on the control panel by pushing the male and female spade connectors together. Attach the wire from the control panel to the power source using the supplied wire connector. Slide the wire connector over the existing power wire, then slide the un-stripped compressor wire into the wire connector. Close the wire connector over both wires with pliers see Figure "E". Next, install the in-line fuse holder. Cut the compressor wire near the power source. Insert the un-stripped ends of the wires into the fuse holder. Use pliers to close the fuse holder over the wires and insert

the 20 Amp blade fuse see Figure "F".

BACK

GAUGEOF

RING


CONGROUNNECTORD)


(TO

WIRE

DASHBOARD

POSITIVE

WIRE)

ILLUMINATION

(TO


Figure "G"

STEP 9 - CHECK THE SYSTEM

STEP 8 - WIRE THE CONTROL PANEL FOR ILLUMINATION

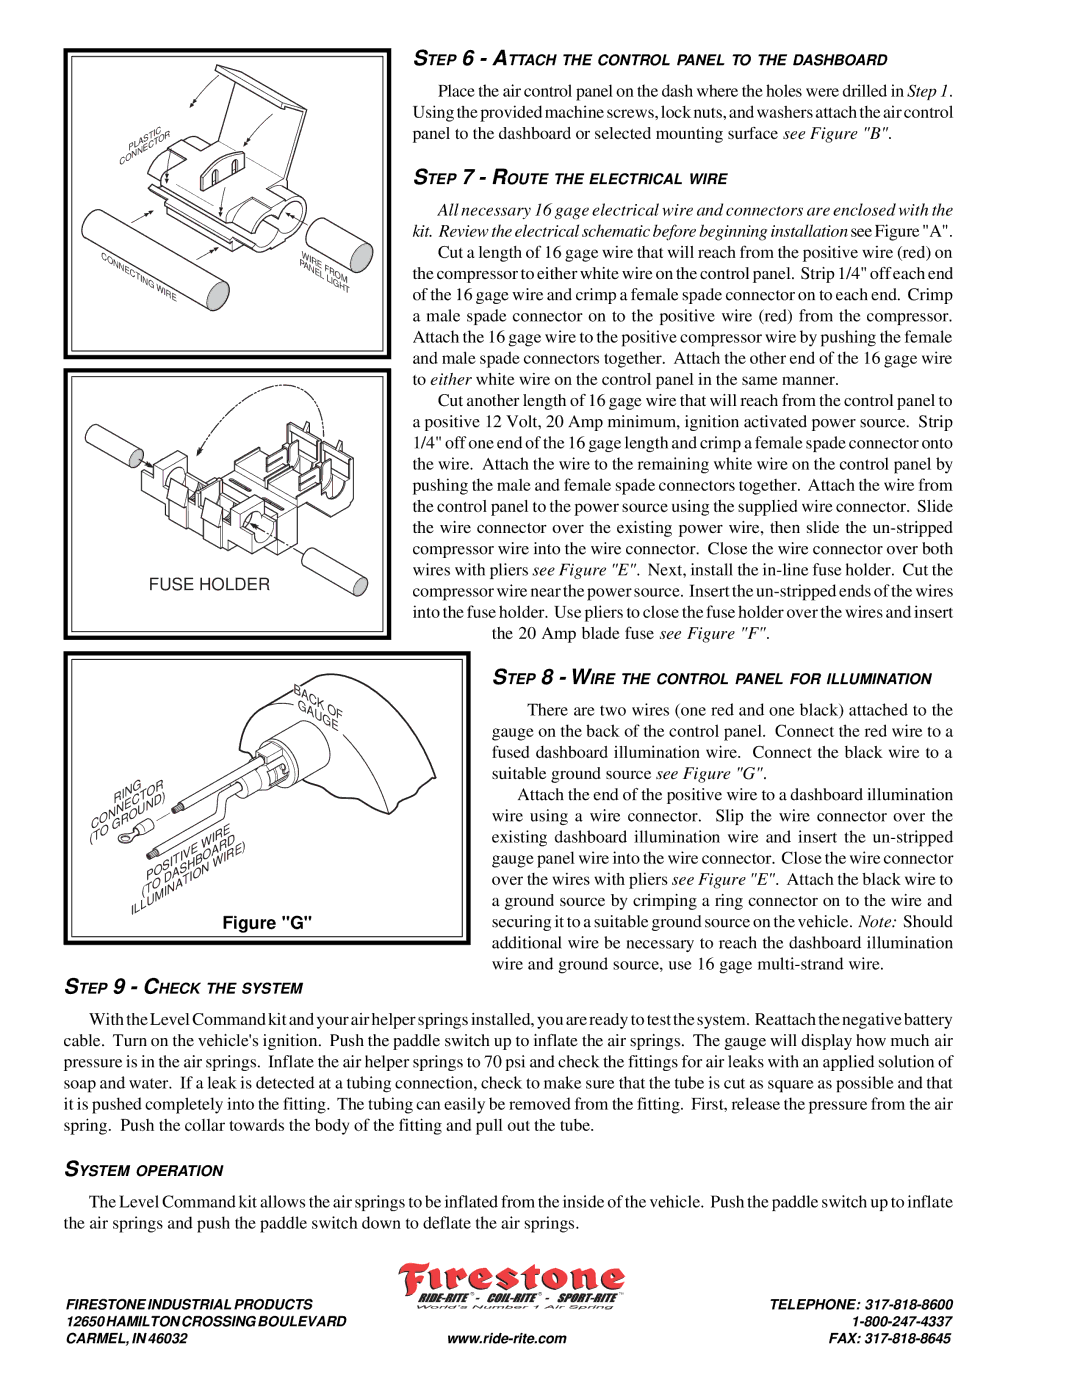
There are two wires (one red and one black) attached to the gauge on the back of the control panel. Connect the red wire to a fused dashboard illumination wire. Connect the black wire to a suitable ground source see Figure "G".

Attach the end of the positive wire to a dashboard illumination wire using a wire connector. Slip the wire connector over the existing dashboard illumination wire and insert the un-stripped gauge panel wire into the wire connector. Close the wire connector over the wires with pliers see Figure "E". Attach the black wire to a ground source by crimping a ring connector on to the wire and securing it to a suitable ground source on the vehicle. Note: Should additional wire be necessary to reach the dashboard illumination wire and ground source, use 16 gage multi-strand wire.

With the Level Command kit and your air helper springs installed, you are ready to test the system. Reattach the negative battery cable. Turn on the vehicle's ignition. Push the paddle switch up to inflate the air springs. The gauge will display how much air pressure is in the air springs. Inflate the air helper springs to 70 psi and check the fittings for air leaks with an applied solution of soap and water. If a leak is detected at a tubing connection, check to make sure that the tube is cut as square as possible and that it is pushed completely into the fitting. The tubing can easily be removed from the fitting. First, release the pressure from the air spring. Push the collar towards the body of the fitting and pull out the tube.

SYSTEM OPERATION

The Level Command kit allows the air springs to be inflated from the inside of the vehicle. Push the paddle switch up to inflate the air springs and push the paddle switch down to deflate the air springs.

R

R

TM

FIRESTONE INDUSTRIAL PRODUCTS


TELEPHONE: 317-818-8600

12650 HAMILTON CROSSING BOULEVARD


1-800-247-4337

CARMEL, IN 46032

www.ride-rite.com

FAX: 317-818-8645

Page 4
Image 4
Black & Decker 2097, 2187, 2227, 2233 installation instructions Back Gaugeof

2097, 2233, 2227, 2187 specifications

Black & Decker offers a range of innovative tools, among which are the models 2187, 2227, 2233, and 2097. Each of these products come with distinct features and technologies that cater to the diverse needs of users, from casual DIY enthusiasts to professionals in the field.

The Black & Decker 2187 is a versatile drill that showcases an impact mechanism designed for increased torque. This model is particularly appreciated for its lightweight design, making it easy to handle during extended periods of use. It incorporates a 3/8-inch keyless chuck that allows users to change drill bits quickly and efficiently. Its variable speed settings enable users to adjust the speed according to the material being drilled, enhancing control and precision.

Next in line is the Black & Decker 2227, a robust model known for its powerful motor and ergonomic design. This drill is equipped with a two-speed gear setting, allowing the user to switch between high-speed drilling and low-speed torque, suitable for various applications. The 2227 also features a built-in LED light that illuminates dark workspaces, making it easier to see what you're working on. Its compact design ensures that it can reach tight spaces, offering versatility in different environments.

The Black & Decker 2233 further enhances the line-up with its advanced lithium-ion battery technology. This model is known for its extended battery life, providing users with the ability to work for longer periods without interruption. The 2233 is equipped with a comfortable handle, reducing fatigue during prolonged use. Additionally, it offers a built-in battery charge indicator, allowing users to monitor power levels conveniently.

Lastly, the Black & Decker 2097 rounds out the group with its emphasis on durability and performance. This model features an all-metal transmission that increases longevity and provides reliable performance even under heavy loads. The 2097 is also designed with a soft-grip handle, contributing to user comfort during operation. Its integrated safety features ensure a secure experience for users.

In conclusion, Black & Decker's 2187, 2227, 2233, and 2097 represent a commitment to quality and innovation in power tools. Each model caters to specific user needs, ensuring that there is a suitable option available for all types of projects. These tools combine power, efficiency, and user-friendly designs, making them valuable additions to any toolbox.