How to Use
This appliance is intended for household use only.
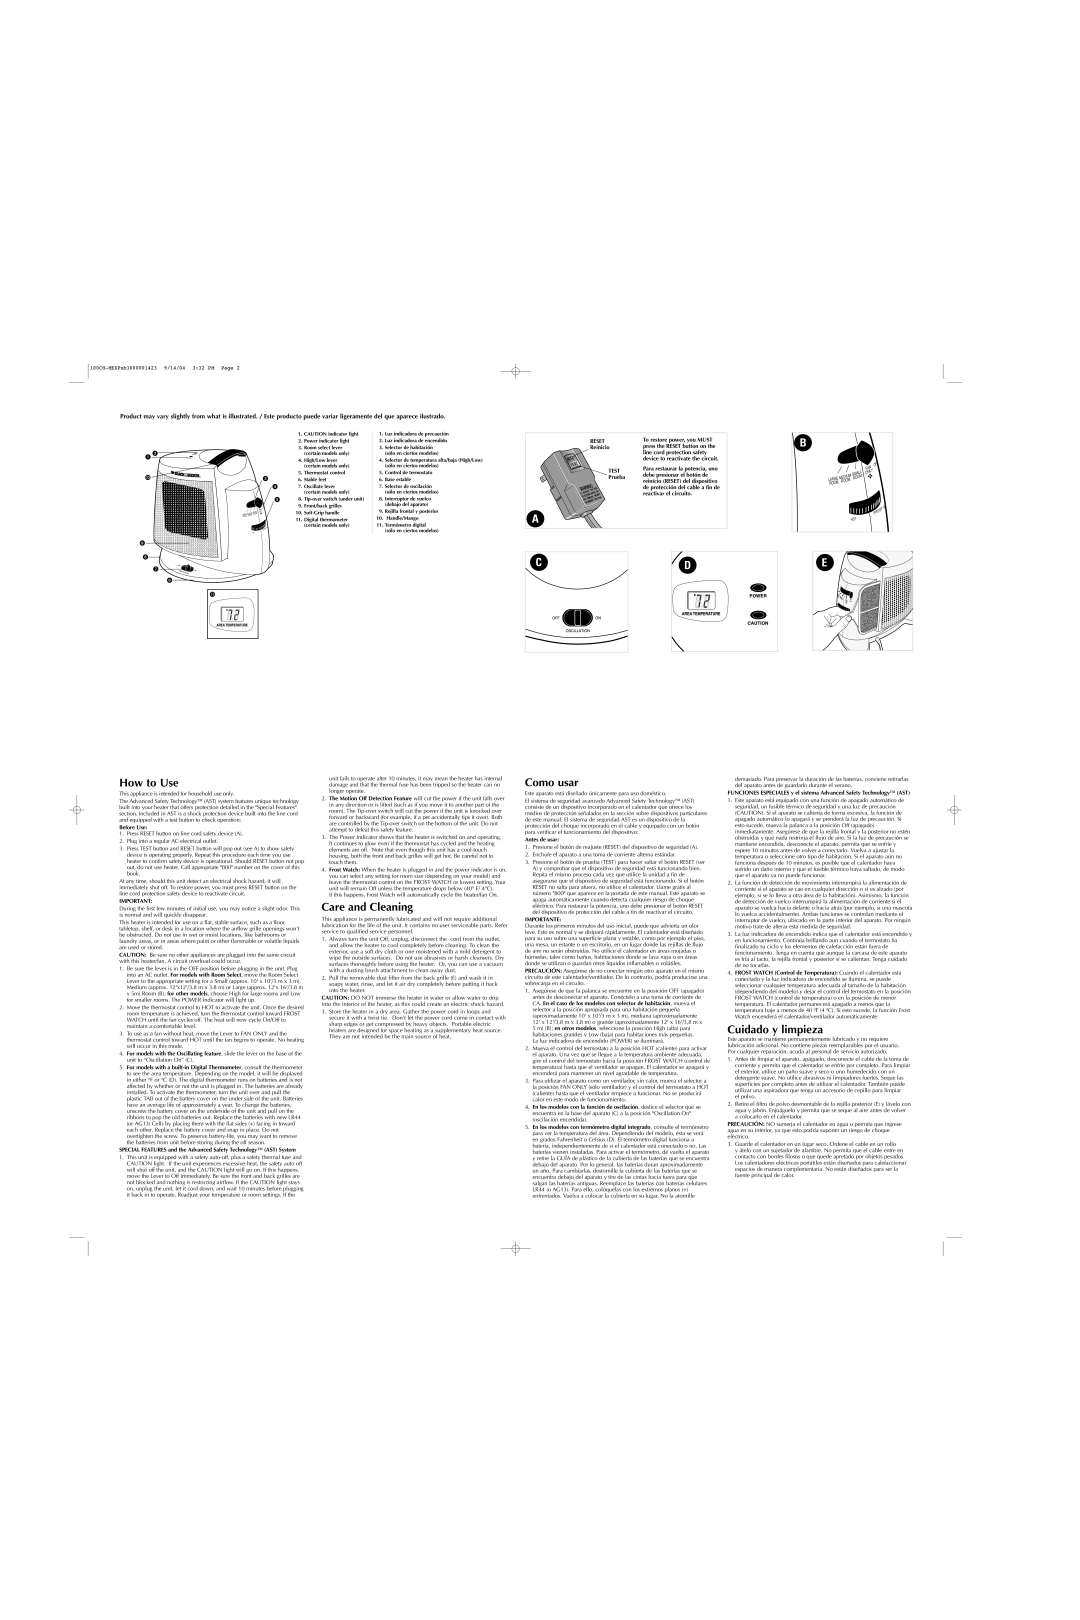
The Advanced Safety Technology™ (AST) system features unique technology built into your heater that offers protection detailed in the "Special Features" section. Included in AST is a shock protection device built into the line cord and equipped with a test button to check operation:
Before Use:
1.Press RESET button on line cord safety device (A).
2.Plug into a regular AC electrical outlet.
3.Press TEST button and RESET button will pop out (see A) to show safety device is operating properly. Repeat this procedure each time you use heater to confirm safety device is operational. Should RESET button not pop out, do not use heater. Call appropriate "800" number on the cover of this book.
At any time, should this unit detect an electrical shock hazard, it will immediately shut off. To restore power, you must press RESET button on the line cord protection safety device to reactivate circuit.
IMPORTANT:
During the first few minutes of initial use, you may notice a slight odor. This is normal and will quickly disappear.
This heater is intended for use on a flat, stable surface, such as a floor, tabletop, shelf, or desk in a location where the airflow grille openings won’t be obstructed. Do not use in wet or moist locations, like bathrooms or laundry areas, or in areas where paint or other flammable or volatile liquids are used or stored.
CAUTION: Be sure no other appliances are plugged into the same circuit with this heater/fan. A circuit overload could occur.
1.Be sure the lever is in the OFF position before plugging in the unit. Plug into an AC outlet. For models with Room Select, move the Room Select Lever to the appropriate setting for a Small (approx. 10' x 10'/3 m x 3 m), Medium (approx. 12'x12'/3.8 m x 3.8 m) or Large (approx. 12'x 16'/3.8 m x 5m) Room (B); for other models, choose High for large rooms and Low for smaller rooms. The POWER indicator will light up.
2.Move the thermostat control to HOT to activate the unit. Once the desired room temperature is achieved, turn the thermostat control toward FROST WATCH until the fan cycles off. The heat will now cycle On/Off to maintain a comfortable level.
3.To use as a fan without heat, move the Lever to FAN ONLY and the thermostat control toward HOT until the fan begins to operate. No heating will occur in this mode.
4.For models with the Oscillating feature, slide the lever on the base of the unit to “Oscillation On” (C).
5.For models with a built-in Digital Thermometer, consult the thermometer to see the area temperature. Depending on the model, it will be displayed in either °F or °C (D). The digital thermometer runs on batteries and is not affected by whether or not the unit is plugged in. The batteries are already installed. To activate the thermometer, turn the unit over and pull the plastic TAB out of the battery cover on the under side of the unit. Batteries have an average life of approximately a year. To change the batteries, unscrew the battery cover on the underside of the unit and pull on the ribbons to pop the old batteries out. Replace the batteries with new LR44 (or AG13) Cells by placing them with the flat sides (+) facing in toward each other. Replace the battery cover and snap in place. Do not overtighten the screw. To preserve battery-life, you may want to remove the batteries from unit before storing during the off season.
SPECIAL FEATURES and the Advanced Safety Technology™ (AST) System
1.This unit is equipped with a safety auto-off, plus a safety thermal fuse and CAUTION light. If the unit experiences excessive heat, the safety auto off will shut off the unit, and the CAUTION light will go on. If this happens, move the Lever to Off immediately. Be sure the front and back grilles are not blocked and nothing is restricting airflow. If the CAUTION light stays on, unplug the unit, let it cool down, and wait 10 minutes before plugging it back in to operate. Readjust your temperature or room settings. If the
unit fails to operate after 10 minutes, it may mean the heater has internal damage and that the thermal fuse has been tripped so the heater can no longer operate.
2.The Motion Off Detection Feature will cut the power if the unit falls over in any direction or is lifted (such as if you move it to another part of the room). The Tip-over switch will cut the power if the unit is knocked over forward or backward (for example, if a pet accidentally tips it over). Both are controlled by the Tip-over switch on the bottom of the unit. Do not attempt to defeat this safety feature.
3.The Power Indicator shows that the heater is switched on and operating. It continues to glow even if the thermostat has cycled and the heating elements are off. Note that even though this unit has a cool-touch housing, both the front and back grilles will get hot. Be careful not to touch them.
4.Frost Watch: When the heater is plugged in and the power indicator is on, you can select any setting for room size (depending on your model) and leave the thermostat control on the FROST WATCH or lowest setting. Your unit will remain Off unless the temperature drops below (40° F/ 4°C).
If this happens, Frost Watch will automatically cycle the heater/fan On.
Care and Cleaning
This appliance is permanently lubricated and will not require additional lubrication for the life of the unit. It contains no user serviceable parts. Refer service to qualified service personnel.
1.Always turn the unit Off, unplug, disconnect the cord from the outlet, and allow the heater to cool completely before cleaning. To clean the exterior, use a soft dry cloth or one moistened with a mild detergent to wipe the outside surfaces. Do not use abrasives or harsh cleansers. Dry surfaces thoroughly before using the heater. Or, you can use a vacuum with a dusting brush attachment to clean away dust.
2.Pull the removable dust filter from the back grille (E) and wash it in soapy water, rinse, and let it air dry completely before putting it back into the heater.
CAUTION: DO NOT immerse the heater in water or allow water to drip into the interior of the heater, as this could create an electric shock hazard.
3.Store the heater in a dry area. Gather the power cord in loops and secure it with a twist tie. Don’t let the power cord come in contact with sharp edges or get compressed by heavy objects. Portable electric heaters are designed for space heating as a supplementary heat source. They are not intended be the main source of heat.
Como usar
Este aparato está diseñado únicamente para uso doméstico.
El sistema de seguridad avanzado Advanced Safety Technology™ (AST) consiste de un dispositivo incorporado en el calentador que ofrece los medios de protección señalados en la sección sobre dispositivos particulares de este manual. El sistema de seguridad AST es un dispositivo de la protección del choque incorporado en el cable y equipado con un botón para verificar el funcionamiento del dispositivo:
Antes de usar:
1.Presione el botón de reajuste (RESET) del dispositivo de seguridad (A).
2.Enchufe el aparato a una toma de corriente alterna estándar.
3.Presione el botón de prueba (TEST) para hacer saltar el botón RESET (ver A) y comprobar que el dispositivo de seguridad está funcionando bien. Repita el mismo proceso cada vez que utilice la unidad a fin de asegurarse que el dispositivo de seguridad está funcionando. Si el botón RESET no salta para afuera, no utilice el calentador. Llame gratis al número "800" que aparece en la portada de este manual. Este aparato se apaga automáticamente cuando detecta cualquier riesgo de choque eléctrico. Para restaurar la potencia, uno debe presionar el botón RESET del dispositivo de protección del cable a fin de reactivar el circuito.
IMPORTANTE:
Durante los primeros minutos del uso inicial, puede que advierta un olor leve. Esto es normal y se disipará rápidamente. El calentador está diseñado para su uso sobre una superficie plana y estable, como por ejemplo el piso, una mesa, un estante o un escritorio, en un lugar donde las rejillas de flujo de aire no serán obstruidas. No utilice el calentador en áreas mojadas o húmedas, tales como baños, habitaciones donde se lava ropa o en áreas donde se utilizan o guardan otros líquidos inflamables o volátiles.
PRECAUCIÓN: Asegúrese de no conectar ningún otro aparato en el mismo circuito de este calentador/ventilador. De lo contrario, podría producirse una sobrecarga en el circuito.
1.Asegúrese de que la palanca se encuentre en la posición OFF (apagado) antes de desconectar el aparato. Conéctelo a una toma de corriente de CA. En el caso de los modelos con selector de habitación, mueva el selector a la posición apropiada para una habitación pequeña (aproximadamente 10' x 10'/3 m x 3 m), mediana (aproximadamente 12' x 12'/3,8 m x 3,8 m) o grande (aproximadamente 12' x 16'/3,8 m x 5 m) (B); en otros modelos, seleccione la posición High (alta) para habitaciones grandes y Low (baja) para habitaciones más pequeñas.
La luz indicadora de encendido (POWER) se iluminará.
2.Mueva el control del termostato a la posición HOT (caliente) para activar el aparato. Una vez que se llegue a la temperatura ambiente adecuada, gire el control del termostato hacia la posición FROST WATCH (control de temperatura) hasta que el ventilador se apague. El calentador se apagará y encenderá para mantener un nivel agradable de temperatura.
3.Para utilizar el aparato como un ventilador, sin calor, mueva el selector a la posición FAN ONLY (sólo ventilador) y el control del termostato a HOT (caliente) hasta que el ventilador empiece a funcionar. No se producirá calor en este modo de funcionamiento.
4.En los modelos con la función de oscilación, deslice el selector que se encuentra en la base del aparato (C) a la posición "Oscillation On" (oscilación encendida).
5.En los modelos con termómetro digital integrado, consulte el termómetro para ver la temperatura del área. Dependiendo del modelo, ésta se verá en grados Fahrenheit o Celsius (D). El termómetro digital funciona a batería, independientemente de si el calentador está conectado o no. Las baterías vienen instaladas. Para activar el termómetro, dé vuelta el aparato y retire la GUÍA de plástico de la cubierta de las baterías que se encuentra debajo del aparato. Por lo general, las baterías duran aproximadamente un año. Para cambiarlas, destornille la cubierta de las baterías que se encuentra debajo del aparato y tire de las cintas hacia fuera para que salgan las baterías antiguas. Reemplace las baterías con baterías celulares LR44 (o AG13). Para ello, colóquelas con los extremos planos (+) enfrentados. Vuelva a colocar la cubierta en su lugar. No la atornille
demasiado. Para preservar la duración de las baterías, conviene retirarlas del aparato antes de guardarlo durante el verano.
FUNCIONES ESPECIALES y el sistema Advanced Safety Technology™ (AST)
1.Este aparato está equipado con una función de apagado automático de seguridad, un fusible térmico de seguridad y una luz de precaución (CAUTION). Si el aparato se calienta de forma excesiva, la función de apagado automático lo apagará y se prenderá la luz de precaución. Si esto sucede, mueva la palanca a la posición Off (apagado) inmediatamente. Asegúrese de que la rejilla frontal y la posterior no estén obstruidas y que nada restrinja el flujo de aire. Si la luz de precaución se mantiene encendida, desconecte el aparato, permita que se enfríe y espere 10 minutos antes de volver a conectarlo. Vuelva a ajustar la temperatura o seleccione otro tipo de habitación. Si el aparato aún no funciona después de 10 minutos, es posible que el calentador haya sufrido un daño interno y que el fusible térmico haya saltado, de modo que el aparato ya no puede funcionar.
2.La función de detección de movimiento interrumpirá la alimentación de corriente si el aparato se cae en cualquier dirección o si es alzado (por ejemplo, si se lo lleva a otra área de la habitación). Asimismo, la función de detección de vuelco interrumpirá la alimentación de corriente si el aparato se vuelca hacia delante o hacia atrás (por ejemplo, si una mascota lo vuelca accidentalmente). Ambas funciones se controlan mediante el interruptor de vuelco, ubicado en la parte inferior del aparato. Por ningún motivo trate de alterar esta medida de seguridad.
3.La luz indicadora de encendido indica que el calentador está encendido y en funcionamiento. Continúa brillando aun cuando el termostato ha finalizado su ciclo y los elementos de calefacción están fuera de funcionamiento. Tenga en cuenta que aunque la carcasa de este aparato es fría al tacto, la rejilla frontal y posterior sí se calientan. Tenga cuidado de no tocarlas.
4.FROST WATCH (Control de Temperatura): Cuando el calentador está conectado y la luz indicadora de encendido se ilumina, se puede seleccionar cualquier temperatura adecuada al tamaño de la habitación (dependiendo del modelo) y dejar el control del termostato en la posición FROST WATCH (control de temperatura) o en la posición de menor temperatura. El calentador permanecerá apagado a menos que la temperatura baje a menos de 40 ºF (4 ºC). Si esto sucede, la función Frost Watch encenderá el calentador/ventilador automáticamente.
Cuidado y limpieza
Este aparato se mantiene permanentemente lubricado y no requiere lubricación adicional. No contiene piezas reemplazables por el usuario. Por cualquier reparación, acuda al personal de servicio autorizado.
1.Antes de limpiar el aparato, apáguelo, desconecte el cable de la toma de corriente y permita que el calentador se enfríe por completo. Para limpiar el exterior, utilice un paño suave y seco o uno humedecido con un detergente suave. No utilice abrasivos ni limpiadores fuertes. Seque las superficies por completo antes de utilizar el calentador. También puede utilizar una aspiradora que tenga un accesorio de cepillo para limpiar
el polvo.
2.Retire el filtro de polvo desmontable de la rejilla posterior (E) y lávelo con agua y jabón. Enjuáguelo y permita que se seque al aire antes de volver a colocarlo en el calentador.
PRECAUCIÓN: NO sumerja el calentador en agua o permita que ingrese agua en su interior, ya que esto podría suponer un riesgo de choque eléctrico.
3.Guarde el calentador en un lugar seco. Ordene el cable en un rollo
y átelo con un sujetador de alambre. No permita que el cable entre en contacto con bordes filosos o que quede apretado por objetos pesados. Los calentadores eléctricos portátiles están diseñados para calefaccionar espacios de manera complementaria. No están diseñados para ser la fuente principal de calor.