INSTALACIÓN DE LA JARRA
1.Antes de usar la licuadora por primera vez, lave todas sus partes con excepción de la base. Coloque la junta sobre el montaje de las cuchillas.
2.Coloque las cuchillas dentro de la base de la jarra y gire la base hacia la derecha hasta quedar ajustada.
3.Sistema de seguro de cierre: Una vez instaladas las cuchillas en la jarra, coloque la jarra sobre la base de la unidad y gírela hacia el candado (  ) hasta quedar fija. El seguro de cierre ha encajado apropiadamente si puede usted sujetar el asa de la jarra y alzar la unidad completa de una sola vez.
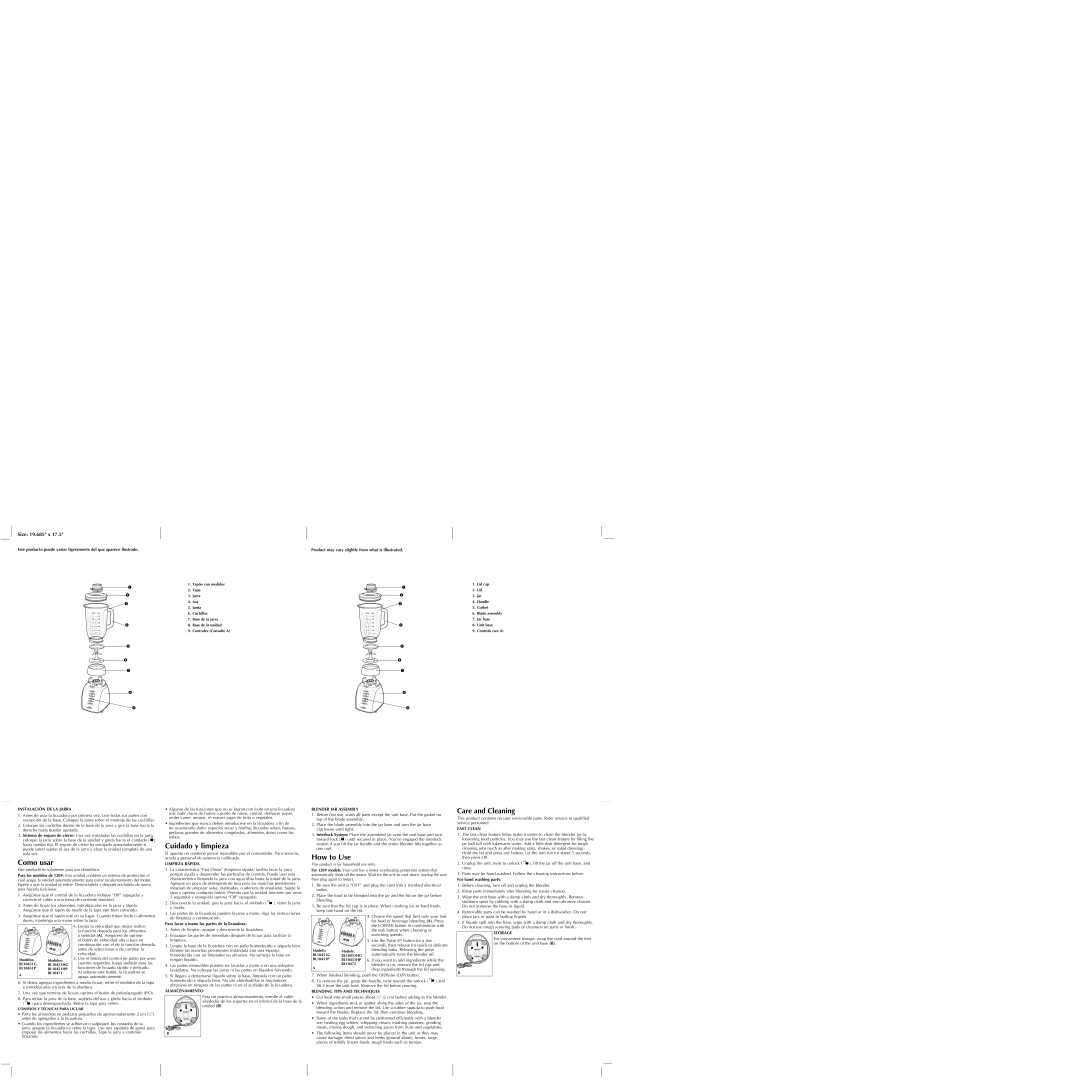
Como usar
Este producto es solamente para uso doméstico.
Para los modelos de 120V: Esta unidad contiene un sistema de protección el cual apaga la unidad automáticamente para evitar recalentamiento del motor. Espere a que la unidad se enfrie. Desenchúfela y después enchúfela de nuevo para hacerla funcionar.
1.Asegúrese que el control de la licuadora indique “Off” (apagada) y conecte el cable a una toma de corriente standard.
2.Antes de licuar los alimentos, introdúzcalos en la jarra y tápela. Asegúrese que el tapón de medir de la tapa esté bien colocado.
3.Asegúrese que el tapón esté en su lugar. Cuando triture hielo o alimentos duros, mantenga una mano sobre la tapa.
•Algunas de las funciones que no se logran con éxito en una licuadora son: batir claras de huevo a punto de nieve, cremar, deshacer papas, moler carne, amasar, ni extraer jugos de fruta o vegetales.
•Ingredientes que nunca deben introducirse en la licuadora a fin de
no ocasionarle daño: especies secas y hierbas (licuadas solas), huesos, pedazos grandes de alimentos congelados, alimentos duros como los nabos.
Cuidado y limpieza
El aparato no contiene piezas reparables por el consumidor. Para servicio, acuda a personal de asistencia calificado.
LIMPIEZA RÁPIDA
1.La característica “Fast Clean” (limpieza rápida) facilita lavar la jarra porque ayuda a desprender las partículas de comida. Puede usar esta characterística llenando la jarra con agua tibia hasta la mitad de la jarra. Agregue un poco de detergente de losa para las manchas persistentes (después de preparar salsa, malteadas, o aderezo de ensalada). Sujete la tapa y oprima cualquier botón. Permita que la unidad funcione por unos 5 segundos y enseguida oprima “Off” (apagada).
2.Desconecte la unidad, gire la jarra hacia el símbolo (  ), retire la jarra y lávela.
3.Las partes de la licuadora pueden lavarse a mano. Siga las instrucciones de limpieza a continuación.
BLENDER JAR ASSEMBLY
1.Before first use, wash all parts except the unit base. Put the gasket on top of the blade assembly.
2.Place the blade assembly into the jar base and turn the jar base clockwise until tight.
3.Interlock System: Place the assembled jar onto the unit base and turn toward lock (  ) until secured in place. You’ve engaged the interlock system if you lift the jar handle and the entire blender lifts together as one unit.
How to Use
This product is for household use only.
For 120V models: Your unit has a motor overheating protection system that automatically shuts off the motor. Wait for the unit to cool down, unplug the unit then plug again to restart.
1.Be sure the unit is “OFF” and plug the cord into a standard electrical outlet.
2.Place the food to be blended into the jar and the lid on the jar before blending.
3.Be sure that the lid cap is in place. When crushing ice or hard foods, keep one hand on the lid.
4. Choose the speed that best suits your task |
for food or beverage blending (A). Press |
Care and Cleaning
This product contains no user serviceable parts. Refer service to qualified service personnel.
FAST CLEAN
1.The fast clean feature helps make it easier to clean the blender jar by loosening food particles. You may use the fast clean feature by filling the jar half full with lukewarm water. Add a little dish detergent for tough cleaning jobs (such as after making salsa, shakes, or salad dressing). Hold the lid and press any button. Let the unit run for about 5 seconds, then press Off.
2.Unplug the unit, twist to unlock (  ), lift the jar off the unit base, and rinse.
3.Parts may be hand-washed. Follow the cleaning instructions below.
For hand washing parts:
1. | Before cleaning, turn off and unplug the blender. |
2. | Rinse parts immediately after blending for easier cleanup. |
3. | Wipe the unit base with a damp cloth and dry thoroughly. Remove |
| stubborn spots by rubbing with a damp cloth and non-abrasive cleaner. |
| Do not immerse the base in liquid. |
4. | Removable parts can be washed by hand or in a dishwasher. Do not |
| place jars or parts in boiling liquids. |
Modelos:Modelos:
BL10451G BL10451HG
BL10451P BL10451HP
4. Escoja la velocidad que mejor realice |
la función deseada para los alimentos |
o bebidas (A). Asegúrese de oprimir |
el botón de velocidad alta o baja en |
combinación con el de la función deseada, |
antes de seleccionar o de cambiar la |
velocidad. |
5. Use el botón del control de pulso por unos |
cuantos segundos, luego suéltelo para las |
funciones de licuado rápido y delicado. |
Para lavar a mano las partes de la licuadora:
1. | Antes de limpiar, apague y desconecte la licuadora. |
2. | Enjuague las partes de inmediato después de licuar para facilitar la |
| | limpieza. |
3. | Limpie la base de la licuadora con un paño humedecido y séquela bien. |
| | Elimine las manchas persistentes frotándola con una esponja |
| | humedecida con un limpiador no abrasivo. No sumerja la base en |
| | ningún líquido. |
4. | Las partes removibles pueden ser lavadas a mano o en una máquina |
| | lavaplatos. No coloque las jarras ni las partes en líquidos hirviendo. |
| | | | |
| | | | |
| | | | |
| | | | |
Models:Models:
BL10451G BL10451HG
BL10451P BL10451HP BL10471
A
the LOW/HI button in combination with |
the task button when choosing or |
switching speeds. |
5. Use the Pulse (P) button for a few |
seconds, then release for quick or delicate |
blending tasks. Releasing the pulse |
automatically turns the blender off. |
6. If you want to add ingredients while the |
blender is on, remove the lid cap and |
drop ingredients through the lid opening. |
5. If liquids spill into the base, wipe with a damp cloth and dry thoroughly. |
Do not use rough scouring pads or cleansers on parts or finish. |
STORAGE
For convenient storage, wrap the cord around the feet on the bottom of the unit base (B).
Al soltarse este botón, la licuadora se |
apaga automáticamente. |
5. Si llegara a derramarse líquido sobre la base, límpiela con un paño |
humedecido y séquela bien. No use almohadillas ni limpiadores |
7. When finished blending, push the Off/Pulse (O/P) button. |
6.Si desea agregar ingredientes a medio licuar, retire el medidor de la tapa e introdúzcalos a través de la abertura.
7.Una vez que termine de licuar, oprima el botón de pulso/apagado (P/O).
8.Para retirar la jarra de la base, sujétela del asa y gírela hacia el símbolo
(  ) para desengancharla. Retire la tapa para verter.
CONSEJOS Y TÉCNICAS PARA LICUAR
•Parta los alimentos en pedazos pequeños de aproximadamente 2 cm (3⁄4”) antes de agregarlos a la licuadora.
•Cuando los ingredientes se adhieran o salpiquen los costados de la
jarra, apague la licuadora y retire la tapa. Use una espátula de goma para empujar los alimentos hacia las cuchillas. Tape la jarra y continúe licuando.
abrasivos en ninguna de las partes ni en el acabado de la licuadora. |
ALMACENAMIENTO
Para un práctico almacenamiento, enrolle el cable alrededor de los soportes en el inferior de la base de la unidad (B).
B
8. To remove the jar, grasp the handle, twist toward the unlock ( | ) and |
lift it from the unit base. Remove the lid before pouring. | |
BLENDING TIPS AND TECHNIQUES
•Cut food into small pieces about 3⁄4” (2 cm) before adding to the blender.
•When ingredients stick or spatter along the sides of the jar, stop the blending action and remove the lid. Use a rubber spatula to push food toward the blades. Replace the lid, then continue blending.
•Some of the tasks that cannot be performed efficiently with a blender are: beating egg whites, whipping cream, mashing potatoes, grinding meats, mixing dough, and extracting juices from fruits and vegetables.
•The following items should never be placed in the unit as they may cause damage: dried spices and herbs (ground alone), bones, large pieces of solidly frozen foods, tough foods such as turnips.