632901-00 Iron 10/24/05 12:37 PM Page 4
Assembly
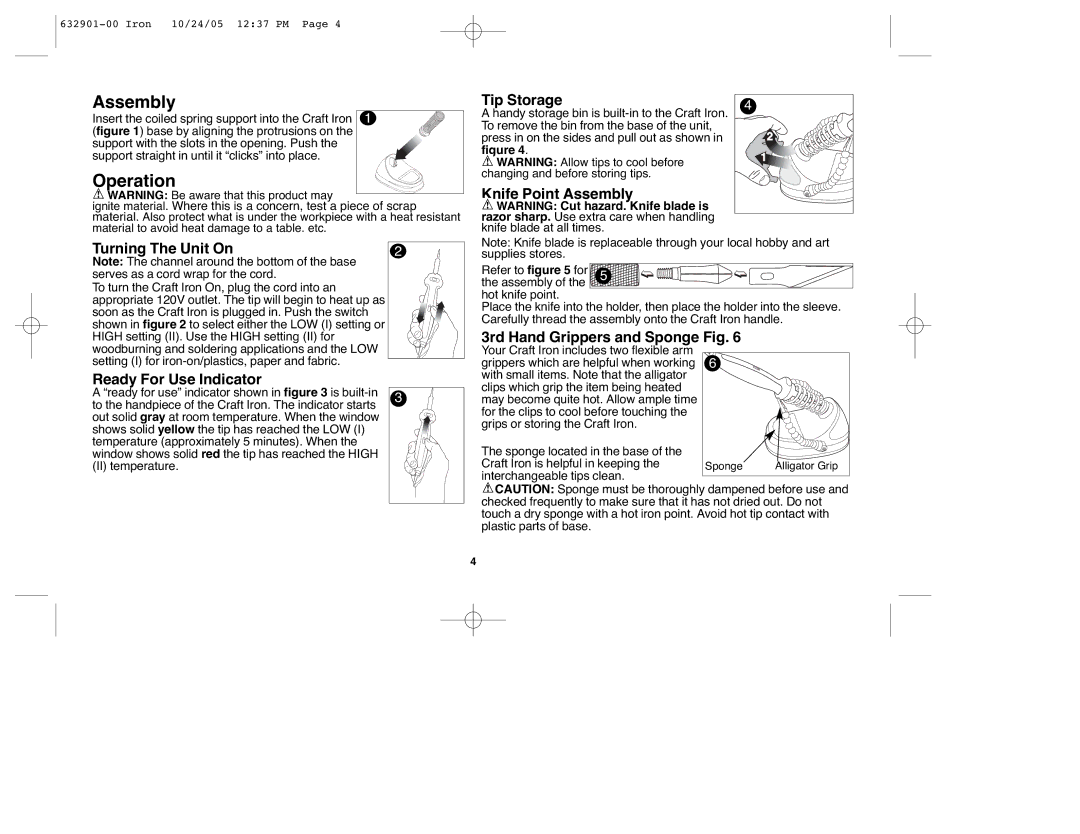
Insert the coiled spring support into the Craft Iron 1 (figure 1) base by aligning the protrusions on the support with the slots in the opening. Push the support straight in until it “clicks” into place.
Operation
![]() WARNING: Be aware that this product may
WARNING: Be aware that this product may
ignite material. Where this is a concern, test a piece of scrap
material. Also protect what is under the workpiece with a heat resistant material to avoid heat damage to a table. etc.
Tip Storage
A handy storage bin is
![]() WARNING: Allow tips to cool before changing and before storing tips.
WARNING: Allow tips to cool before changing and before storing tips.
Knife Point Assembly
![]() WARNING: Cut hazard. Knife blade is razor sharp. Use extra care when handling knife blade at all times.
WARNING: Cut hazard. Knife blade is razor sharp. Use extra care when handling knife blade at all times.
4 |
2 |
1 |
Turning The Unit On | 2 |
Note: The channel around the bottom of the base serves as a cord wrap for the cord.
To turn the Craft Iron On, plug the cord into an appropriate 120V outlet. The tip will begin to heat up as soon as the Craft Iron is plugged in. Push the switch shown in figure 2 to select either the LOW (I) setting or HIGH setting (II). Use the HIGH setting (II) for
Note: Knife blade is replaceable through your local hobby and art supplies stores.
Refer to figure 5 for | 5 |
the assembly of the |
|
hot knife point. |
|
Place the knife into the holder, then place the holder into the sleeve. Carefully thread the assembly onto the Craft Iron handle.
3rd Hand Grippers and Sponge Fig. 6
woodburning and soldering applications and the LOW setting (I) for
Ready For Use Indicator
A “ready for use” indicator shown in figure 3 is | 3 |
to the handpiece of the Craft Iron. The indicator starts |
|
out solid gray at room temperature. When the window |
|
shows solid yellow the tip has reached the LOW (I) |
|
temperature (approximately 5 minutes). When the |
|
window shows solid red the tip has reached the HIGH |
|
(II) temperature. |
|
Your Craft Iron includes two flexible arm grippers which are helpful when working with small items. Note that the alligator clips which grip the item being heated may become quite hot. Allow ample time for the clips to cool before touching the grips or storing the Craft Iron.
The sponge located in the base of the Craft Iron is helpful in keeping the interchangeable tips clean.
6
Sponge | Alligator Grip |
![]() CAUTION: Sponge must be thoroughly dampened before use and checked frequently to make sure that it has not dried out. Do not touch a dry sponge with a hot iron point. Avoid hot tip contact with plastic parts of base.
CAUTION: Sponge must be thoroughly dampened before use and checked frequently to make sure that it has not dried out. Do not touch a dry sponge with a hot iron point. Avoid hot tip contact with plastic parts of base.
4