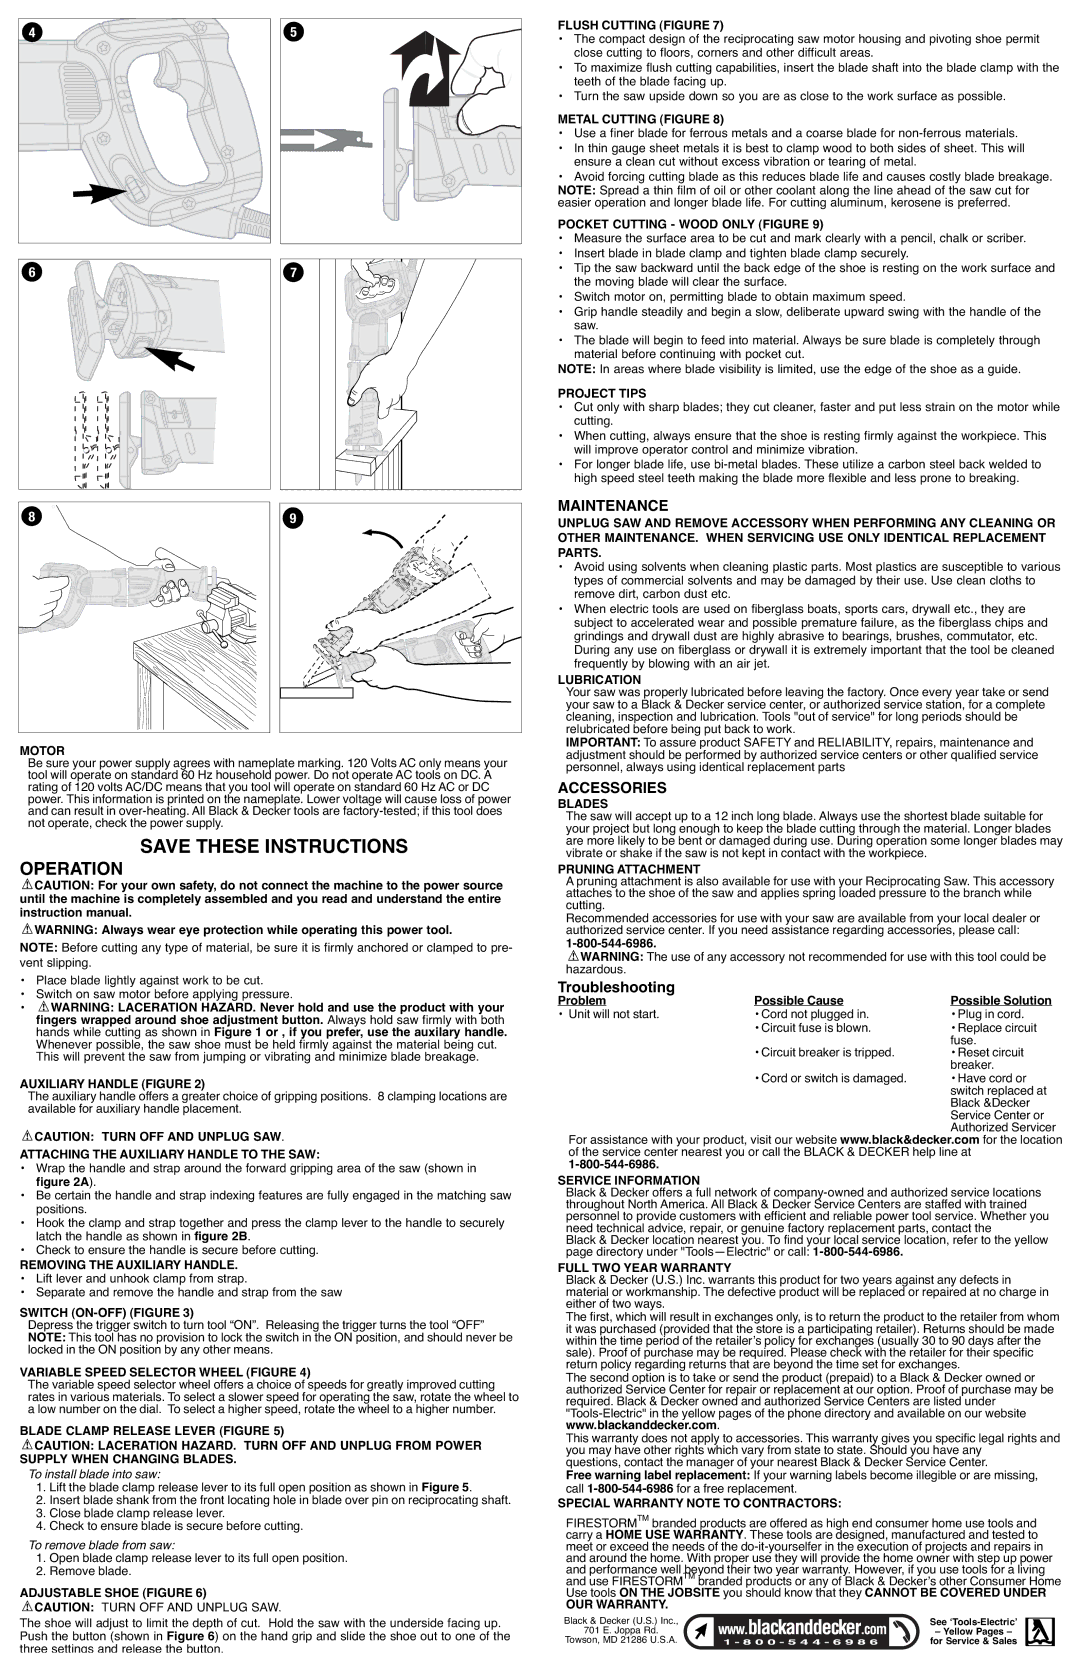
4 |
6 |
8 |
5 |
7 |
9 |
FLUSH CUTTING (FIGURE 7)
•The compact design of the reciprocating saw motor housing and pivoting shoe permit close cutting to floors, corners and other difficult areas.
•To maximize flush cutting capabilities, insert the blade shaft into the blade clamp with the teeth of the blade facing up.
•Turn the saw upside down so you are as close to the work surface as possible.
METAL CUTTING (FIGURE 8)
•Use a finer blade for ferrous metals and a coarse blade for
•In thin gauge sheet metals it is best to clamp wood to both sides of sheet. This will ensure a clean cut without excess vibration or tearing of metal.
•Avoid forcing cutting blade as this reduces blade life and causes costly blade breakage. NOTE: Spread a thin film of oil or other coolant along the line ahead of the saw cut for easier operation and longer blade life. For cutting aluminum, kerosene is preferred.
POCKET CUTTING - WOOD ONLY (FIGURE 9)
•Measure the surface area to be cut and mark clearly with a pencil, chalk or scriber.
•Insert blade in blade clamp and tighten blade clamp securely.
•Tip the saw backward until the back edge of the shoe is resting on the work surface and the moving blade will clear the surface.
•Switch motor on, permitting blade to obtain maximum speed.
•Grip handle steadily and begin a slow, deliberate upward swing with the handle of the saw.
•The blade will begin to feed into material. Always be sure blade is completely through material before continuing with pocket cut.
NOTE: In areas where blade visibility is limited, use the edge of the shoe as a guide.
PROJECT TIPS
•Cut only with sharp blades; they cut cleaner, faster and put less strain on the motor while cutting.
•When cutting, always ensure that the shoe is resting firmly against the workpiece. This will improve operator control and minimize vibration.
•For longer blade life, use
MAINTENANCE
UNPLUG SAW AND REMOVE ACCESSORY WHEN PERFORMING ANY CLEANING OR OTHER MAINTENANCE. WHEN SERVICING USE ONLY IDENTICAL REPLACEMENT PARTS.
•Avoid using solvents when cleaning plastic parts. Most plastics are susceptible to various types of commercial solvents and may be damaged by their use. Use clean cloths to remove dirt, carbon dust etc.
•When electric tools are used on fiberglass boats, sports cars, drywall etc., they are subject to accelerated wear and possible premature failure, as the fiberglass chips and grindings and drywall dust are highly abrasive to bearings, brushes, commutator, etc. During any use on fiberglass or drywall it is extremely important that the tool be cleaned frequently by blowing with an air jet.
LUBRICATION
Your saw was properly lubricated before leaving the factory. Once every year take or send your saw to a Black & Decker service center, or authorized service station, for a complete cleaning, inspection and lubrication. Tools "out of service" for long periods should be relubricated before being put back to work.
MOTOR
Be sure your power supply agrees with nameplate marking. 120 Volts AC only means your tool will operate on standard 60 Hz household power. Do not operate AC tools on DC. A rating of 120 volts AC/DC means that you tool will operate on standard 60 Hz AC or DC power. This information is printed on the nameplate. Lower voltage will cause loss of power and can result in
SAVE THESE INSTRUCTIONS
OPERATION
![]() CAUTION: For your own safety, do not connect the machine to the power source until the machine is completely assembled and you read and understand the entire instruction manual.
CAUTION: For your own safety, do not connect the machine to the power source until the machine is completely assembled and you read and understand the entire instruction manual.
![]() WARNING: Always wear eye protection while operating this power tool.
WARNING: Always wear eye protection while operating this power tool.
NOTE: Before cutting any type of material, be sure it is firmly anchored or clamped to pre- vent slipping.
•Place blade lightly against work to be cut.
•Switch on saw motor before applying pressure.
•![]() WARNING: LACERATION HAZARD. Never hold and use the product with your fingers wrapped around shoe adjustment button. Always hold saw firmly with both hands while cutting as shown in Figure 1 or , if you prefer, use the auxilary handle. Whenever possible, the saw shoe must be held firmly against the material being cut.
WARNING: LACERATION HAZARD. Never hold and use the product with your fingers wrapped around shoe adjustment button. Always hold saw firmly with both hands while cutting as shown in Figure 1 or , if you prefer, use the auxilary handle. Whenever possible, the saw shoe must be held firmly against the material being cut.
This will prevent the saw from jumping or vibrating and minimize blade breakage.
AUXILIARY HANDLE (FIGURE 2)
The auxiliary handle offers a greater choice of gripping positions. 8 clamping locations are available for auxiliary handle placement.
![]() CAUTION: TURN OFF AND UNPLUG SAW.
CAUTION: TURN OFF AND UNPLUG SAW.
ATTACHING THE AUXILIARY HANDLE TO THE SAW:
•Wrap the handle and strap around the forward gripping area of the saw (shown in figure 2A).
•Be certain the handle and strap indexing features are fully engaged in the matching saw positions.
•Hook the clamp and strap together and press the clamp lever to the handle to securely latch the handle as shown in figure 2B.
•Check to ensure the handle is secure before cutting.
REMOVING THE AUXILIARY HANDLE.
•Lift lever and unhook clamp from strap.
•Separate and remove the handle and strap from the saw
SWITCH (ON-OFF) (FIGURE 3)
Depress the trigger switch to turn tool “ON”. Releasing the trigger turns the tool “OFF” NOTE: This tool has no provision to lock the switch in the ON position, and should never be locked in the ON position by any other means.
VARIABLE SPEED SELECTOR WHEEL (FIGURE 4)
The variable speed selector wheel offers a choice of speeds for greatly improved cutting rates in various materials. To select a slower speed for operating the saw, rotate the wheel to a low number on the dial. To select a higher speed, rotate the wheel to a higher number.
BLADE CLAMP RELEASE LEVER (FIGURE 5)
![]() CAUTION: LACERATION HAZARD. TURN OFF AND UNPLUG FROM POWER SUPPLY WHEN CHANGING BLADES.
CAUTION: LACERATION HAZARD. TURN OFF AND UNPLUG FROM POWER SUPPLY WHEN CHANGING BLADES.
To install blade into saw:
1.Lift the blade clamp release lever to its full open position as shown in Figure 5.
2.Insert blade shank from the front locating hole in blade over pin on reciprocating shaft.
3.Close blade clamp release lever.
4.Check to ensure blade is secure before cutting.
To remove blade from saw:
1.Open blade clamp release lever to its full open position.
2.Remove blade.
ADJUSTABLE SHOE (FIGURE 6)
![]() CAUTION: TURN OFF AND UNPLUG SAW.
CAUTION: TURN OFF AND UNPLUG SAW.
The shoe will adjust to limit the depth of cut. Hold the saw with the underside facing up. Push the button (shown in Figure 6) on the hand grip and slide the shoe out to one of the three settings and release the button.
IMPORTANT: To assure product SAFETY and RELIABILITY, repairs, maintenance and adjustment should be performed by authorized service centers or other qualified service personnel, always using identical replacement parts
ACCESSORIES
BLADES
The saw will accept up to a 12 inch long blade. Always use the shortest blade suitable for your project but long enough to keep the blade cutting through the material. Longer blades are more likely to be bent or damaged during use. During operation some longer blades may vibrate or shake if the saw is not kept in contact with the workpiece.
PRUNING ATTACHMENT
A pruning attachment is also available for use with your Reciprocating Saw. This accessory attaches to the shoe of the saw and applies spring loaded pressure to the branch while cutting.
Recommended accessories for use with your saw are available from your local dealer or authorized service center. If you need assistance regarding accessories, please call:
![]() WARNING: The use of any accessory not recommended for use with this tool could be hazardous.
WARNING: The use of any accessory not recommended for use with this tool could be hazardous.
Troubleshooting
Problem | Possible Cause | Possible Solution |
• Unit will not start. | • Cord not plugged in. | • Plug in cord. |
| • Circuit fuse is blown. | • Replace circuit |
|
| fuse. |
| • Circuit breaker is tripped. | • Reset circuit |
|
| breaker. |
| • Cord or switch is damaged. | • Have cord or |
|
| switch replaced at |
|
| Black &Decker |
|
| Service Center or |
|
| Authorized Servicer |
For assistance with your product, visit our website www.black&decker.com for the location of the service center nearest you or call the BLACK & DECKER help line at
SERVICE INFORMATION
Black & Decker offers a full network of
Black & Decker location nearest you. To find your local service location, refer to the yellow page directory under
FULL TWO YEAR WARRANTY
Black & Decker (U.S.) Inc. warrants this product for two years against any defects in material or workmanship. The defective product will be replaced or repaired at no charge in either of two ways.
The first, which will result in exchanges only, is to return the product to the retailer from whom it was purchased (provided that the store is a participating retailer). Returns should be made within the time period of the retailer’s policy for exchanges (usually 30 to 90 days after the sale). Proof of purchase may be required. Please check with the retailer for their specific return policy regarding returns that are beyond the time set for exchanges.
The second option is to take or send the product (prepaid) to a Black & Decker owned or authorized Service Center for repair or replacement at our option. Proof of purchase may be required. Black & Decker owned and authorized Service Centers are listed under
This warranty does not apply to accessories. This warranty gives you specific legal rights and you may have other rights which vary from state to state. Should you have any questions, contact the manager of your nearest Black & Decker Service Center.
Free warning label replacement: If your warning labels become illegible or are missing, call
SPECIAL WARRANTY NOTE TO CONTRACTORS:
FIRESTORMTM branded products are offered as high end consumer home use tools and carry a HOME USE WARRANTY. These tools are designed, manufactured and tested to meet or exceed the needs of the
OUR WARRANTY.
Black & Decker (U.S.) Inc., | See | |
701 | E. Joppa Rd. | – Yellow Pages – |
Towson, | MD 21286 U.S.A. | for Service & Sales |