BEFORE RETURNING THIS PRODUCT
FOR ANY REASON PLEASE CALL
1-800-54-HOW-TO (544-6986)
IF YOU SHOULD EXPERIENCE A PROBLEM
WITH YOUR BLACK & DECKER PRODUCT,
CALL 1-800-54-HOW-TO (544-6986).
BEFORE YOU CALL, HAVE THE FOLLOWING INFORMATION
AVAILABLE, CATALOG NO., TYPE NO., AND DATE CODE.
IN MOST CASES, A BLACK & DECKER REPRESENTATIVE CAN RESOLVE YOUR PROBLEM OVER THE PHONE. IF YOU HAVE A SUGGESTION OR COMMENT, GIVE US A CALL. YOUR FEEDBACK IS VITAL TO BLACK & DECKER.
KEY INFORMATION YOU SHOULD KNOW:
•Attach guard before trimming or edging. •Angle tool slightly (10° to 30°) when trimming. •Use only .065” diameter line.
•This is an automatic feed trimmer – do not bump head against ground.
SAVE THIS MANUAL FOR FUTURE REFERENCE.
Cat No. GH400, GH500 | Form No. 264713-04 REV. 4 | (NOV ‘03) |
Copyright © 2003 Black & Decker | Printed in Mexico |
WARNING: IMPORTANT SAFETY WARNINGS
AND INSTRUCTIONS
TO REDUCE RISK OF INJURY:
•Before any use, be sure everyone using this tool reads and understands all safety instructions and other information contained in this manual.
•Save these instructions and review frequently prior to use and in instructing others.
• WARNING: When using electric gardening appliances, basic safety precautions should always be followed to reduce risk of fire, electric shock, and personal injury, including the following:
• WARNING: Some dust created by this product contains chemicals known to the State of California to cause cancer, birth defects or other reproductive harm. Some examples of these chemicals are:
•compounds in fertilizers
•compounds in insecticides, herbicides and pesticides
•arsenic and chromium from chemically treated lumber
To reduce your exposure to these chemicals, wear approved safety equipment such as dust masks that are specially designed to filter out microscopic particles.
•  WARNING: This product contains chemicals, including lead, known to the State of California to cause cancer, and birth defects or other reproductive harm. Wash hands after handling.
 CAUTION: Wear appropriate personal hearing protection during use. Under some conditions and duration of use, noise from this product may contribute to hearing loss.
 GENERAL SAFETY WARNINGS AND INSTRUCTIONS FOR ALL TOOLS
• ALWAYS WEAR EYE PROTECTION – Wear safety spectacles or goggles at all times |
when this tool is plugged in. |
• GUARD – Do not use this tool without guard attached. |
• DRESS PROPERLY – Do not wear loose clothing or jewelry. They can be caught in |
moving parts. Rubber gloves and substantial rubber soled footwear are recommended |
when working outdoors. Don’t operate the tool when barefoot or wearing open sandals. |
Wear long pants to protect your legs. Wear protective hair covering to contain long hair. |
• NYLON LINE – Keep face, hands and feet clear of rotating nylon line at all times. |
• THE ROTATING LINE PERFORMS A CUTTING FUNCTION – Use care when trimming |
around screens and desirable plantings. |
• KEEP ALL BY-STANDERS AWAY – At a safe distance from work area, especially |
children. |
• IMPORTANT WARNING – When being used as an Edger, stones, pieces of metal and |
other objects can be thrown out at high speed by the line. The tool and guard are |
designed to reduce the danger. However, the following special precautions should be |
taken: |
• MAKE SURE that other persons and pets are at least 100 feet away. |
• TO REDUCE THE RISK of rebound (ricochet) injury, work going away from any nearby |
solid object such as wall, steps, large stone, tree, etc. Use great care when working close |
Figure 1
Figure 3
Cut-off Blade
Lame de coupe
Cuchilla de corte
Figure 6
Figure 8
| Figure 2 | Rotate 90º |
| Faire pivoter sur 90º |
| |
| | Gire 90º |
| Raised Lug | |
| Borne | |
| Ceja | |
Figure 4
Figure 5
Figure 7
Tomas de aire
ASSEMBLY / ADJUSTMENT SET-UP
•  WARNING: The guard must always be on the tool to protect the user.
NEVER OPERATE TOOL WITHOUT GUARD FIRMLY IN PLACE. Unplug the tool before attempting to attach the guard.
1.Attach edge guide to guard, as shown in Figure 1.
2.Press the guard against the motor housing, as shown in Figure 2 and rotate the guard 90 degrees clockwise until you hit a stop on the housing.
3.With the guard installed, insert the screw, (see figure 3) through the hole in the guard and into the bottom of the Trimmer housing. Tighten the screw. The screw will firmly retain the guard to your trimmer.
4.The guard is not intended to be removed.
5.Secure the extension cord with cord retainer as shown in Figures 4 and 5.
6.The auxiliary handle can be located all around the tube and all the way up and down. Simply loosen the knob and position the handle as desired.
OPERATING INSTRUCTIONS
• CAUTION: ALWAYS WEAR EYE PROTECTION
• CAUTION: Inspect area to be trimmed and remove any wire, cord, or string-like objects which could become entangled in the rotating line or spool. Be particularly careful to avoid any wire which might be bent outwardly into the path of the tool, such as barbs at the base of a chain link fence.
1.Angle unit as shown in Figure 6.
2.Slowly swing trimmer side to side, as shown in Figure 7.
3.To convert for maintenance edging (Figure 8) unplug from power source, depress conversion button and rotate the motor housing.
4.When the button snaps back into place the tool is locked in the edger position.
5.Return to trimming position by unplugging the tool, depressing the button and rotating back.
6.To operate as a maintenance edger, position tool above sidewalk, as shown in Figure 9. Rest edge guide as shown in Figure 9.
7.The GH500 is equipped for height adjustment, as shown in Figure 10.
Cutting Line
LINE FEEDING
Your trimmer uses .065” (1.65 mm) diameter nylon line to cut grass and weeds quickly and easily. In time, the tip of the nylon line will become frayed and worn and the special self feeding line hub will automatically feed and trim a fresh length of line.
Of course cutting line will wear faster and require more feeding if the cutting is done along sidewalks or other abrasive surfaces or heavier weeds are being cut. The advanced automatic line feeding mechanism senses when more cutting line is needed and feeds and trims the correct length of line whenever its required. You don’t even have to think about it. Do not bump unit on ground in attempt to feed line or for any other purposes.
CLEARING JAMS AND TANGLED LINES
From time to time, especially when cutting thick or stalky weeds, the line feeding hub may become clogged with sap or other material and the line will become jammed as a result. To clear the jam, follow the steps listed below.
1.Unplug the trimmer.
2.Press the release tabs on the line hub cover, as shown in Figure 11 and remove the cover by pulling it straight off.
3.Lift the spool of nylon line out of the hub and clear any broken line or cutting debris from the spool area. (If you plan to replace the spool or rewind it, this is the place to do so, otherwise, move on.)
4.Unwrap about one foot (30 cm) of line to ensure that it’s undamaged. If it is OK rewind it and insert the line end through the eyelet in the spool hub as shown in Figure 12. Pull the line through the hole to maintain tension while placing the spool down into the hub with the arrow up, as shown in Figure 13.
5.Press the spool down GENTLY and rotate it until you feel it drop into place. (When in place, the spool will turn a few degrees left and right freely). Take care to keep the line from becoming trapped under the spool.
6.Snap the hub cover back on, and turn the tool on. In a few seconds or less you’ll hear the nylon line being cut automatically to the proper length.
REWINDING SPOOL FROM BULK LINE
Bulk line for your trimmer/edger is available at extra cost from your local dealer or Black & Decker Service Center. To install bulk line, follow the steps below.
1. | Perform steps 1 and 2 above. |
2. | Remove the spool from the tool and remove and discard all line on the spool. |
3. | Insert one end of the bulk line into the hole in the spool shown in Figure 14 about 1/2” |
IMPORTE LA RAISON PRIÈRE DE COMPOSER
1 800 544-6986
RENSEIGNEMENTS IMPORTANTS
•Fixer le protecteur avant d’utiliser le coupe-bordure.
•Incliner légèrement l’outil (de 10° à 30°) pendant la coupe.
•Utiliser seulement du fil de 1,65 mm (0,065 po) de diamètre.
•L’alimentation du coupe-bordure est automatique; il ne faut pas en frapper la tête contre le sol.
CONSERVER LE PRÉSENT GUIDE À TITRE DE RÉFÉRENCE.
AVERTISSEMENT : IMPORTANTES MESURES DE SÉCURITÉ
AFIN DE RÉDUIRE LES RISQUES DE BLESSURES
•Avant toute utilisation, s’assurer que tous ceux qui se servent de l’outil lisent et comprennent toutes les mesures de sécurité et tout autre renseignement contenus dans le présent guide.
•Conserver ces mesures et les relire fréquemment avant d’utiliser l’outil et d’en expliquer le fonctionnement à d’autres personnes.
•  AVERTISSEMENT : Afin de réduire les risques d’incendie, de secousses électriques ou de blessures lorsqu’on utilise des outils de jardinage électriques, il faut toujours respecter les mesures de sécurité suivantes.
•  AVERTISSEMENT : Le produit génère de la poussière qui peut renfermer des produits chimiques. Selon l’état de la Californie, ces produits chimiques peuvent causer le cancer ainsi que des malformations congénitales, et ils présentent d’autres dangers au système reproductif humain. Voici des exemples de tels produits chimiques :
•les composés d’engrais;
•les composés d’insecticides, d’herbicides et de pesticides;
•l’arsenic et le chrome provenant de bois traité.
Afin de minimiser les risques, porter de l’équipement de sécurité approuvé comme des masques antipoussières spécialement conçu pour filtrer les particules microscopiques.
•  AVERTISSEMENT : Le produit renferme des produits chimiques, dont du plomb. Selon l’état de la Californie, ce produit chimique peut causer le cancer ainsi que des malformations congénitales, et il présente d’autres dangers au système reproductif humain. Se laver les mains après l’utilisation.
 MISE EN GARDE : Porter un dispositif approprié de protection de l’ouïe lors de l’utilisation
du produit. Dans certaines conditions et durées d’utilisation, le produit peut émettre un niveau de bruit provoquant la perte de l’ouïe.
LIRE TOUTES LES DIRECTIVES.
MESURES DE SÉCURITÉ POUR TOUS LES OUTILS
• TOUJOURS PORTER DES LUNETTES DE SÉCURITÉ. – Porter de lunettes de sécurité en |
tout temps lorsque l’outil est branché. |
• PROTECTEUR – Ne pas utiliser l’outil lorsque le protecteur n’est pas en place. |
• PORTER DES VÊTEMENTS APPROPRIÉS. – Éviter de porter des vêtements amples et des |
bijoux qui peuvent être happés par les pièces en mouvement. Il est conseillé de porter des |
gants en caoutchouc et des chaussures robustes à semelle en caoutchouc lorsqu’on travaille à |
l’extérieur. Ne pas se servir de l’outil pieds nus ou lorsqu’on porte des sandales ouvertes. |
Porter des pantalons pour se protéger les jambes. Protéger la chevelure si elle longue. |
• FIL DE NYLON – Éloigner en tout temps le visage, les mains et les pieds du fil en mouvement. |
• LE FIL ROTATIF SERT À COUPER. – Manipuler l’outil avec soin autour de moustiquaires et |
de plantes à conserver. |
• ÉLOIGNER LES OBSERVATEURS. – S’assurer qu’ils se trouvent à une distance sûre de la |
zone de coupe, particulièrement les enfants. |
• AVERTISSEMENT IMPORTANT – Lorsque l’outil sert à tailler le rebord des pelouses, le fil |
peut projeter des pierres, des morceaux de métaux ou tout autre objet à grande vitesse. |
L’outil et le protecteur sont conçus pour minimiser ce risque. Il faut toutefois prendre les |
mesures de précaution suivantes. |
• S’ASSURER que les observateurs et les animaux domestiques se trouvent à plus de 30,5 m |
(100 pi) de la zone de coupe. |
• AFIN DE RÉDUIRE LES RISQUES de blessures dues aux rebonds (ricochets), manipuler |
l’outil en s’éloignant de tout objet comme un mur, des marches, une grosse roche ou un |
arbre. Prendre garde lorsqu’on coupe près d’un tel objet et, le cas échéant, tailler la bordure |
à la main. |
• ÉVITER LES DÉMARRAGES ACCIDENTELS. – Ne pas transporter l’outil branché avec le |
doigt sur l’interrupteur. |
• NE JAMAIS FORCER L’OUTIL. Afin d’obtenir un rendement sûr et efficace, utiliser l’outil à |
son rendement nominal. |
• UTILISER L’OUTIL APPROPRIÉ. – Utiliser l’outil seulement aux fins pour lesquelles il a été |
conçu. |
• NE PAS DÉPASSER SA PORTÉE. – Toujours demeurer dans une position stable et garder |
• DISCONNECT TOOL – When not in use, when replacing line, or prior to cleaning. |
• AVOID DANGEROUS ENVIRONMENTAL CONDITIONS – Do not use electric tools in |
| damp or wet locations. Follow all instructions in this Instruction Manual for proper |
| operation of your tool. Don’t use the tool in the rain. |
• DO NOT OPERATE portable electric tools in gaseous or explosive atmospheres. Motors |
| in these tools normally spark, and the sparks might ignite fumes. |
• STORE IDLE TOOLS INDOORS – When not in use, tools should be stored indoors in a |
| dry, locked-up place out of reach of children. |
• GROUND FAULT CIRCUIT INTERRUPTER (GFCI) protection should be provided on the |
| circuits or outlets to be used for the gardening appliance. Receptacles are available |
| having built in GFCI protection and may be used for this measure of protection. |
• SECURE EXTENSION CORD using the cord retainer shown in Figures 4 and 5. |
• STAY ALERT – Watch what you are doing. Use common sense. Do not operate tool when |
| you are tired. |
• | MAINTAIN APPLIANCES WITH CARE – Follow instructions for lubricating and |
| changing accessories. Inspect extension cords periodically and replace if damaged. Keep |
| handles dry, clean and free from oil and grease. |
• CHECK DAMAGED PARTS – Before further use of the appliance, a guard or other part |
| that is damaged should be carefully checked to determine that it will operate properly and |
| perform its intended function. Check for alignment of moving parts, binding of |
| moving parts, breakage of parts, mounting, and any other condition that may affect its |
| operation. A guard or other part that is damaged should be properly repaired or replaced |
| by an authorized service center unless otherwise indicated elsewhere in this manual. |
• | WARNING: When servicing double insulated tools, USE ONLY IDENTICAL |
| REPLACEMENT PARTS. Replace or repair damaged cords. |
• | WARNING: | To prevent electrical shock hazard, use only with an extension cord |
| | suitable for outdoor use. Always connect extension cords to a fused |
| | line or one protected by a circuit breaker. |
 SAFETY WARNINGS AND INSTRUCTIONS: POLARIZED PLUGS
To reduce the risk of electric shock, this equipment has a polarized plug (one blade is wider than the other) and will require the use of a polarized extension cord. The appliance plug will fit into a polarized extension cord only one way. If the plug does not fit fully into the extension cord, reverse the plug. If the plug still does not fit, obtain a correct polarized extension cord. A polarized extension cord will require the use of a polarized wall outlet. This plug will fit into the polarized wall outlet only one way. If the plug does not fit fully into the wall outlet, reverse the plug. If the plug still does not fit, contact a qualified electrician to install the proper wall outlet. Do not change the equipment plug, extension cord receptacle, or extension cord plug in any way.
 SAFETY WARNINGS AND INSTRUCTIONS: EXTENSION CORDS
Make sure your extension cord is in good condition. When using an extension cord, be sure to use one heavy enough to carry the current your product will draw. An undersized cord will cause a drop in line voltage resulting in loss of power and overheating. The table shows the correct size to use depending on cord length and nameplate ampere rating. If in doubt, use the next heavier gauge. The smaller the gauge number, the heavier the cord. If the extension will be used outside, the cord must be suitable for outdoor work. The letters “WA” on the cord jacket indicate that the cord is suitable for outdoor use.
Figure 12 Cutting Line
Fil tranchant
Linea de Corte
Figure 14
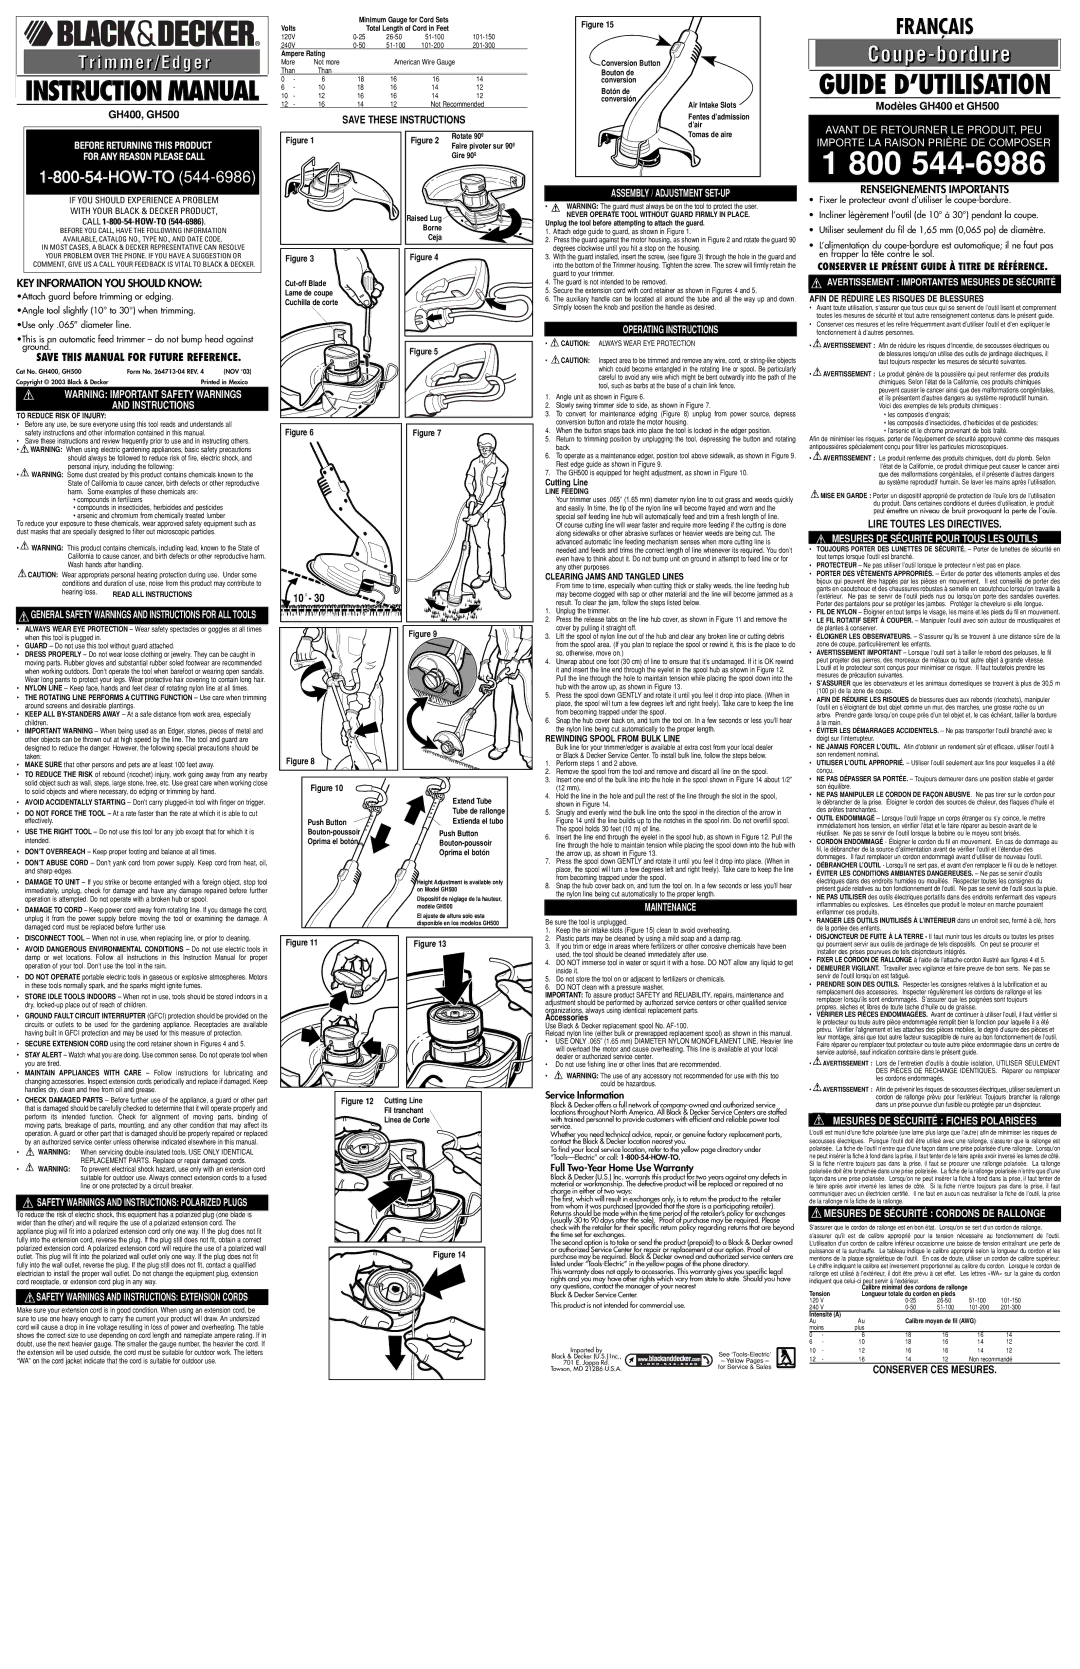
1.Keep the air intake slots (Figure 15) clean to avoid overheating.
2.Plastic parts may be cleaned by using a mild soap and a damp rag.
3.If you trim or edge in areas where fertilizers or other corrosive chemicals have been used, the tool should be cleaned immediately after use.
4.DO NOT immerse tool in water or squirt it with a hose. DO NOT allow any liquid to get inside it.
5.Do not store the tool on or adjacent to fertilizers or chemicals.
6.DO NOT clean with a pressure washer.
IMPORTANT: To assure product SAFETY and RELIABILITY, repairs, maintenance and adjustment should be performed by authorized service centers or other qualified service organizations, always using identical replacement parts.
Accessories
Use Black & Decker replacement spool No. AF-100.
Reload nylon line (either bulk or prewrapped replacement spool) as shown in this manual.
•USE ONLY .065” (1.65 mm) DIAMETER NYLON MONOFILAMENT LINE. Heavier line will overload the motor and cause overheating. This line is available at your local dealer or authorized service center.
•Do not use fishing line or other lines that are recommended.
• WARNING: The use of any accessory not recommended for use with this too could be hazardous.
Service Information
Black & Decker offers a full network of company-owned and authorized service locations throughout North America. All Black & Decker Service Centers are staffed with trained personnel to provide customers with efficient and reliable power tool service.
Whether you need technical advice, repair, or genuine factory replacement parts, contact the Black & Decker location nearest you.
To find your local service location, refer to the yellow page directory under “Tools—Electric” or call: 1-800-54-HOW-TO.
Full Two-Year Home Use Warranty
Black & Decker (U.S.) Inc. warrants this product for two years against any defects in material or workmanship. The defective product will be replaced or repaired at no charge in either of two ways:
The first, which will result in exchanges only, is to return the product to the retailer from whom it was purchased (provided that the store is a participating retailer). Returns should be made within the time period of the retailer’s policy for exchanges (usually 30 to 90 days after the sale). Proof of purchase may be required. Please check with the retailer for their specific return policy regarding returns that are beyond the time set for exchanges.
The second option is to take or send the product (prepaid) to a Black & Decker owned or authorized Service Center for repair or replacement at our option. Proof of purchase may be required. Black & Decker owned and authorized service centers are listed under “Tools-Electric” in the yellow pages of the phone directory.
This warranty does not apply to accessories. This warranty gives you specific legal rights and you may have other rights which vary from state to state. Should you have any questions, contact the manager of your nearest
Black & Decker Service Center.
This product is not intended for commercial use.
Imported by | | See ‘Tools-Electric’ |
Black & Decker (U.S.) Inc., | |
701 E. Joppa Rd. | | – Yellow Pages – |
Towson, MD 21286 U.S.A. | | for Service & Sales |
de la portée des enfants. |
• DISJONCTEUR DE FUITE À LA TERRE - Il faut munir tous les circuits ou toutes les prises |
qui pourraient servir aux outils de jardinage de tels dispositifs. On peut se procurer et |
installer des prises pourvues de tels disjoncteurs intégrés. |
• FIXER LE CORDON DE RALLONGE à l’aide de l’attache-cordon illustré aux figures 4 et 5. |
• DEMEURER VIGILANT. Travailler avec vigilance et faire preuve de bon sens. Ne pas se |
servir de l’outil lorsqu’on est fatigué. |
• PRENDRE SOIN DES OUTILS. Respecter les consignes relatives à la lubrification et au |
remplacement des accessoires. Inspecter régulièrement les cordons de rallonge et les |
remplacer lorsqu’ils sont endommagés. S’assurer que les poignées sont toujours |
propres, sèches et libres de toute tache d’huile ou de graisse. |
• VÉRIFIER LES PIÈCES ENDOMMAGÉES. Avant de continuer à utiliser l’outil, il faut vérifier si |
le protecteur ou toute autre pièce endommagée remplit bien la fonction pour laquelle il a été |
prévu. Vérifier l’alignement et les attaches des pièces mobiles, le degré d’usure des pièces et |
leur montage, ainsi que tout autre facteur susceptible de nuire au bon fonctionnement de l’outil. |
Faire réparer ou remplacer tout protecteur ou toute autre pièce endommagée dans un centre de |
service autorisé, sauf indication contraire dans le présent guide. |
•  AVERTISSEMENT : Lors de l’entretien d’outils à double isolation, UTILISER SEULEMENT DES PIÈCES DE RECHANGE IDENTIQUES. Réparer ou remplacer les cordons endommagés.
•  AVERTISSEMENT : Afin de prévenir les risques de secousses électriques, utiliser seulement un cordon de rallonge prévu pour l’extérieur. Toujours brancher la rallonge dans un prise pourvue d’un fusible ou protégée par un disjoncteur.
MESURES DE SÉCURITÉ : FICHES POLARISÉES
L’outil est muni d’une fiche polarisée (une lame plus large que l’autre) afin de minimiser les risques de secousses électriques. Puisque l’outil doit être utilisé avec une rallonge, s’assurer que la rallonge est polarisée. La fiche de l’outil n’entre que d’une façon dans une prise polarisée d’une rallonge. Lorsqu’on ne peut insérer la fiche à fond dans la prise, il faut tenter de le faire après avoir inversé les lames de côté. Si la fiche n’entre toujours pas dans la prise, il faut se procurer une rallonge polarisée. La rallonge polarisée doit être branchée dans une prise polarisée. La fiche de la rallonge polarisée n’entre que d’une façon dans une prise polarisée. Lorsqu’on ne peut insérer la fiche à fond dans la prise, il faut tenter de le faire après avoir inversé les lames de côté. Si la fiche n’entre toujours pas dans la prise, il faut communiquer avec un électricien certifié. Il ne faut en aucun cas neutraliser la fiche de l’outil, la prise de la rallonge ni la fiche de la rallonge.
 MESURES DE SÉCURITÉ : CORDONS DE RALLONGE
S’assurer que le cordon de rallonge est en bon état. Lorsqu’on se sert d’un cordon de rallonge, s’assurer qu’il est de calibre approprié pour la tension nécessaire au fonctionnement de l’outil. L’utilisation d’un cordon de calibre inférieur occasionne une baisse de tension entraînant une perte de puissance et la surchauffe. Le tableau indique le calibre approprié selon la longueur du cordon et les mentions de la plaque signalétique de l’outil. En cas de doute, utiliser un cordon de calibre supérieur. Le chiffre indiquant le calibre est inversement proportionnel au calibre du cordon. Lorsque le cordon de rallonge est utilisé à l’extérieur, il doit être prévu à cet effet. Les lettres «WA» sur la gaine du cordon
indiquent que celui-ci peut servir à l’extérieur. | | | |
| | Calibre minimal des cordons de rallonge | | |
Tension | Longueur totale du cordon en pieds | | |
120 V | | 0-25 | 26-50 | 51-100 | 101-150 |
240 V | | 0-50 | 51-100 | 101-200 | 201-300 |
Intensité (A) | | Calibre moyen de fil (AWG) | |
Au | | Au | |
moins | plus | | | | |
0 | - | 6 | 18 | 16 | 16 | 14 |
6 | - | 10 | 18 | 16 | 14 | 12 |
10 | - | 12 | 16 | 16 | 14 | 12 |
12 | - | 16 | 14 | 12 | Non recommandé |
CONSERVER CES MESURES.