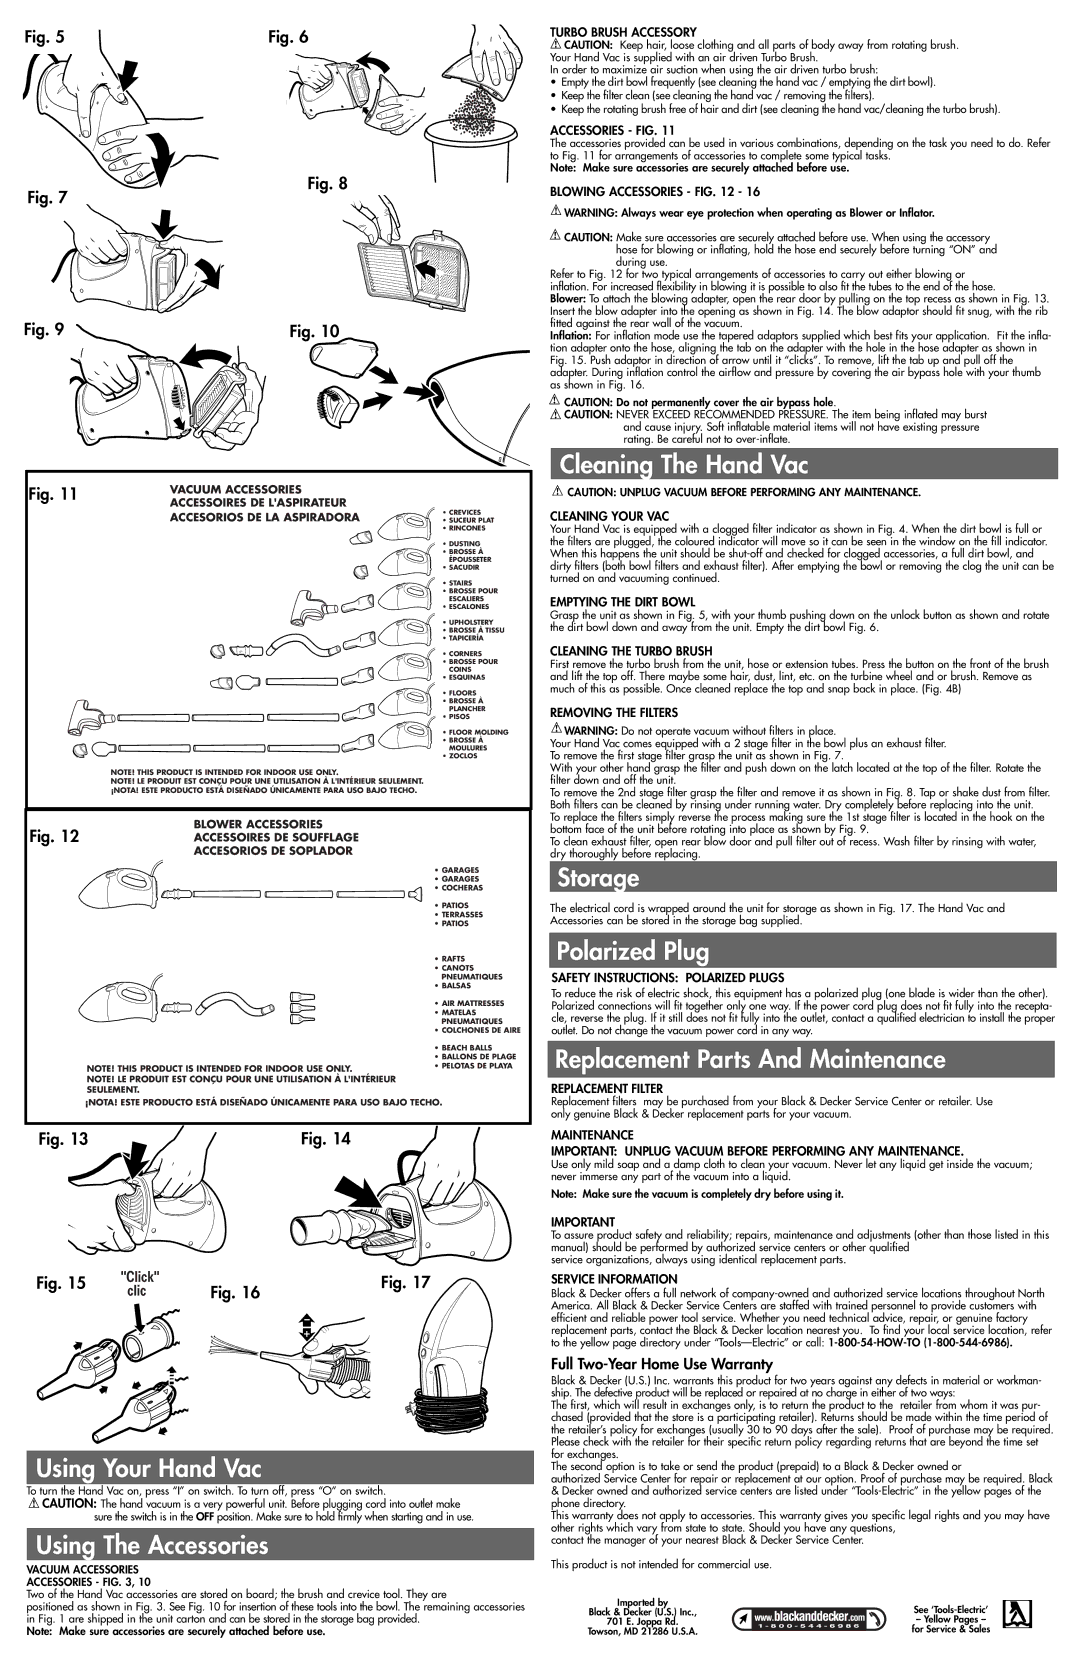
Fig. 5 |
| Fig. 6 |
|
|
|
TURBO BRUSH ACCESSORY
![]() CAUTION: Keep hair, loose clothing and all parts of body away from rotating brush. Your Hand Vac is supplied with an air driven Turbo Brush.
CAUTION: Keep hair, loose clothing and all parts of body away from rotating brush. Your Hand Vac is supplied with an air driven Turbo Brush.
In order to maximize air suction when using the air driven turbo brush:
•Empty the dirt bowl frequently (see cleaning the hand vac / emptying the dirt bowl).
•Keep the filter clean (see cleaning the hand vac / removing the filters).
•Keep the rotating brush free of hair and dirt (see cleaning the hand vac/cleaning the turbo brush).
ACCESSORIES - FIG. 11
The accessories provided can be used in various combinations, depending on the task you need to do. Refer to Fig. 11 for arrangements of accessories to complete some typical tasks.
Note: Make sure accessories are securely attached before use.
Fig. 7
Fig. 8
BLOWING ACCESSORIES - FIG. 12 - 16
![]() WARNING: Always wear eye protection when operating as Blower or Inflator.
WARNING: Always wear eye protection when operating as Blower or Inflator.
![]() CAUTION: Make sure accessories are securely attached before use. When using the accessory hose for blowing or inflating, hold the hose end securely before turning “ON” and during use.
CAUTION: Make sure accessories are securely attached before use. When using the accessory hose for blowing or inflating, hold the hose end securely before turning “ON” and during use.
Refer to Fig. 12 for two typical arrangements of accessories to carry out either blowing or inflation. For increased flexibility in blowing it is possible to also fit the tubes to the end of the hose.
Fig. 9 | Fig. 10 |
|
|
Fig. 11 | VACUUM ACCESSORIES |
|
ACCESSOIRES DE L'ASPIRATEUR |
| |
| • CREVICES | |
| ACCESORIOS DE LA ASPIRADORA | |
| • SUCEUR PLAT | |
|
| • RINCONES |
|
| • DUSTING |
|
| • BROSSE À |
|
| ÉPOUSSETER |
|
| • SACUDIR |
|
| • STAIRS |
|
| • BROSSE POUR |
|
| ESCALIERS |
|
| • ESCALONES |
|
| • UPHOLSTERY |
|
| • BROSSE À TISSU |
|
| • TAPICERÍA |
|
| • CORNERS |
|
| • BROSSE POUR |
|
| COINS |
|
| • ESQUINAS |
|
| • FLOORS |
|
| • BROSSE À |
|
| PLANCHER |
|
| • PISOS |
|
| • FLOOR MOLDING |
|
| • BROSSE À |
|
| MOULURES |
|
| • ZOCLOS |
NOTE! THIS PRODUCT IS INTENDED FOR INDOOR USE ONLY.
NOTE! LE PRODUIT EST CONÇU POUR UNE UTILISATION À L'INTÉRIEUR SEULEMENT. ¡NOTA! ESTE PRODUCTO ESTÁ DISEÑADO ÚNICAMENTE PARA USO BAJO TECHO.
Blower: To attach the blowing adapter, open the rear door by pulling on the top recess as shown in Fig. 13. Insert the blow adapter into the opening as shown in Fig. 14. The blow adaptor should fit snug, with the rib fitted against the rear wall of the vacuum.
Inflation: For inflation mode use the tapered adaptors supplied which best fits your application. Fit the infla- tion adapter onto the hose, aligning the tab on the adapter with the hole in the hose adapter as shown in Fig. 15. Push adaptor in direction of arrow until it “clicks”. To remove, lift the tab up and pull off the adapter. During inflation control the airflow and pressure by covering the air bypass hole with your thumb as shown in Fig. 16.
![]() CAUTION: Do not permanently cover the air bypass hole.
CAUTION: Do not permanently cover the air bypass hole.
![]() CAUTION: NEVER EXCEED RECOMMENDED PRESSURE. The item being inflated may burst and cause injury. Soft inflatable material items will not have existing pressure rating. Be careful not to
CAUTION: NEVER EXCEED RECOMMENDED PRESSURE. The item being inflated may burst and cause injury. Soft inflatable material items will not have existing pressure rating. Be careful not to
Cleaning The Hand Vac
![]() CAUTION: UNPLUG VACUUM BEFORE PERFORMING ANY MAINTENANCE.
CAUTION: UNPLUG VACUUM BEFORE PERFORMING ANY MAINTENANCE.
CLEANING YOUR VAC
Your Hand Vac is equipped with a clogged filter indicator as shown in Fig. 4. When the dirt bowl is full or the filters are plugged, the coloured indicator will move so it can be seen in the window on the fill indicator. When this happens the unit should be
EMPTYING THE DIRT BOWL
Grasp the unit as shown in Fig. 5, with your thumb pushing down on the unlock button as shown and rotate the dirt bowl down and away from the unit. Empty the dirt bowl Fig. 6.
CLEANING THE TURBO BRUSH
First remove the turbo brush from the unit, hose or extension tubes. Press the button on the front of the brush and lift the top off. There maybe some hair, dust, lint, etc. on the turbine wheel and or brush. Remove as much of this as possible. Once cleaned replace the top and snap back in place. (Fig. 4B)
REMOVING THE FILTERS
![]() WARNING: Do not operate vacuum without filters in place.
WARNING: Do not operate vacuum without filters in place.
Your Hand Vac comes equipped with a 2 stage filter in the bowl plus an exhaust filter. To remove the first stage filter grasp the unit as shown in Fig. 7.
With your other hand grasp the filter and push down on the latch located at the top of the filter. Rotate the filter down and off the unit.
To remove the 2nd stage filter grasp the filter and remove it as shown in Fig. 8. Tap or shake dust from filter. Both filters can be cleaned by rinsing under running water. Dry completely before replacing into the unit.
BLOWER ACCESSORIES
Fig. 12ACCESSOIRES DE SOUFFLAGE
ACCESORIOS DE SOPLADOR
NOTE! THIS PRODUCT IS INTENDED FOR INDOOR USE ONLY.
NOTE! LE PRODUIT EST CONÇU POUR UNE UTILISATION À L'INTÉRIEUR SEULEMENT.
•GARAGES
•GARAGES
•COCHERAS
•PATIOS
•TERRASSES
•PATIOS
•RAFTS
•CANOTS PNEUMATIQUES
•BALSAS
•AIR MATTRESSES
•MATELAS PNEUMATIQUES
•COLCHONES DE AIRE
•BEACH BALLS
•BALLONS DE PLAGE
•PELOTAS DE PLAYA
To replace the filters simply reverse the process making sure the 1st stage filter is located in the hook on the bottom face of the unit before rotating into place as shown by Fig. 9.
To clean exhaust filter, open rear blow door and pull filter out of recess. Wash filter by rinsing with water, dry thoroughly before replacing.
Storage
The electrical cord is wrapped around the unit for storage as shown in Fig. 17. The Hand Vac and Accessories can be stored in the storage bag supplied.
Polarized Plug
SAFETY INSTRUCTIONS: POLARIZED PLUGS
To reduce the risk of electric shock, this equipment has a polarized plug (one blade is wider than the other). Polarized connections will fit together only one way. If the power cord plug does not fit fully into the recepta- cle, reverse the plug. If it still does not fit fully into the outlet, contact a qualified electrician to install the proper outlet. Do not change the vacuum power cord in any way.
Replacement Parts And Maintenance
REPLACEMENT FILTER
¡NOTA! ESTE PRODUCTO ESTÁ DISEÑADO ÚNICAMENTE PARA USO BAJO TECHO.
Fig. 13 | Fig. 14 |
Fig. 15 | "Click" |
|
|
|
|
| Fig. 17 | ||
| clic |
| Fig. 16 |
|
|
|
| ||
|
|
|
|
|
Using Your Hand Vac
To turn the Hand Vac on, press “I” on switch. To turn off, press “O” on switch.
![]() CAUTION: The hand vacuum is a very powerful unit. Before plugging cord into outlet make sure the switch is in the OFF position. Make sure to hold firmly when starting and in use.
CAUTION: The hand vacuum is a very powerful unit. Before plugging cord into outlet make sure the switch is in the OFF position. Make sure to hold firmly when starting and in use.
Using The Accessories
VACUUM ACCESSORIES
ACCESSORIES - FIG. 3, 10
Two of the Hand Vac accessories are stored on board; the brush and crevice tool. They are
positioned as shown in Fig. 3. See Fig. 10 for insertion of these tools into the bowl. The remaining accessories in Fig. 1 are shipped in the unit carton and can be stored in the storage bag provided.
Note: Make sure accessories are securely attached before use.
Replacement filters may be purchased from your Black & Decker Service Center or retailer. Use only genuine Black & Decker replacement parts for your vacuum.
MAINTENANCE
IMPORTANT: UNPLUG VACUUM BEFORE PERFORMING ANY MAINTENANCE.
Use only mild soap and a damp cloth to clean your vacuum. Never let any liquid get inside the vacuum; never immerse any part of the vacuum into a liquid.
Note: Make sure the vacuum is completely dry before using it.
IMPORTANT
To assure product safety and reliability; repairs, maintenance and adjustments (other than those listed in this manual) should be performed by authorized service centers or other qualified
service organizations, always using identical replacement parts.
SERVICE INFORMATION
Black & Decker offers a full network of
Full Two-Year Home Use Warranty
Black & Decker (U.S.) Inc. warrants this product for two years against any defects in material or workman- ship. The defective product will be replaced or repaired at no charge in either of two ways:
The first, which will result in exchanges only, is to return the product to the retailer from whom it was pur- chased (provided that the store is a participating retailer). Returns should be made within the time period of the retailer’s policy for exchanges (usually 30 to 90 days after the sale). Proof of purchase may be required. Please check with the retailer for their specific return policy regarding returns that are beyond the time set for exchanges.
The second option is to take or send the product (prepaid) to a Black & Decker owned or
authorized Service Center for repair or replacement at our option. Proof of purchase may be required. Black
&Decker owned and authorized service centers are listed under
This warranty does not apply to accessories. This warranty gives you specific legal rights and you may have other rights which vary from state to state. Should you have any questions,
contact the manager of your nearest Black & Decker Service Center.
This product is not intended for commercial use.
Imported by |
| See |
Black & Decker (U.S.) Inc., |
| |
701 E. Joppa Rd. |
| – Yellow Pages – |
Towson, MD 21286 U.S.A. |
| for Service & Sales |
|