QUICKSTARTGUIDE - LST120/LST220
RECHARGEABLELITHIUMSTRINGTRIMMER
1) Unpack components and verify contents. LST120/LST220 contains (1) trimmer, (1) black handle, (1) guard, (1) battery (LST120) or | ||||||
(2) batteries (LST220), and (1) charger. NOTE: LST120 contains one battery. |
|
| A | |||
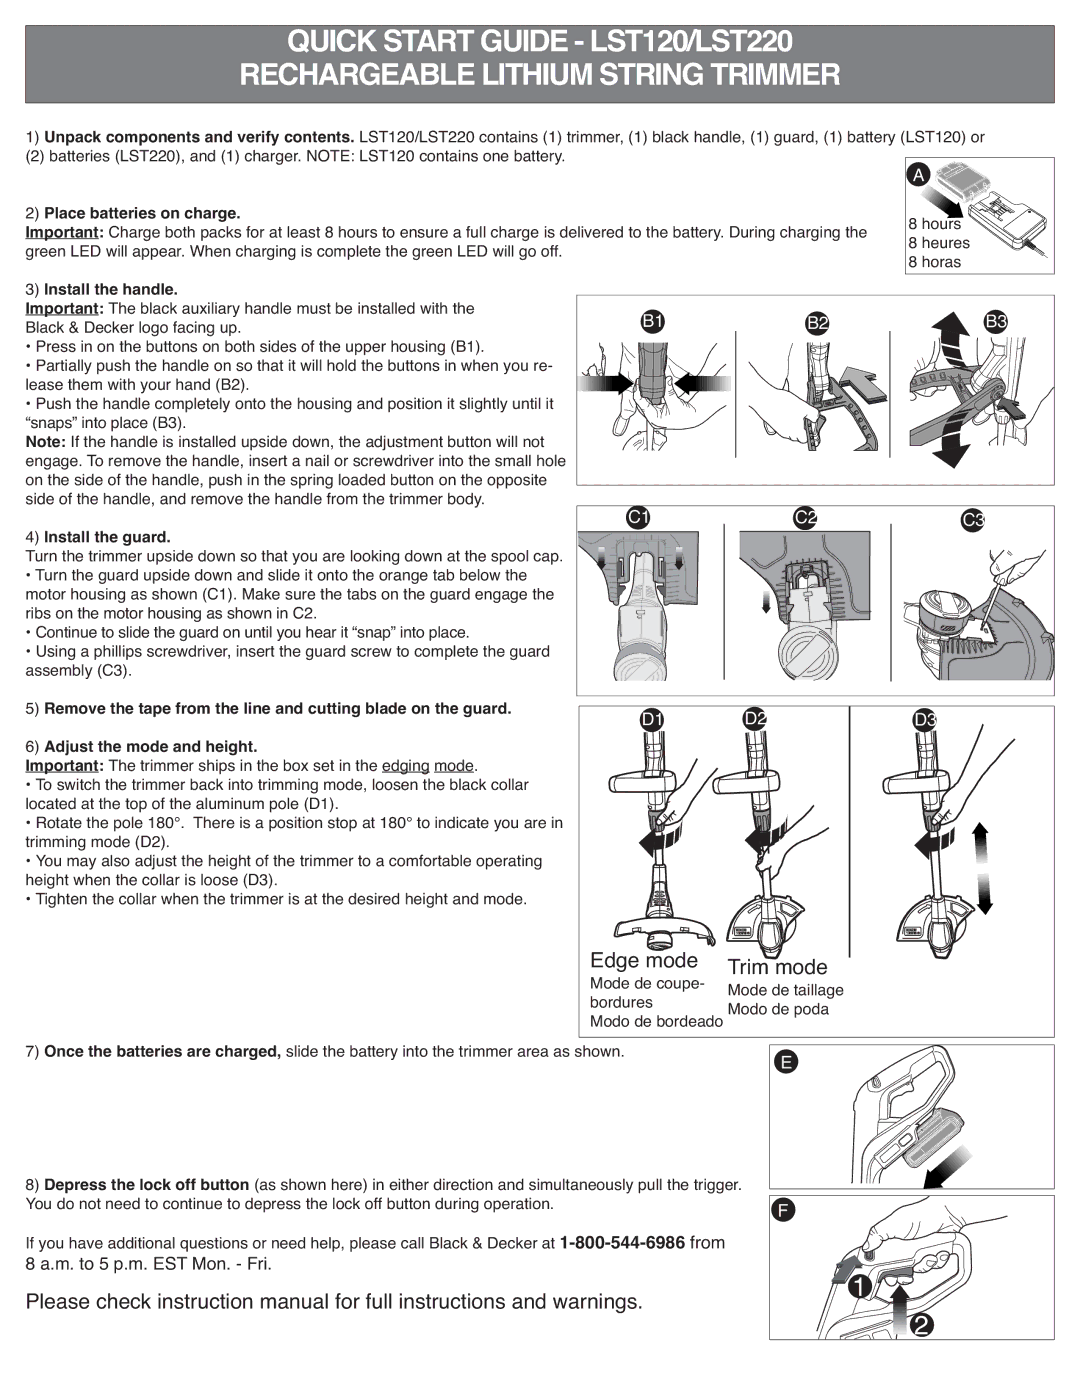
2) Place batteries on charge. |
|
|
|
| ||
|
|
|
| 8 hours | ||
Important: Charge both packs for at least 8 hours to ensure a full charge is delivered to the battery. During charging the | 8 heures | |||||
green LED will appear. When charging is complete the green LED will go off. |
|
| 8 horas | |||
3) Install the handle. |
| be installed with the |
|
|
| |
Important: The black auxiliary handle must | B1 | B2 | B3 | |||
Black & Decker logo facing up. |
|
| ||||
• Press in on the buttons on both sides of the upper housing (B1). |
|
|
| |||
• Partially push the handle on so that it will hold the buttons in when you re- |
|
|
| |||
lease them with your hand (B2). | housing and position it slightly until it |
|
|
| ||
• Push the handle completely onto the |
|
|
| |||
“snaps” into place (B3). |
| the adjustment button will not |
|
|
| |
Note: If the handle is installed upside down, |
|
|
| |||
engage. To remove the handle, insert a nail | or screwdriver into the small hole |
|
|
| ||
on the side of the handle, push in the spring | loaded button on the opposite |
|
|
| ||
side of the handle, and remove the handle from the trimmer body. |
|
| C3 | |||
4) Install the guard. |
|
|
|
|
| |
Turn the trimmer upside down so that you are looking down at the spool cap. |
|
|
| |||
• Turn the guard upside down and slide it onto the orange tab below the |
|
|
| |||
motor housing as shown (C1). Make sure the tabs on the guard engage the |
|
|
| |||
ribs on the motor housing as | shown in C2. |
|
|
|
|
|
• Continue to slide the guard on | until you hear it “snap” into place. |
|
|
| ||
• Using a phillips screwdriver, insert the guard screw to complete the guard |
|
|
| |||
assembly (C3). |
|
|
|
|
|
|
5) Remove the tape from the line and cutting blade on the guard. |
|
|
| |||
6) Adjust the mode and height. |
| edging mode. |
|
|
| |
Important: The trimmer ships in the box set in the |
|
|
| |||
• To switch the trimmer back into trimming mode, loosen | the black collar |
|
|
| ||
located at the top of the aluminum pole (D1). | to indicate you are in |
|
|
| ||
• Rotate the pole 180°. There is a position stop at 180° |
|
|
| |||
trimming mode (D2). |
|
| comfortable operating |
|
|
|
• You may also adjust the height of the trimmer to a |
|
|
| |||
height when the collar is loose (D3). |
|
|
|
|
| |
• Tighten the collar when the trimmer is at the desired height and mode. |
|
|
| |||
Edge mode | Trim mode |
Mode de coupe- | |
bordures | Mode de taillage |
Modo de bordeado Modo de poda | |
7) Once the batteries are charged, slide the battery into the trimmer area as shown. | E |
8) Depress the lock off button (as shown here) in either direction and simultaneously pull the trigger. | F |
| |
You do not need to continue to depress the lock off button during operation. |
| ||
If you have additional questions or need help, please call Black & Decker at |
|
| |
8 a.m. to 5 p.m. EST Mon. - Fri. | 1 |
| |
Please check instruction manual for full instructions and warnings. | 2 | ||
|