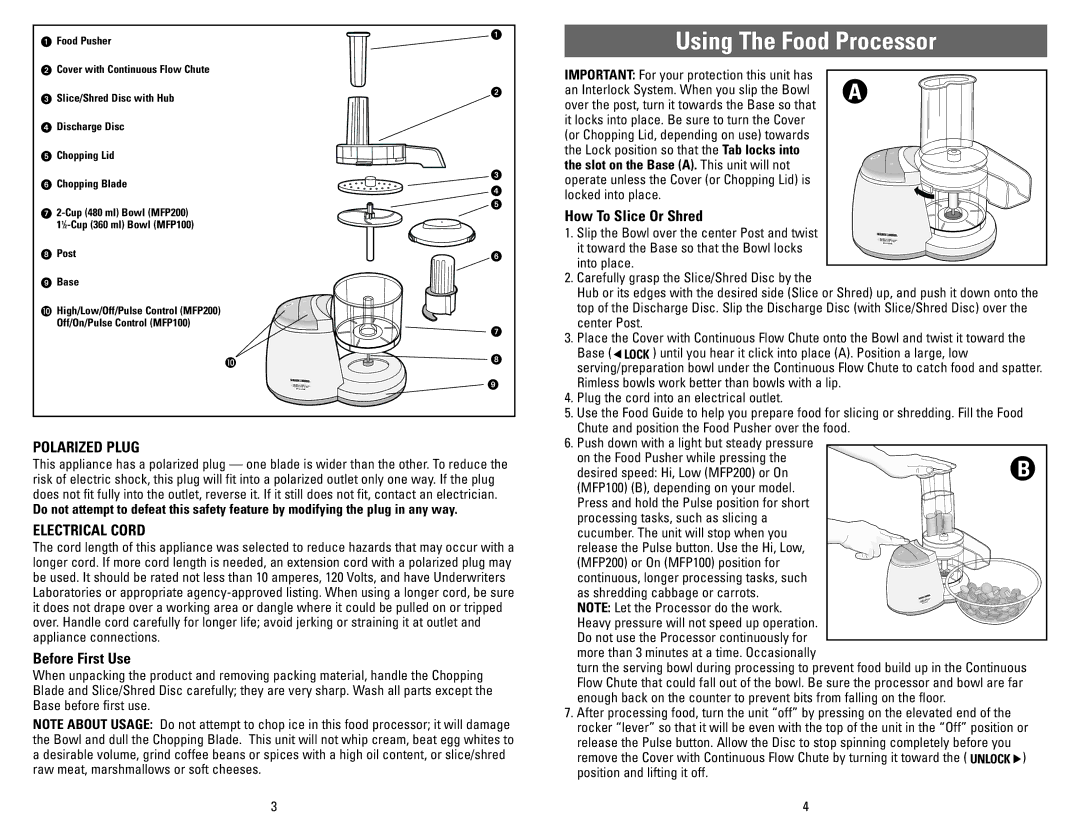
Food Pusher
Cover with Continuous Flow Chute
Slice/Shred Disc with Hub
Discharge Disc
Chopping Lid
Chopping Blade
Post
Base
High/Low/Off/Pulse Control (MFP200)
Off/On/Pulse Control (MFP100)
POLARIZED PLUG
This appliance has a polarized plug — one blade is wider than the other. To reduce the risk of electric shock, this plug will fit into a polarized outlet only one way. If the plug does not fit fully into the outlet, reverse it. If it still does not fit, contact an electrician.
Do not attempt to defeat this safety feature by modifying the plug in any way.
ELECTRICAL CORD
The cord length of this appliance was selected to reduce hazards that may occur with a longer cord. If more cord length is needed, an extension cord with a polarized plug may be used. It should be rated not less than 10 amperes, 120 Volts, and have Underwriters Laboratories or appropriate
Before First Use
When unpacking the product and removing packing material, handle the Chopping Blade and Slice/Shred Disc carefully; they are very sharp. Wash all parts except the Base before first use.
NOTE ABOUT USAGE: Do not attempt to chop ice in this food processor; it will damage the Bowl and dull the Chopping Blade. This unit will not whip cream, beat egg whites to a desirable volume, grind coffee beans or spices with a high oil content, or slice/shred raw meat, marshmallows or soft cheeses.
3
Using The Food Processor
IMPORTANT: For your protection this unit has
an Interlock System. When you slip the Bowl A over the post, turn it towards the Base so that
it locks into place. Be sure to turn the Cover (or Chopping Lid, depending on use) towards the Lock position so that the Tab locks into the slot on the Base (A). This unit will not operate unless the Cover (or Chopping Lid) is locked into place.
How To Slice Or Shred
1. Slip the Bowl over the center Post and twist it toward the Base so that the Bowl locks into place.
2.Carefully grasp the Slice/Shred Disc by the
Hub or its edges with the desired side (Slice or Shred) up, and push it down onto the top of the Discharge Disc. Slip the Discharge Disc (with Slice/Shred Disc) over the center Post.
3.Place the Cover with Continuous Flow Chute onto the Bowl and twist it toward the Base ( ![]() LOCK ) until you hear it click into place (A). Position a large, low serving/preparation bowl under the Continuous Flow Chute to catch food and spatter. Rimless bowls work better than bowls with a lip.
LOCK ) until you hear it click into place (A). Position a large, low serving/preparation bowl under the Continuous Flow Chute to catch food and spatter. Rimless bowls work better than bowls with a lip.
4.Plug the cord into an electrical outlet.
5.Use the Food Guide to help you prepare food for slicing or shredding. Fill the Food Chute and position the Food Pusher over the food.
6.Push down with a light but steady pressure
on the Food Pusher while pressing the
desired speed: Hi, Low (MFP200) or On![]() B
B
(MFP100) (B), depending on your model. Press and hold the Pulse position for short
processing tasks, such as slicing a cucumber. The unit will stop when you release the Pulse button. Use the Hi, Low, (MFP200) or On (MFP100) position for continuous, longer processing tasks, such
as shredding cabbage or carrots. NOTE: Let the Processor do the work. Heavy pressure will not speed up operation. Do not use the Processor continuously for
more than 3 minutes at a time. Occasionally
turn the serving bowl during processing to prevent food build up in the Continuous Flow Chute that could fall out of the bowl. Be sure the processor and bowl are far enough back on the counter to prevent bits from falling on the floor.
7.After processing food, turn the unit “off” by pressing on the elevated end of the rocker “lever” so that it will be even with the top of the unit in the “Off” position or release the Pulse button. Allow the Disc to stop spinning completely before you remove the Cover with Continuous Flow Chute by turning it toward the ( UNLOCK ![]() ) position and lifting it off.
) position and lifting it off.
4