DO NOT operate the lawnmower when barefoot or wearing open sandals.

NEVER attempt to make a wheel height adjustment while the motor is running or while the lawnmower is plugged in.

DO NOT put hands or feet near or under rotating parts. Keep clear of the discharge opening at all times.

RELEASE switch lever to turn mower off when crossing gravel drives, walks, roads, or when flipping handle.

IF MOWER stalls, release switch lever to turn mower off, wait for blade to stop and unplug the cord before attempting to unclog the chute or remove anything from under the deck.

AFTER STRIKING a foreign object, release switch lever to turn mower off, wait for the blade to stop and unplug the mower, thoroughly inspect the mower for any

damage, and repair the damage before restarting and operating the mower.

IF THE lawnmower should start to vibrate abnormally release switch lever wait for blade to stop and unplug mower check immediately for cause. Vibration is generally a warning of trouble.

RELEASE SWITCH lever to turn mower off, wait for the blade to stop and unplug the mower whenever you leave the equipment, before removing the grass catcher, discharge chute or unclogging or cleaning the mower housing, and when making any repairs or inspections.

MOW ACROSS the face of slopes; never up and down. Exercise extreme caution when changing direction on slopes. Do not mow excessively steep slopes.

KEEP HANDS and feet away from cutting area.

KEEP BLADES sharp.

IF YOU are using a grass catcher, check it frequently for wear and deterioration. If excessively worn, replace with new bag for your safety.

USE EXTREME CAUTION when reversing or pulling mower toward you.

SAVE THESE INSTRUCTIONS

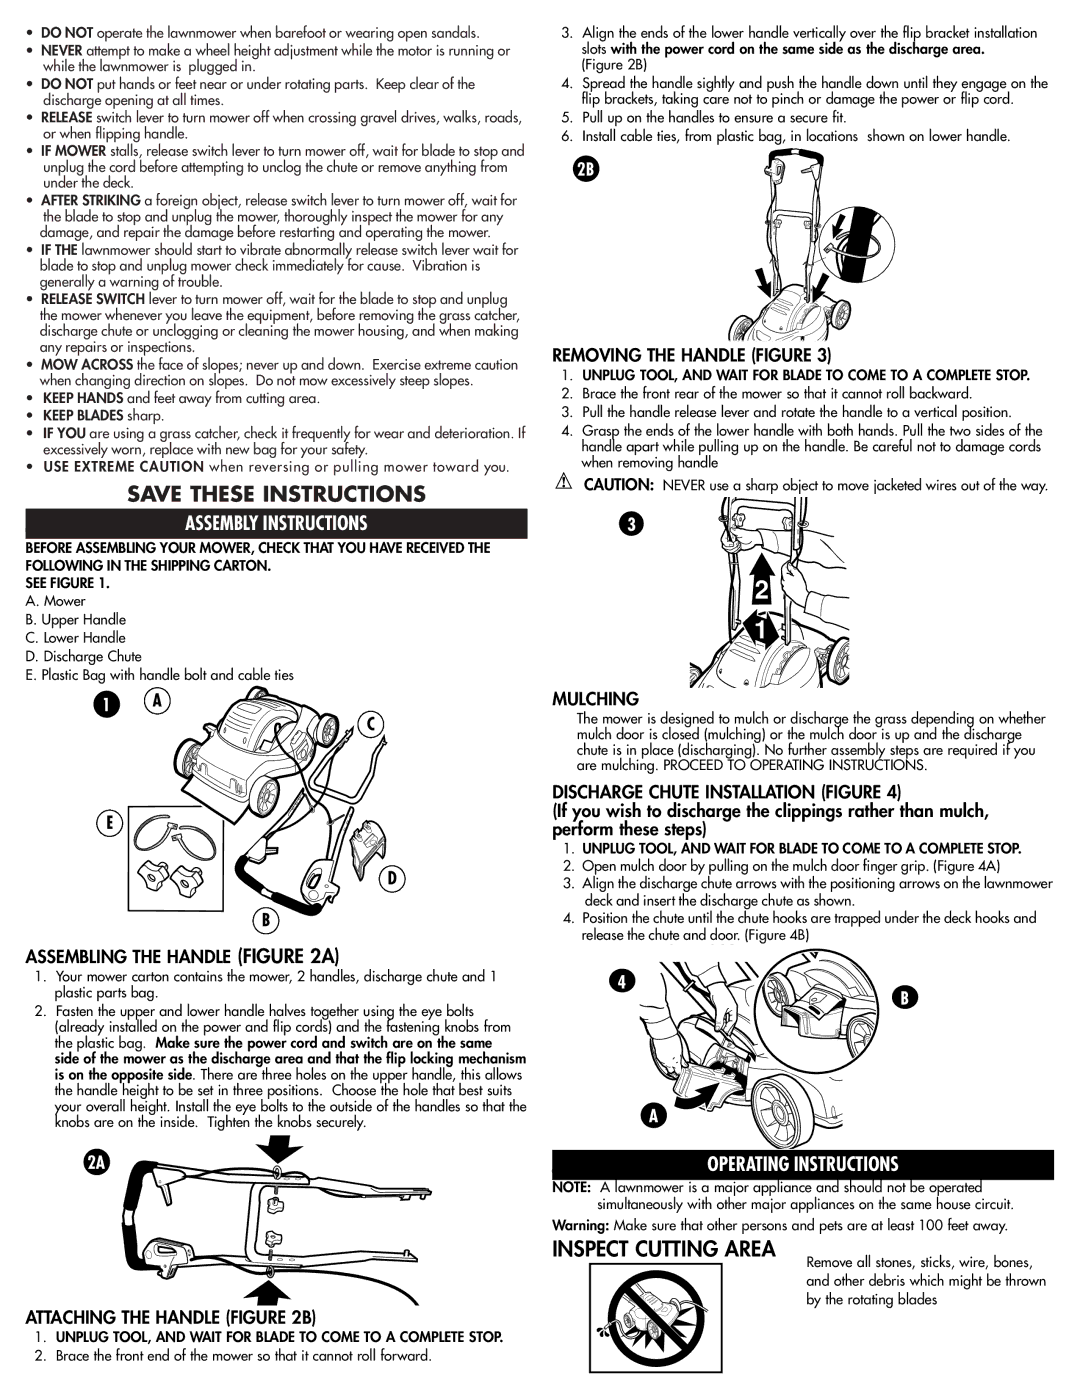
ASSEMBLY INSTRUCTIONS

BEFORE ASSEMBLING YOUR MOWER, CHECK THAT YOU HAVE RECEIVED THE FOLLOWING IN THE SHIPPING CARTON.

SEE FIGURE 1.

A.Mower

B.Upper Handle

C.Lower Handle

D.Discharge Chute

E.Plastic Bag with handle bolt and cable ties

1 A

C

E

D

B

ASSEMBLING THE HANDLE (FIGURE 2A)

1.Your mower carton contains the mower, 2 handles, discharge chute and 1 plastic parts bag.

2.Fasten the upper and lower handle halves together using the eye bolts (already installed on the power and flip cords) and the fastening knobs from the plastic bag. Make sure the power cord and switch are on the same side of the mower as the discharge area and that the flip locking mechanism is on the opposite side. There are three holes on the upper handle, this allows the handle height to be set in three positions. Choose the hole that best suits your overall height. Install the eye bolts to the outside of the handles so that the knobs are on the inside. Tighten the knobs securely.

2A

ATTACHING THE HANDLE (FIGURE 2B)

1.UNPLUG TOOL, AND WAIT FOR BLADE TO COME TO A COMPLETE STOP.

2.Brace the front end of the mower so that it cannot roll forward.

3.Align the ends of the lower handle vertically over the flip bracket installation slots with the power cord on the same side as the discharge area.

(Figure 2B)

4.Spread the handle sightly and push the handle down until they engage on the flip brackets, taking care not to pinch or damage the power or flip cord.

5.Pull up on the handles to ensure a secure fit.

6.Install cable ties, from plastic bag, in locations shown on lower handle.

2B

REMOVING THE HANDLE (FIGURE 3)

1.UNPLUG TOOL, AND WAIT FOR BLADE TO COME TO A COMPLETE STOP.

2.Brace the front rear of the mower so that it cannot roll backward.

3.Pull the handle release lever and rotate the handle to a vertical position.

4.Grasp the ends of the lower handle with both hands. Pull the two sides of the handle apart while pulling up on the handle. Be careful not to damage cords when removing handle

CAUTION: NEVER use a sharp object to move jacketed wires out of the way.

3

2

1

MULCHING

The mower is designed to mulch or discharge the grass depending on whether mulch door is closed (mulching) or the mulch door is up and the discharge chute is in place (discharging). No further assembly steps are required if you are mulching. PROCEED TO OPERATING INSTRUCTIONS.

DISCHARGE CHUTE INSTALLATION (FIGURE 4)

(If you wish to discharge the clippings rather than mulch, perform these steps)

1.UNPLUG TOOL, AND WAIT FOR BLADE TO COME TO A COMPLETE STOP.

2.Open mulch door by pulling on the mulch door finger grip. (Figure 4A)

3.Align the discharge chute arrows with the positioning arrows on the lawnmower deck and insert the discharge chute as shown.

4.Position the chute until the chute hooks are trapped under the deck hooks and release the chute and door. (Figure 4B)

4

B

A

OPERATING INSTRUCTIONS

NOTE: A lawnmower is a major appliance and should not be operated simultaneously with other major appliances on the same house circuit.

Warning: Make sure that other persons and pets are at least 100 feet away.

INSPECT CUTTING AREA

Remove all stones, sticks, wire, bones, and other debris which might be thrown by the rotating blades

Page 3
Image 3
Black & Decker MM675 instruction manual Inspect Cutting Area, Assembly Instructions, Operating Instructions

MM675 specifications

The Black & Decker MM675 is a versatile and efficient electric lawn mower designed to provide homeowners with a reliable solution for maintaining their lawns. With its user-friendly features and powerful performance, the MM675 has become a go-to choice for anyone seeking a durable and easy-to-use mower.

One of the standout features of the Black & Decker MM675 is its 12-amp motor, which delivers substantial power for tackling thick grass and uneven terrain. This motor is designed for optimal efficiency, allowing users to mow their lawns quickly and effectively without causing undue strain on the machine. The mower also boasts a 20-inch cutting deck, providing a broad cutting path that reduces the number of passes needed over the yard and saves valuable time during lawn care.

The MM675 incorporates advanced technology with its adjustable cutting height feature, allowing users to customize the length of their grass easily. With six different height settings ranging from 1 inch to 3 inches, users can choose the ideal cut for their specific grass type and personal aesthetic preferences. This level of customization not only enhances the look of the lawn but also promotes healthier grass growth.

In terms of usability, the Black & Decker MM675 is equipped with a lightweight design that makes it easy to maneuver around obstacles and tight spaces. Weighing in at just around 50 pounds, the mower is manageable for most individuals, making it a practical choice for homeowners of all ages. The foldable handles provide an added convenience by allowing for easy storage in tight spaces, further enhancing its appeal.

Furthermore, the MM675 features an easy-to-empty grass collection bag that gathers clippings efficiently to keep the lawn looking tidy. This bag has a capacity that minimizes interruptions during mowing sessions and can be easily detached for quick disposal of clippings.

Safety is another priority with the Black & Decker MM675, featuring a safety switch that prevents accidental start-ups. This ensures that the mower operates only when intended, providing peace of mind for users.

In summary, the Black & Decker MM675 electric lawn mower impresses with its powerful 12-amp motor, adjustable cutting heights, lightweight design, and user-friendly features. With its blend of performance, technology, and safety, this lawn mower is an excellent choice for anyone looking to maintain their yard effortlessly and effectively.