Introduction
Pairing with your Bluetooth device
Before you can use your headset, you must ‘link’ it with the device you wish to use.
Step A: Put your headset in Pairing Mode
Trouble Shooting and Support Documents
See the support section of www.blueantwireless.com for troubleshooting and Frequently Asked Questions (FAQ) as well as info on using with computers for VOIP application\s.
Specifications
Bluetooth Version…............. v2.0
Supported Bluetooth |
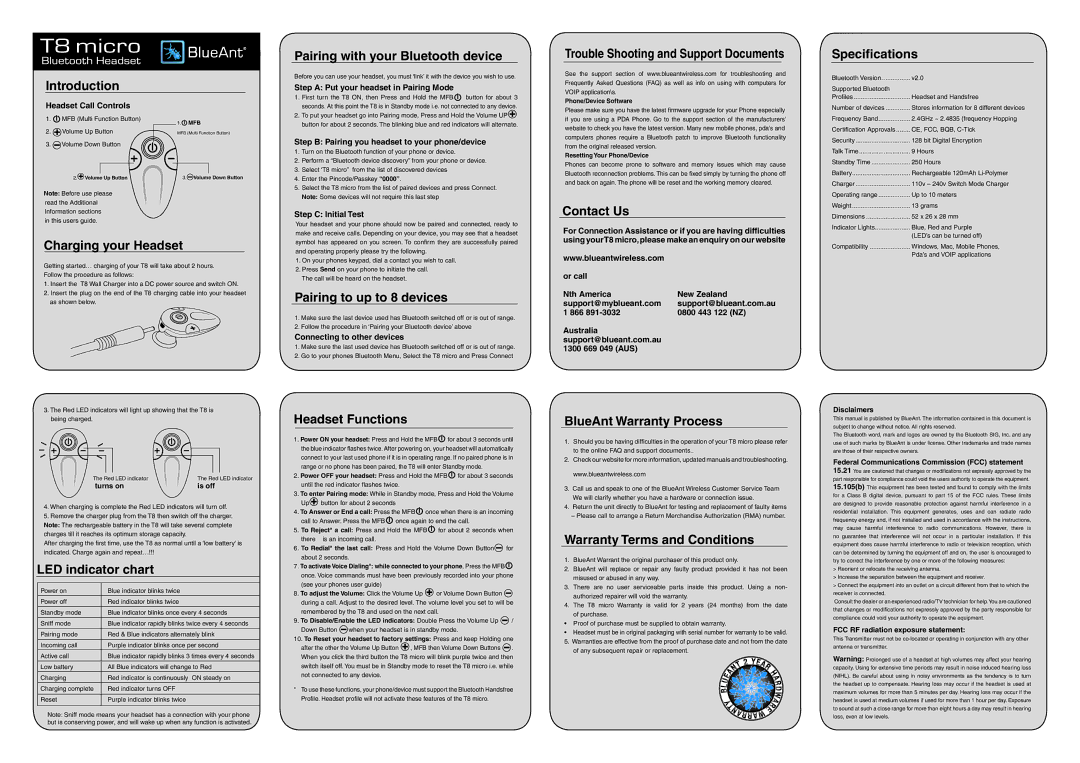
Headset Call Controls
1.![]() MFB (Multi Function Button)
MFB (Multi Function Button)
2.![]() Volume Up Button
Volume Up Button
3.![]() Volume Down Button
Volume Down Button
2.![]() Volume Up Button
Volume Up Button
Note: Before use please read the Additional Information sections
in this users guide.
1. MFB
MFB
MFB (Multi Function Button)
3.![]() Volume Down Button
Volume Down Button
1.First turn the T8 ON, then Press and Hold the MFB![]() button for about 3 seconds. At this point the T8 is in Standby mode i.e. not connected to any device.
button for about 3 seconds. At this point the T8 is in Standby mode i.e. not connected to any device.
2.To put your headset go into Pairing mode, Press and Hold the Volume UP![]() button for about 2 seconds. The blinking blue and red indicators will alternate.
button for about 2 seconds. The blinking blue and red indicators will alternate.
Step B: Pairing you headset to your phone/device
1.Turn on the Bluetooth function of your phone or device.
2.Perform a “Bluetooth device discovery” from your phone or device.
3.Select ‘T8 micro” from the list of discovered devices
4.Enter the Pincode/Passkey “0000”.
5.Select the T8 micro from the list of paired devices and press Connect. Note: Some devices will not require this last step
Step C: Initial Test
Your headset and your phone should now be paired and connected, ready to make and receive calls. Depending on your device, you may see that a headset
Phone/Device Software
Please make sure you have the latest firmware upgrade for your Phone especially if you are using a PDA Phone. Go to the support section of the manufacturers’ website to check you have the latest version. Many new mobile phones, pda’s and computers phones require a Bluetooth patch to improve Bluetooth functionality from the original released version.
Resetting Your Phone/Device
Phones can become prone to software and memory issues which may cause Bluetooth reconnection problems. This can be fixed simply by turning the phone off and back on again. The phone will be reset and the working memory cleared.
Contact Us
For Connection Assistance or if you are having difficulties using yourT8 micro, please make an enquiry on our website
Profiles | Headset and Handsfree |
Number of devices | Stores information for 8 different devices |
Frequency Band | 2.4GHz ~ 2.4835 (frequency Hopping |
Certification Approvals | CE, FCC, BQB, |
Security | 128 bit Digital Encryption |
Talk Time | 9 Hours |
Standby Time | 250 Hours |
Battery | Rechargeable 120mAh |
Charger | 110v – 240v Switch Mode Charger |
Operating range | Up to 10 meters |
Weight | 13 grams |
Dimensions | 52 x 26 x 28 mm |
Indicator Lights | Blue, Red and Purple |
| (LED’s can be turned off) |
Charging your Headset
Getting started… charging of your T8 will take about 2 hours. Follow the procedure as follows:
1.Insert the T8 Wall Charger into a DC power source and switch ON.
2.Insert the plug on the end of the T8 charging cable into your headset as shown below.
symbol has appeared on you screen. To confirm they are successfully paired and operating properly please try the following.
1.On your phones keypad, dial a contact you wish to call.
2.Press Send on your phone to initiate the call. The call will be heard on the headset.
Pairing to up to 8 devices
1.Make sure the last device used has Bluetooth switched off or is out of range.
2.Follow the procedure in ‘Pairing your Bluetooth device’ above
Connecting to other devices
1.Make sure the last used device has Bluetooth switched off or is out of range.
2.Go to your phones Bluetooth Menu, Select the T8 micro and Press Connect
www.blueantwireless.com |
|
or call |
|
Nth America | New Zealand |
support@myblueant.com | support@blueant.com.au |
1 866 | 0800 443 122 (NZ) |
Australia |
|
support@blueant.com.au |
|
1300 669 049 (AUS) |
|
Compatibility | Windows, Mac, Mobile Phones, |
| Pda’s and VOIP applications |
3.The Red LED indicators will light up showing that the T8 is being charged.
The Red LED indicator | The Red LED indicator |
turns on | is off |
4.When charging is complete the Red LED indicators will turn off.
5.Remove the charger plug from the T8 then switch off the charger. Note: The rechargeable battery in the T8 will take several complete charges till it reaches its optimum storage capacity.
After charging the first time, use the T8 as normal until a ‘low battery’ is indicated. Charge again and repeat…!!!
LED indicator chart
Power on | Blue indicator blinks twice |
Power off | Red indicator blinks twice |
Standby mode | Blue indicator blinks once every 4 seconds |
|
|
Sniff mode | Blue indicator rapidly blinks twice every 4 seconds |
|
|
Pairing mode | Red & Blue indicators alternately blink |
|
|
Incoming call | Purple indicator blinks once per second |
Active call | Blue indicator rapidly blinks 3 times every 4 seconds |
|
|
Low battery | All Blue indicators will change to Red |
Charging | Red indicator is continuously ON steady on |
|
|
Charging complete | Red indicator turns OFF |
|
|
Reset | Purple indicator blinks twice |
|
|
Note: Sniff mode means your headset has a connection with your phone but is conserving power, and will wake up when any function is activated.
Headset Functions
1.Power ON your headset: Press and Hold the MFB![]() for about 3 seconds until the blue indicator flashes twice. After powering on, your headset will automatically
for about 3 seconds until the blue indicator flashes twice. After powering on, your headset will automatically
connect to your last used phone if it is in operating range. If no paired phone is in range or no phone has been paired, the T8 will enter Standby mode.
2.Power OFF your headset: Press and Hold the MFB![]() for about 3 seconds until the red indicator flashes twice.
for about 3 seconds until the red indicator flashes twice.
3.To enter Pairing mode: While in Standby mode, Press and Hold the Volume
Up![]() button for about 2 seconds
button for about 2 seconds
4.To Answer or End a call: Press the MFB![]() once when there is an incoming call to Answer. Press the MFB
once when there is an incoming call to Answer. Press the MFB![]() once again to end the call.
once again to end the call.
5.To Reject* a call: Press and Hold the MFB![]() for about 2 seconds when
for about 2 seconds when
there is an incoming call.
6.To Redial* the last call: Press and Hold the Volume Down Button![]() for about 2 seconds.
for about 2 seconds.
7.To activate Voice Dialing*: while connected to your phone, Press the MFB![]() once. Voice commands must have been previously recorded into your phone
once. Voice commands must have been previously recorded into your phone
(see your phones user guide)
8.To adjust the Volume: Click the Volume Up ![]() or Volume Down Button
or Volume Down Button ![]() during a call. Adjust to the desired level. The volume level you set to will be
during a call. Adjust to the desired level. The volume level you set to will be
remembered by the T8 and used on the next call.
9.To Disable/Enable the LED indicators: Double Press the Volume Up ![]() / Down Button
/ Down Button ![]() when your headset is in standby mode.
when your headset is in standby mode.
10.To Reset your headset to factory settings: Press and keep Holding one after the other the Volume Up Button ![]() , MFB then Volume Down Buttons
, MFB then Volume Down Buttons ![]() . When you click the third button the T8 micro will blink purple twice and then
. When you click the third button the T8 micro will blink purple twice and then
switch itself off. You must be in Standby mode to reset the T8 micro i.e. while not connected to any device.
*To use these functions, your phone/device must support the Bluetooth Handsfree Profile. Headset profile will not activate these features of the T8 micro.
BlueAnt Warranty Process
1.Should you be having difficulties in the operation of your T8 micro please refer to the online FAQ and support documents..
2.Check our website for more information, updated manuals and troubleshooting. www.blueantwireless.com
3.Call us and speak to one of the BlueAnt Wireless Customer Service Team We will clarify whether you have a hardware or connection issue.
4.Return the unit directly to BlueAnt for testing and replacement of faulty items
–Please call to arrange a Return Merchandise Authorization (RMA) number.
Warranty Terms and Conditions
1.BlueAnt Warrant the original purchaser of this product only.
2.BlueAnt will replace or repair any faulty product provided it has not been misused or abused in any way.
3.There are no user serviceable parts inside this product. Using a non- authorized repairer will void the warranty.
4.The T8 micro Warranty is valid for 2 years (24 months) from the date of purchase.
•Proof of purchase must be supplied to obtain warranty.
•Headset must be in original packaging with serial number for warranty to be valid.
5. Warranties are effective from the proof of purchase date and not from the date of any subsequent repair or replacement.
Disclaimers
This manual is published by BlueAnt. The information contained in this document is subject to change without notice. All rights reserved.
The Bluetooth word, mark and logos are owned by the Bluetooth SIG, Inc. and any use of such marks by BlueAnt is under license. Other trademarks and trade names are those of their respective owners.
Federal Communications Commission (FCC) statement
15.21You are cautioned that changes or modifications not expressly approved by the part responsible for compliance could void the users authority to operate the equipment. 15.105(b) This equipment has been tested and found to comply with the limits for a Class B digital device, pursuant to part 15 of the FCC rules. These limits are designed to provide reasonable protection against harmful interference in a residential installation. This equipment generates, uses and can radiate radio frequency energy and, if not installed and used in accordance with the instructions, may cause harmful interference to radio communications. However, there is no guarantee that interference will not occur in a particular installation. If this equipment does cause harmful interference to radio or television reception, which can be determined by turning the equipment off and on, the user is encouraged to try to correct the interference by one or more of the following measures:
> Reorient or relocate the receiving antenna.
> Increase the separation between the equipment and receiver.
> Connect the equipment into an outlet on a circuit different from that to which the receiver is connected.
Consult the dealer or an experienced radio/TV technician for help.You are cautioned that changes or modifications not expressly approved by the party responsible for compliance could void your authority to operate the equipment.
FCC RF radiation exposure statement:
This Transmitter must not be
Warning: Prolonged use of a headset at high volumes may affect your hearing capacity. Using for extensive time periods may result in noise induced hearing loss (NIHL). Be careful about using in noisy environments as the tendency is to turn the headset up to compensate. Hearing loss may occur if the headset is used at maximum volumes for more than 5 minutes per day. Hearing loss may occur if the headset is used at medium volumes if used for more than 1 hour per day. Exposure to sound at such a close range for more than eight hours a day may result in hearing loss, even at low levels.