BM 2610914527 3/03 3/18/03 10:47 AM Page 9

Assembly

ATTACHING THE BLADE

Do not use wrenches with longer handles,

Disconnect battery pack

since it may lead to over tightening of the

! WARNING from tool or place the

blade stud.

switch in the locked or off position before

VARI-TORQUE CLUTCH

making any assembly, adjustments or

This clutching action is provided by the friction

changing accessories. Such preventive

of the OUTER WASHER against the BLADE

safety measures reduce the risk of starting

and permits the blade shaft to turn when the

the tool accidentally.


blade encounters excessive resistance. When

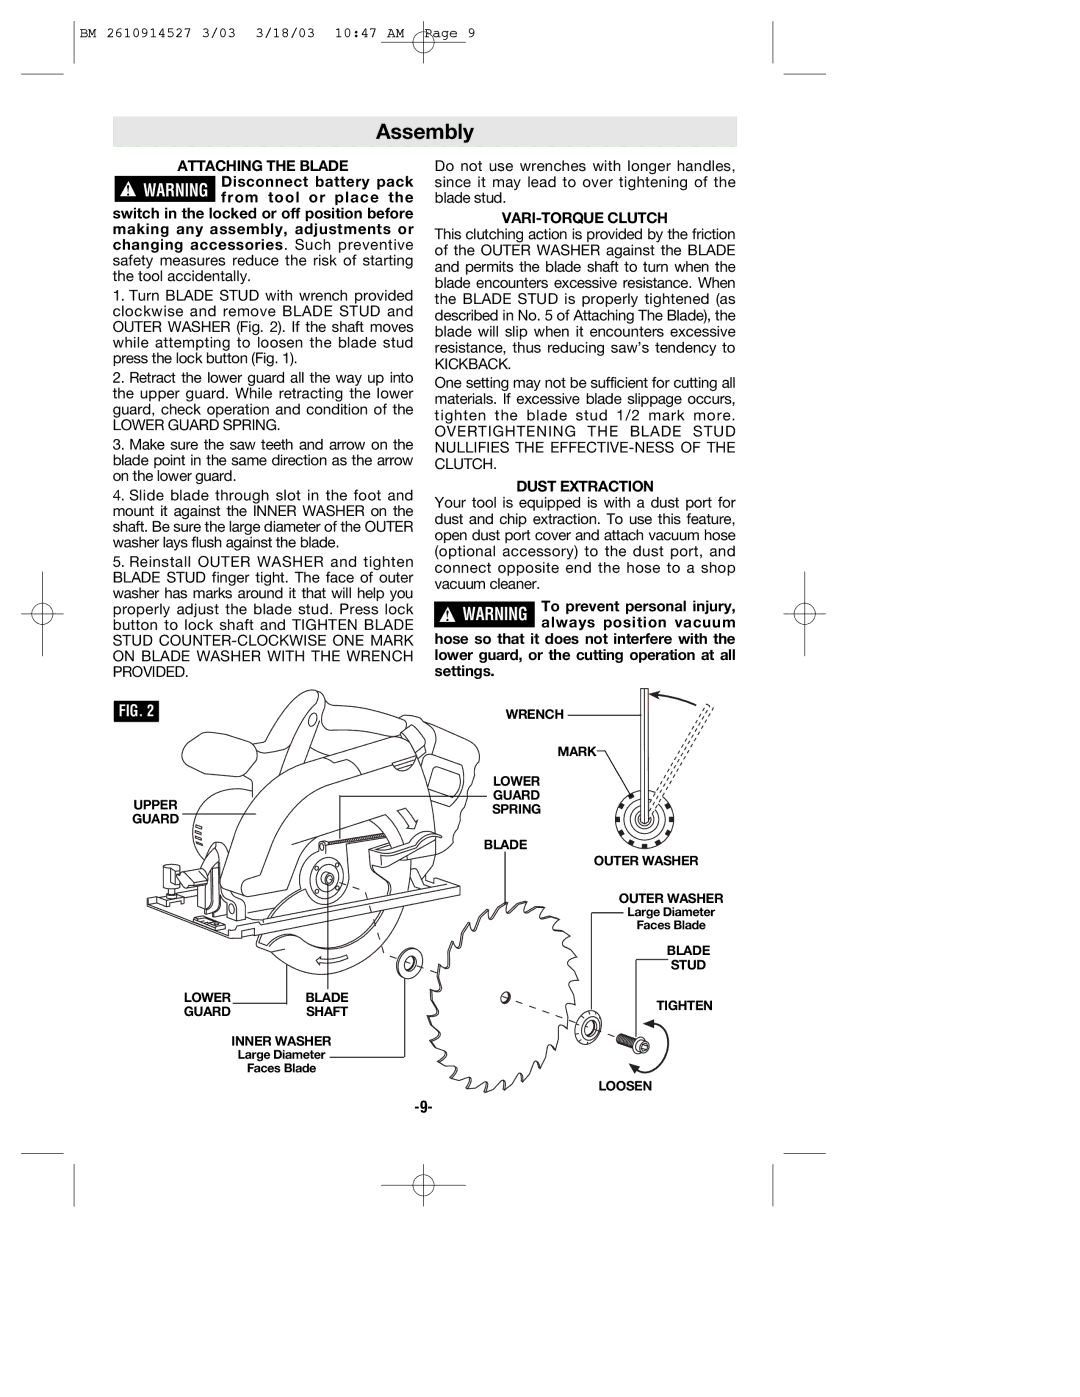
1. Turn BLADE STUD with wrench provided

the BLADE STUD is properly tightened (as

clockwise and remove BLADE STUD and

described in No. 5 of Attaching The Blade), the

OUTER WASHER (Fig. 2). If the shaft moves

blade will slip when it encounters excessive

while attempting to loosen the blade stud

resistance, thus reducing saw’s tendency to

press the lock button (Fig. 1).


KICKBACK.

2. Retract the lower guard all the way up into

One setting may not be sufficient for cutting all

the upper guard. While retracting the lower

materials. If excessive blade slippage occurs,

guard, check operation and condition of the

tighten the blade stud 1/2 mark more.

LOWER GUARD SPRING.


OVERTIGHTENING THE BLADE STUD

3. Make sure the saw teeth and arrow on the

NULLIFIES THE EFFECTIVE-NESS OF THE

blade point in the same direction as the arrow

CLUTCH.

on the lower guard.


DUST EXTRACTION

4. Slide blade through slot in the foot and

Your tool is equipped is with a dust port for

mount it against the INNER WASHER on the

dust and chip extraction. To use this feature,

shaft. Be sure the large diameter of the OUTER

open dust port cover and attach vacuum hose

washer lays flush against the blade.

(optional accessory) to the dust port, and

5. Reinstall OUTER WASHER and tighten

connect opposite end the hose to a shop

BLADE STUD finger tight. The face of outer

vacuum cleaner.

washer has marks around it that will help you

To prevent personal injury,

properly adjust the blade stud. Press lock

button to lock shaft and TIGHTEN BLADE

! WARNING always position vacuum

STUD COUNTER-CLOCKWISE ONE MARK

hose so that it does not interfere with the

ON BLADE WASHER WITH THE WRENCH

lower guard, or the cutting operation at all

PROVIDED.


settings.

FIG. 2


WRENCH


MARK


LOWER

UPPER


GUARD


SPRING

GUARD


BLADE


OUTER WASHER


OUTER WASHER


Large Diameter


Faces Blade


BLADE


STUD

LOWER

BLADE

TIGHTEN

GUARD

SHAFT


INNER WASHER

Large Diameter

Faces Blade

LOOSEN

-9-

Page 9
Image 9
Bosch Power Tools 1662, 1660 manual Assembly, Attaching the Blade, VARI-TORQUE Clutch, Dust Extraction

1660, 1662 specifications

Bosch is renowned for its range of high-quality power tools, and the Bosch Power Tools 1662 and 1660 models are no exceptions. Designed for both professional tradespeople and DIY enthusiasts, these power tools combine cutting-edge technology with user-friendly features to deliver exceptional performance and reliability.

The Bosch 1662 is known for its robust design and versatility. It is a corded power tool that provides consistent power for various applications, enabling users to tackle heavy-duty tasks with ease. One of its standout features is the adjustable speed control, which allows operators to customize the tool's RPM based on the specific material being worked on. This adaptability makes it suitable for a wide range of applications, from drilling into wood to working with metal.

The 1662 also incorporates a built-in electronic feedback system that maintains speed under load, ensuring smooth operation and preventing stalling during demanding tasks. Additionally, it features an ergonomic design with a soft-grip handle, providing comfort during prolonged use. This model is also equipped with an integrated spindle lock for easy bit changes, enhancing efficiency and convenience.

Turning to the Bosch 1660, this model shares many of the same qualities but boasts its unique set of specifications that cater to specific needs. The 1660 is particularly favored for its lightweight design, making it an excellent choice for users who prioritize portability. Despite its lighter weight, the 1660 does not compromise on power, offering sufficient torque for various drilling, chiseling, and fastening tasks.

Like its counterpart, the 1660 features variable speed control, allowing users to fine-tune their drilling performance. Its durable construction ensures longevity, while the combination of vibration control technology enhances user comfort, reducing fatigue during extended use.

Both models are equipped with high-quality motors that deliver impressive power while maintaining energy efficiency. Bosch's commitment to innovation is evident in the features and technology embedded in these models, ensuring that users can rely on their tools for professional-grade results. Overall, whether you choose the 1662 or the 1660, both power tools exemplify Bosch's dedication to quality and performance, making them excellent additions to any toolkit.